Behaviour-Driven Development with Gherkin
What is Gherkin?
Gherkin, part of the Cucumber BDD framework, is a simple natural language syntax built around a small set of keywords. Designed to support behaviour-driven development (BDD), Gherkin's simple and structured format makes it accessible to everyone involved in the project, regardless of skillset.
Project sponsors and non-technical team members can easily create and understand test scenarios that directly align with the business requirements. At the same time, Gherkin provides sufficient structure and guidance for testers and automation tools to implement these scenarios effectively.
This dual-purpose design makes Gherkin an excellent bridge between business requirements and technical implementation, allowing all stakeholders to participate in the quality assurance process.
Here is a simple example of a Gherkin script:
Scenario: I want to add two values in the Calculator application
    Given the calculator app is running
    When I add 2*2
    Then The calculator displays the correct value of 4
Writing Gherkin script in Robot
Create the feature file
The first step within Robot is to create a new script which will hold the basic Gherkin scenario. This is done the same way as any other Robot script: File → New Script or Right click the Scripts node within the Project tree and select “New Script”.
This generates a standard Robot (TPR) script which includes just the report command - amend the name of the output report here as desired.
Within this script, you can then either write or copy/paste your Gherkin script as you would do normally, utilizing any combination of your Gherkin keywords. Using the above example, this would result in the following:
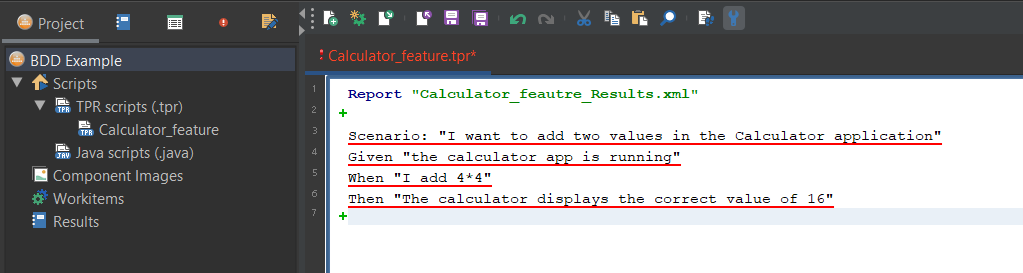
It is important to enclose all text after the keyword within quotes. This allows Robot to handle the string as a procedure parameter.
At this stage, the Robot compiler is marking each line as a syntax error. This is fine for now and can be ignored as it will be resolved with the next steps where we define the procedures.
Create the Robot action script
Now that we have the feature file written we need to define the automation steps required to perform the defined tasks. To achieve this we need to create an associated script, define the keyword procedures and then insert the Robot script commands, tying them to the relevant feature keyword. Lets break each of these steps down further…
Create a new Robot script
As above, we create a new Robot script the same way that you would normally: File → New Script or right click the Script node within the Project tree and select “New Script”
You can name this script anything, but it is generally advised to reflect the feature files name.
Define the keyword procedures
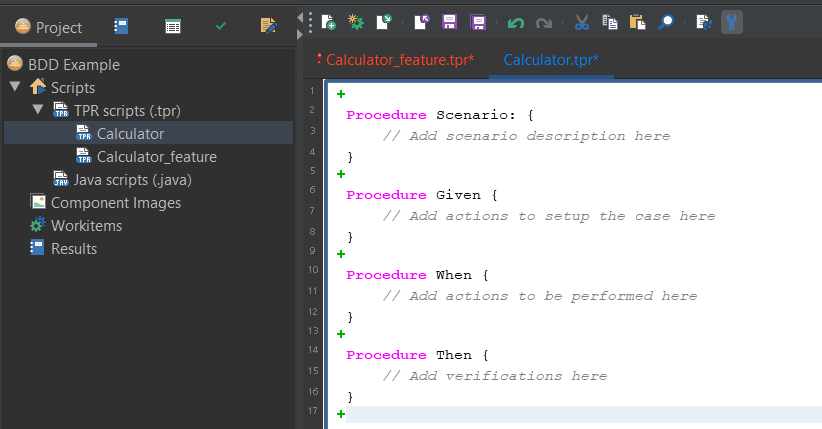
Each keyword that is present within your feature file should be defined as a separate Procedure within your Robot action script.
The Procedure name should reflect exactly the first whole word that represents the 'keyword'. For example:
Procedure=<keyword> {
}
Sticking with the above example, in its simplest form, you should then have a script that looks as follows:
Insert the Robot script commands
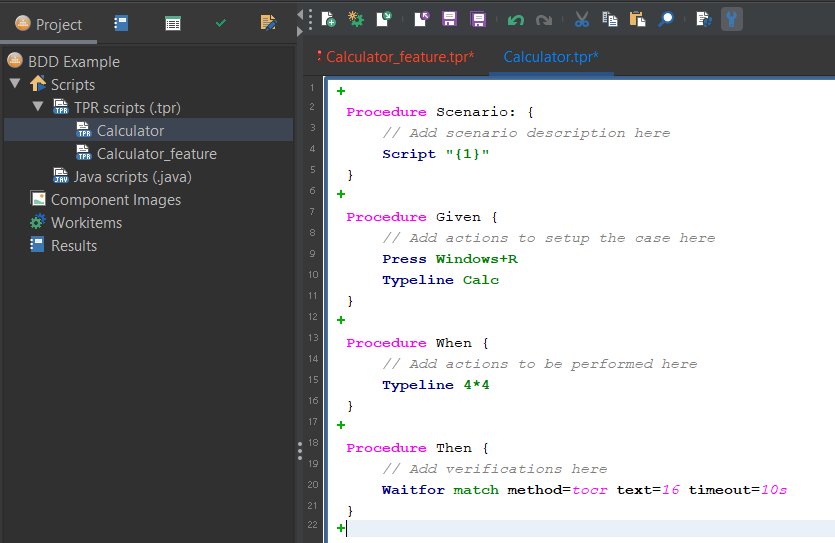
Now that we have the keywords outlined, we can move onto defining the exact automated actions that Robot must perform in order to successfully run this task.
To help us achieve this we can make use of Robots various scripting features including the script recorder, the drag/drop command generator, the component capture or the live code editor allowing both technical and non-technical members of the team to generate these automation scripts.
Remember that Robot “Procedures” allow space separated values to be passed in as variables.
As mentioned, this follows the basic principles of how Procedures work, but here is a visual of the relationship:

We can also insert any number of other commands as you wish. Perhaps these might include “Log” for writing information to the execution log and output report, or the “Screenshot” command to capture evidence for key verification points.
This simple example does not include any cross platform support, custom failure handling or verification points. These should be added if required using standard best practises. For example, to ensure the app has opened successfully before proceeding.
Associate the feature file with the action script
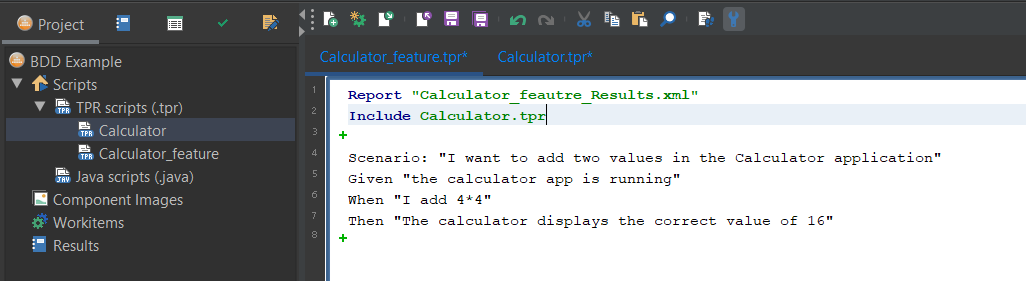
This is a simple case of adding one command into your original feature file pointing to the action script. This allows Robot to know which feature relates to which actions.
Include Calculation.tpr
As soon as we add this to our feature file, you will notice that the compiler immediately validates the procedure links and removes the syntax warnings.
Execution
You are now ready to execute your feature!
Using any of Robots execution methods, whether it be within the UI, via the command line, or through an integration with another application, the target should always be the feature file.
During execution, the feature file will perform the required actions through the procedure calls.
In order to execute any script you need to ‘connect’ to your SUT. This can be achieved either:- manually in the UI, by adding a “Connect” command to your feature file header or passing in the connection string as CLI runtime parameters.
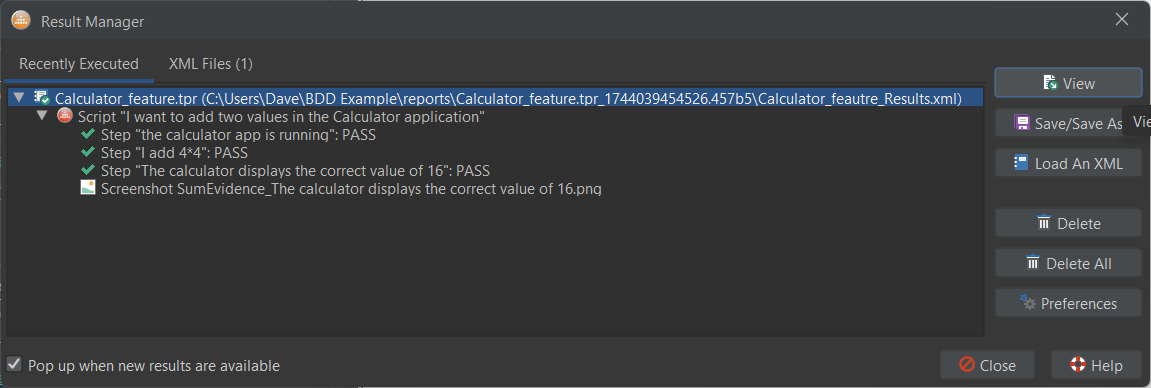
Upon successful execution, the Result Manager will display the summary output. From here you can select “View” to open the full output report.
Source files
If you wish to download this Robot Project you can do so from here: BDD Example.zip
Assumptions:
This sample is built for execution on a Windows 11 SUT only
Before executing the feature file, you should have an active connection to your Windows 11 SUT.