Image Doctor
The Image Doctor wizard helps to identify and resolve image comparison failures in executed scripts, especially in cases where the application or System Under Automation (SUA) has changed and the image comparison code and/or the template images may need updating. The wizard consists of three elements:
- The Image Doctor Warning pop up window allows to resolve image comparisons interactively.
- The Image Doctor Records facility records failed image comparisons in the automation (unattended) mode for later resolution.
- The ImageDoctor commands control the features behaviour directly from a script.
Behaviour of the Image Doctor is subject to the Robot's start up mode and options selected in the Edit -> Preferences -> Image Doctor configuration screen:
- Image Doctor gets activated on start up when the "Start Image Doctor on Robot start up" option is on. The factory setting is "on".
- It can be enabled/disabled at any time via the
 Script -> Enable Image Doctor menu item.
 - Scripts may set it on or off through a call of the ImageDoctor command
- It can be enabled/disabled at any time via the
- When active, and running the Robot UI any image comparison failures in the currently executed script will cause the Image Doctor Warning window to pop up immediately.
- If Robot is running in automation mode (with the -n/--nodisplay CLI option) and an image comparison fails in the currently executed script, the wizard records the failure through the Image Doctor Records facility.
Image Doctor Warning
The Image Doctor Warning window allows to resolve comparison failures immediately without having to stop the currently executing script.
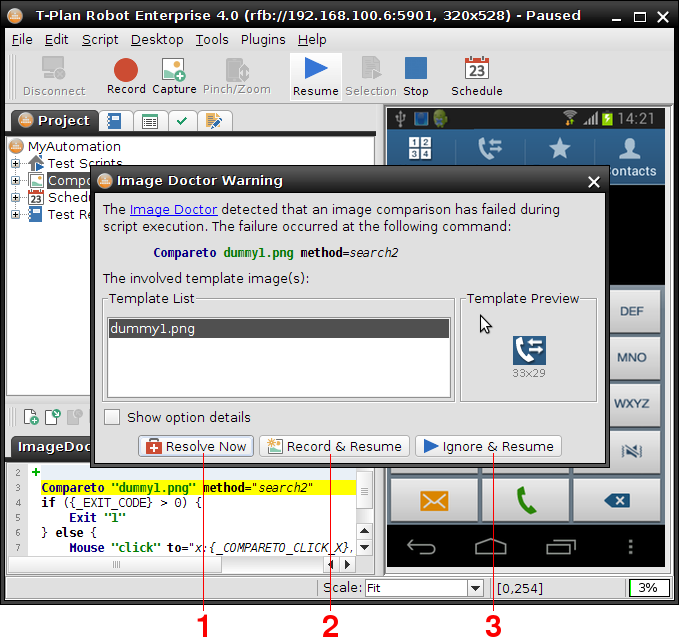
- The "Resolve Now" button opens up the command editor (the command "Properties" window). Update the comparison parameters and/or the template images as needed and save the changes with OK. You may optionally apply other changes while the script is paused. Then resume the script by clicking the Resume button and the comparison command will re-execute. This will allow the script to continue as if the failure had never happened.
- The "Record & Resume" button will store the data of the failure to the hard drive and resume the script. The record may then be viewed in, and eventually resolved, through the Image Doctor Records window.
- The "Ignore & Resume" button will resume the script without any further action.
Image Doctor Records
The Image Doctor Records facility captures data about failed image comparisons for later use/resolution. This approach is used mainly when the script is executed through the CLI option in a production environment, without the Robot UI. The flow is as follows:
- An image comparison fails in a script started through the -r/--run CLI option…
- The facility detects the failure and records a PNG screen shot and a .properties text file with the details (failure cause and location, date, environment). The data is stored to the imgdoctor/ folder under the home of the project the script belongs to.
- The facility saves an entry of the new record to the user configuration file. This mechanism ensures that the new incidents are reported to the user the next time the Robot UI is launched.
- The script resumes as expected.
The records may be also created manually through the Record & Resume button of the Image Doctor Warning window.
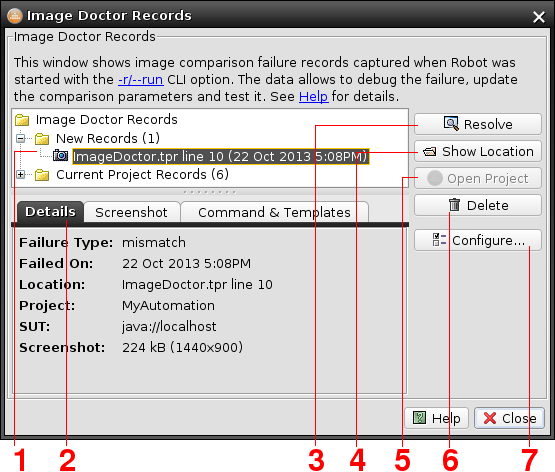
- The New Records tree branch displays new incidents which haven't been reported yet. This list is loaded from the configuration file and it may comprise of records created across multiple projects. The Current Project Records tree branch lists all records available in the current project.
- The tabbed pane at the bottom displays details of the currently selected record.
- The Resolve button allows to resolve the failure in three steps:
- The script is opened in the script editor and it changes the position to the failure location. The GUI also reopens the script project if it is different from the current one.
- The PNG screen shot is loaded either to the desktop view through the Static Image connection or to the command Properties dialog only. The latter option will preserve the current desktop connection.
- The command Properties window gets displayed to adjust the command against the recorded screenshot image.
- The Show Location button will show location of the selected record in the script editor. This action will not reload the script project if it differs from the current one.
- The Open Project button will reopen the project the selected record belongs to. The tree of records will be updated accordingly.
- The Delete button will delete the selected record(s).
- The Configure button leads to the Image Doctor screen of the Preferences window. It controls the facility behaviour.