Language Reference
1. Introduction
1.1 Purpose
This document provides a complete specification of the script language supported by T-Plan Robot. Its goal is to provide a complete syntax and functionality reference to those who write automated scripts using this tool and its testing framework. As the scripting language is tightly coupled with the Java Script API, it is also intended to provide a complementary functionality reference for the design of Java scripts.
Scripts in the language described by this document are called TPR scripts. Scripts based on the Java Script API are called Java scripts.
The document describes script requirements, parsing and processing rules, language structure and syntax of particular elements, such as statements, expressions, commands and image comparison methods.
1.2 Overview
T-Plan Robot Enterprise supports a simple scripting language allowing to write automated scripts. It is a structured procedural language somewhat similar to shell scripting on Linux/Unix. It supports structures and elements well known from modern programming languages, such as:
- Variables (both global and local),
- Numeric and Boolean expressions,
- Procedures with parameters, which together with the Run and Include commands allow to create libraries of functions and subroutines,
- Looping and conditional structures such as Language Reference and if/else,
- Set of functional commands indicating result through a numeric return value.
As T-Plan Robot is designed to work with most common remote and local desktop technologies, the scripting language supports commands fall into roughly four functionality areas:
- Desktop Commands typically involve the client to server communication, such as connecting to/disconnecting from a desktop and transfer of mouse and keyboard inputs (press a key, type a text, perform a mouse move, click, drag or wheel event).
- Administrative And Execution Control Commands provide the necessary infrastructure for script execution control (pause, stop, desktop image analysis, waiting for a specified time period or particular event) as well as the support of variables, libraries and external OS command calls.
- Reporting Commands define automated testing outputs and report them to the user. Commands in this category allow for example to take a screenshot of the desktop image or its part, create a report, send an e-mail or upload the results to an associated test management tool.
- I/O Commands deal with input from and output to various data sources.
Be aware that the behaviour of some commands may be customized through user preferences. Such parameters are implementation-specific and do not always form part of this documentation. To explore whether there are any configurable values open the Preferences window in the T-Plan Robot GUI and check whether there is a command preference panel under the Plugins section. Though the scripting language provides a fast and easy way of automation, it has limited functionality and it lacks an object-oriented approach. For this reason, T-Plan Robot version 2.0 introduced Java Script API allowing to write scripts in pure Java through calls of methods accessing the functionality of commands specified by this reference. That is why you should refer to this specification even if you plan on sticking to Java. See the Java API documentation for details, in particular the Developing Java Scripts document. Scripts may be also customized with embedded snippets of Java source code (see the Java Code Blocks chapter). Another way of enhancing the language with your custom actions coded in Java is the Run command which supports parametrized calls of Java since v2.2.
1.3 Robot Features
T-Plan Robot Enterprise is a functionally rich and mature product and is built upon the language specifications developed in the previous versions. In general terms, T-Plan Robot delivers additional features on top of the previous product versions, and its language is extended with additional commands and service providers, such as report generators, image comparison algorithms and desktop clients. Scripts designed with previous product versions are compatible with the T-Plan Robot language.
2. Language Syntax
2.1 Language Structure
T-Plan Robot Enterprise language is a text-based programming language and scripts are typically saved as plain text files. The following general rules apply:
- ISO8859-1 (Latin-1) characters are recommended. Characters out of this set may be used in command arguments and parameter values but their support is subject to the particular remote desktop client and its protocol capabilities. Please read the client documentation before using other than ISO8859-1 characters.
- The language is NOT case sensitive unless where explicitly stated in this documentation.
Scripts are interpreted according to the following rules:
- Scripts are processed line by line. A single command or expression cannot be split to multiple lines unless the specification explicitly says so.
- Lines may contain any number of leading and/or trailing white space characters, i.e. spaces, tabulators etc. They will be trimmed before further processing.
- Empty lines are ignored.
- Lines beginning with hash '#' are considered to be comments and they are ignored. Version 2.3 and newer also accepts Java/C++ style comments starting with double slash '//':
# This is a comment
// This is also a comment
- Other text lines which are not eliminated by the rules above may contain one element of the scripting language, such as a command, procedure header, procedure call, an if/else/for statement or its terminating right curly brace ('}'). Each such a text line is processed in the following way:
- The text is broken into tokens by one or more spaces. Any text preceded by a space and enclosed between a pair of double quotes ("...") is considered to be a single token. An escaped double quote (\") is not considered to indicate the beginning or end of a token and for further processing is replaced with a double quote. Strings which have a form of 'identifier=value' or 'identifier="value with spaces"' are considered to be one single token and they are further parsed into identifier/value pairs.
Examples:
This is a text containing spaces
- Will be parsed into 6 tokens: 'This', 'is', 'a', 'text', 'containing', 'spaces'.
This "is a text" containing spaces
- Will be parsed into 4 tokens, 'This', 'is a text', 'containing', 'spaces'.
This text contains "double quote (\")"
- Will be parsed into 4 tokens, 'This', 'text', 'contains', 'double quote (")'
Var SAMPLE_VAR_1="value with spaces" SAMPLE_VAR_2=no_spaces "NO_VAR=not_a_variable"
- Will be parsed into 4 tokens: 'Var,'SAMPLE_VAR_1="value with spaces"', 'SAMPLE_VAR_2=no_spaces' and 'NO_VAR=not_a_variable'. The second and third tokens will be further parsed into identifier/value pairs. The fourth token will not be parsed as it does not comply with the required format.
This design doesn't allow to specify a value with a trailing backslash:
Var SAMPLE_VAR="This is a backslash \"
The compiler reports an error because the trailing '\"' sequence is interpreted as escaped double quote instead of a backslash followed by the closing double quote. Version 4.4.4 introduced the '&bs;' keyword which gets replaced internally by a backslash:
Var SAMPLE_VAR="This is a backslash &bs;" - The very first token is considered to be a command or procedure name and is matched against command and procedure tables. Command names are NOT case sensitive.
- Further processing and syntax validation are then performed by the command/procedure handlers as described below in the Command Syntax and Procedures chapters.
2.2 Time Values
Time values such as the Wait command argument and wait/timeout/delay parameters of other commands support the following syntax:
- "1" is parsed as 1 millisecond,
- "1s" is 1 second,
- "1m" is 1 minute,
- "1h" is 1 hour,
- "1d" is one day.
- "1w" is one week (since 7.0.2).
- "1M" is one month (since 7.0.2)
- "1y" is one year (since 7.0.2).
Floating point variables are acceptable in the English format only, i.e. '3.5h' will be parsed as 3.5 hrs (3 hrs 30 mins). Time values may contain numeric expressions - check the Numeric Expressions chapter for syntax.
Examples:
Wait "1.5d"
- Wait one and a half days (36 hours)
Press Ctrl+C wait=5s
- Press Ctrl+C and pause for 5 seconds.
2.3 Variables
Variables may be created through the Var and Eval commands. A variable has a case sensitive name and a value. Variables can be referred to in anywhere where dynamic content is needed (including the Var/Eval commands themselves). T-Plan Robot Enterprise's text preprocessor will replace all occurrences of {<var_name>} with the <var_name> variable value before parsing of each command line.
A typical example:
Var PATH=/tmp
Typeline "mkdir -p {PATH}; cd {PATH}"
Avoid variable names consisting of plain numbers, e.g. 'Var 1="test"'. These variables are reserved for procedure parameters and they will be rewritten by any procedure execution without any warning.
If a variable is not defined, no replacement is performed. The following example will rather type 'cd {PATH}' than 'cd /tmp' because the variable definition is commented out:
# Var PATH=/tmp
Typeline "cd {PATH}"
The preprocessor supports nested variable references. This functionality is necessary to process multiple matches of the 'search' image comparison method where coordinates of the matches are stored as SEARCH_X<number> and it is necessary to generate the variable names dynamically in a loop. The following example illustrates such usage. Let's suppose that you are to search the remote desktop for an icon and you click onto each of the occurrences:
Compareto "search.png" method="search"
for (i=1; {i}<{_SEARCH_MATCH_COUNT}+1; i={i}+1) {
# Nested variables compose the variable name from a suffix and an index
Mouse click to=x:{_SEARCH_X{i}},y:{SEARCH_Y{i}}_
}
T-Plan Robot Enterprise also supports a concept of global and local variables which is similar to member class and local variables in object-oriented programming (OOP). The variable type is not explicitly declared but depends on where in the code it is created:
- Variables created in the main script body are considered to be global and they are accessible from the moment of definition until the end of script execution.
- Variables created within a structured block of code (procedure, if/else and for statements) are considered to be local and they are available only within the block of code (including any nested blocks it may contain).
A local variable cannot override a global one. This means that if you run a Var or Eval command in a block of code and the variable name matches an already existing global variable, you'll rather modify the global variable than define a local one with the same name. The following example demonstrates the principles.
# Create a global variable
Var GLOBAL=global
if (1 == 1) {
# Create a local variable and change the value of GLOBAL to 'modified'
Var LOCAL=local GLOBAL=modified
if (1 > 0) {
Var LOCAL2=local2
# Here GLOBAL, LOCAL and LOCAL2 are available.
# The command will type "GLOBAL=modified, LOCAL=local, LOCAL2=local2"
Type "GLOBAL={GLOBAL}, LOCAL={LOCAL}, LOCAL2={LOCAL2}"
}
# Here GLOBAL and LOCAL are available and LOCAL2 doesn't exist any more.
# The command will type "GLOBAL=modified, LOCAL=local, LOCAL2={LOCAL2}"
Type "GLOBAL={GLOBAL}, LOCAL={LOCAL}, LOCAL2={LOCAL2}"
}
# Here GLOBAL is available and LOCAL and LOCAL2 don't exist any more.
# The command will type "GLOBAL=modified, LOCAL={LOCAL}, LOCAL2={LOCAL2}"
Type "GLOBAL={GLOBAL}, LOCAL={LOCAL}, LOCAL2={LOCAL2}"
The same rules are applied to variables defined inside scripts loaded through the Include and Run commands. T-Plan Robot Enterprise provides a set of predefined (also called explicit) variables which may be referenced from any script. They include various useful data, such as execution start date, desktop server hostname, name of the executed script etc. For a complete list of predefined variables see the Var command specification. Variable values may be overridden in script executions through CLI. See the v/-variable parameter specified in the CLI Options document. This allows to parametrize particular script executions and/or avoid exposure of sensitive information in the script code (user names, passwords ...). Setting through the CLI makes the variable 'read-only' and fixes its value for the whole time of script execution. Any Var/Eval commands modifying this variable executed in the script will be ignored and they will have no impact on its value. This applies to any variable including the explicit (predefined) ones.
2.4 Procedures
T-Plan Robot supports simple procedures. A procedure is a named block of language elements written in required format which can be executed by calling its name. A procedure has a header, body and terminating right curly brace.
Procedure format is:
procedure <procedure_name> {
command1command2...commandN
}
The following rules apply:
- Procedure names are not case sensitive and they must not conflict with any other command or language element name. Since v3.0.1 the name may contain spaces if it is enclosed with double quotes, for example:
procedure "Perform action A" {
...
}...
"Perform action A"
- The left curly brace '{' must be on the same line as the procedure header.
- The terminating right curly brace '}' must be alone on a single line.
- A procedure definition overrides any eventual already defined procedure of the same name.
- A procedure can be called anywhere in the script AFTER its definition.
- Procedures defined in another script (file) may be imported through the Include command.
It is possible to pass any number of space-separated parameters to a procedure call as follows:
<procedure_name> parameter1 "parameter2 with spaces" .... parameterN
Parameters are then available as variables with names '0', '1' ... 'N'. The first variable with index 0 always contains the procedure name. Note that parameters accepted by a procedure are not declared anywhere in the procedure header.
A number of input arguments are available from the _PROCEDURE_ARG_COUNT variable since version 2.1. They may be used for branching of behaviour depending on the number of parameters or for populating of omitted parameters with default values.
The following example illustrates how to write and call a simple procedure creating a screenshot with variable image format. Note that the default value assignment (Var extension=png) must be specified after the parameter assignment (Var extension={2}) because the script otherwise reports an error. This is due to a compiler limitation which executes all variable assignments at the compile-time regardless of the if/else structures to verify the correct command syntax.
# Procedure definition. Expected parameters are:
# {1} ... file name without extension
# {2} ... image extension (either jpg, jpeg or png). Defaults to "png" when omitted.
procedure take_screenshot {
    Var extension={2}
    if ({_PROCEDURE_ARG_COUNT} == 1) {
        Var extension=png
    }
    Screenshot {1}.{extension} desc="This screenshot was created by procedure called {0}"
}

take_screenshot image1 jpg
take_screenshot image2
Procedures always return exit code of the last executed command within the procedure body. To exit a procedure with a specific exit code use the Exit command with the scope parameter set to procedure. An example follows:
# Procedure definitionprocedure exit2 { Exit 2 scope=procedure}# Procedure callexit2if ({_EXIT_CODE} == 2) { # Any code here will be executed because exit2 returns 2}
Procedure content is never compiled at procedure definition because without parameters it is not possible to resolve whether the code is correct or not. T-Plan Robot Enterprise compiles the procedure calls instead. If you e.g. type
take_screenshot image3 tiff
T-Plan Robot will report an error in this line because 'tiff' is not a Java supported image format causing the Screenshot command in the example procedure body to throw a compilation error.
2.5 Fallback Procedures
T-Plan Robot Enterprise version 2.3 introduced so-called fallback procedures. These are procedures of reserved names which are automatically called when a particular condition (event) is met. Fallback procedures are otherwise standard ones which means that all general procedure rules described above apply to it. In short, (1) the name is not case sensitive, (2) the procedure may be in another file which is linked to the script through Include or Run and (3) the procedure must be defined before the code which may call it.
- A procedure called DisconnectFallback will be called when connection to the VNC server crashes either in the init phase (inside the Connect command) or any time later on, for example when the server is terminated (killed) or a network error is experienced. A call of the Disconnect command will not start the procedure because it is an expected connection termination. If a Connect is called in the fallback procedure body, it will not call the procedure again on failure to prevent infinite connection looping. If the connection crash is detected in the normal operation phase during script execution, the procedure gets called right after the currently executing command finishes. Be aware that the procedure may not be used in such a case for a safe recovery (meaning reconnection and resuming of the script) because the scope of data transferred to the server correctly is not known. This is a problem when the crash happens for example in the middle of text typing where it is not possible to determine how many characters were typed successfully before the connection failure.
- A procedure called ComparisonFailureFallback gets executed every time a CompareTo or Waitfor match/mismatch fails and no explicit fail action is specified through the onfail or ontimeout parameter. The first procedure argument which may be retrieved inside the procedure body as "{1}" will always contain the numeric exit code of the calling comparison command. This is typically "1" when the object is not found or "2" when one or more of the template images are not found or can not be read.
The following example shows how to use fall back procedures. Both will simply exit the script with a specific exit code. The comparison one, in addition, creates a screenshot to allow later debugging. The example may be easily extended to perform any other suitable action, for example sending of an E-mail through the SendMail command or pausing the script through Pause.
procedure DisconnectFallback { Exit 3 }procedure ComparisonFailureFallback { Screenshot comparison_failure.png Exit {1} }
// Script bodyConnect localhost:1 password=welcomeCompareto button.png method=search
// ...
Version 7.2.4 introduced support of the BrowserFailureFallback procedure. When it is defined in the script it gets called after each failed Browser open/find/close command. It exposes three extra arguments:
{1} is the command numeric exit code,
{2} indicates the operation. It can be used to filter out the irrelevant calls.
If the failed command is "Browser open/close" it is set to "open" or "close".
If the failed command is "Browser find" without the "elaction" parameter specified then the argument is set to "find".
Otherwise the argument specifies the failed element action, one of "click", "submit", "clear", "type" or "select".
{3} contains the error message, typically the same one that is logged to the execution log.
Here's an example (requires the Chromium plugin):
procedure BrowserFailureFallback { Log "Failed action: {2} (exit code: {1})" Log "Reported error: {3}"}
Browser "open" url="https://www.t-plan.com" browser=chromium
// This command will fail for wrong button text and call the "BrowserFailureFallback" procedureBrowser "find" class="elementor-button-text" text="Why T-Plans" timeout=5s
2.6 Numeric Expressions
Numeric expressions are supported since v1.3. The following rules apply:
English format of floating-point variables is expected, e.g. '1.25'.
Time variables like '5s' (five seconds) are not accepted except the cases where the time modifier is at the very end of the expression. Examples:
- CORRECT: Wait 5+5s
- INCORRECT: Wait 5s+5s
Supported numeric operators are:
- Parenthesis '(' and ')'
- Plus '+'
- Minus '-'
- Unary minus '-' (negative numbers)
- Multiplication '*'
- Division '/'
- Modulo division '%'
- Power operator '^'
Numeric expressions are accepted anywhere in the language where a number is expected, e.g.
# Wait 1 hour - in milliseconds
Wait "1*60*60*1000"
# Search for an image and then click onto it 10 points from its left upper corner
Compareto "pattern.png" method="search"
Mouse click to="x:{_SEARCH_X}+10,y:{_SEARCH_Y}+10"
To define a variable based on a numeric expression use the Eval command instead of the Var one, e.g. 'Eval HOUR_IN_MS=1*60*60*1000'.
2.7 Boolean Expressions
Boolean expressions facilitate constructions like if/else and for. The following operators are supported:
- Parenthesis '(' and ')'
- Greater than '>', greater than or equal to '>=', lower than '<' and lower than or equal to '<='. These operators require numeric arguments.
- Equal to '==' and not equal to '!=' or '<>'. If at least one of the arguments is not a number (a string enclosed in double-quotes) a plain string comparison is performed. Examples:
- Result of 'yes == no' will be false
- Result of 'yes != no' will be true
- Result of '1.0 == 1' will be true because both arguments can be converted to a number and the numeric values are equal.
- Operators '&&' and '||' - logical "and" and "or". These operators require Boolean arguments, i.e. other expressions. Example:
- Expression '1 > 0 || yes != no' will be true because one of the two expressions is true
- Expression '1 > 0 && yes != no' will be false because one expression is false
Version 2.2 and higher also supports a set of operators allowing to test the existence of variables and compare strings:
- Unary operator 'exists <variableName>' tests existence of a variable. Example:
- Expression
'exists _REPORT_FILE'will be true if the script creates a report through the Report command
- Expression
- Operator 'contains' tests whether the first string argument contains the other one (case sensitive). Example:
- Expression
'"{_MACHINE}" contains "sourceforge"'will be true if the connected VNC server name contains 'sourceforge'
- Expression
- Operator 'hasphrase' verifies if the first string contains the other one (since 7.2.2). It is similar to the "contains" one save that it is tolerant to new lines and unnecessary spaces. This allows for an easier evaluation of text recognized through the OCR on the screen. Example:
- Expression
'"{_TOCR_TEXT}" hasphrase "Hello world I am here"'will be true if the text resulting from the previously performed OCR contains the specified phrase regardless of whether it is split to multiple lines or it contains multiple spaces.
- Expression
- Operator 'startswith' tests whether the first string argument starts with the other one (case sensitive). Example:
- Expression
'"{_DISPLAY}" startswith "localhost"'will be true if the connected VNC desktop name starts with 'localhost', for example, 'localhost:1'.
- Expression
- Operator 'endswith' tests whether the first string argument ends with the other one (case sensitive). Example:
- Expression
'"{_DISPLAY}" endswith ":3"'will be true if the connected VNC server runs on port 5903 (which is typically indicated by the ':3' display number in the desktop name).
- Expression
- Operator 'matches' compares the first string argument to a java.util.regex.Pattern compliant regular expression. Example:
- Expression
'"{_DATE}" matches "201008[12][1-5]"'will be true if the current date is between 11 and 15 or between 21 and 25 August 2010 .
- Expression
Boolean expressions are exclusively used by the if/else and for constructions as is shown in the following example. A Boolean expression may be also passed to the Eval command which populates the specified variable with the result of 'true' or 'false'.
# Look for an image on the remote desktopCompareto "pattern.png" method="search"# Exit if the image is not found,if ({_EXIT_CODE} > 0) { Exit 1 }
For more information read the If/Else Statement and For Statement chapters.
2.8 Functions
Functions were introduced in release 5. They may be used anywhere where a boolean or numeric expression is expected, such as the if/else and for statements, the Eval command and any other command parameters that support numeric expressions by this specification. Function names are not case sensitive.
For example, the following 'for' statement will iterate 10 times:
for (i=0; i<MAX(6,10,9); i=i+1) {
...
}
Supported functions (contact support if you need a custom one):
| Function | Description |
|---|---|
| NOT(expression) | Boolean negation, 1 (means true) if the expression is not zero |
| IF(condition,value_if_true,value_if_false) | Returns one value if the condition evaluates to true or the other if it evaluates to false |
| RANDOM() | Produces a random number between 0 and 1 |
| MIN(e1,e2, ...) | Returns the smallest of the given expressions |
| MAX(e1,e2, ...) | Returns the biggest of the given expressions |
| ABS(expression) | Returns the absolute (non-negative) value of the expression |
| ROUND(expression,precision) | Rounds a value to a certain number of digits, uses the current rounding mode |
| FLOOR(expression) | Rounds the value down to the nearest integer |
| CEILING(expression) | Rounds the value up to the nearest integer |
| LOG(expression) | Returns the natural logarithm (base e) of an expression |
| LOG10(expression) | Returns the common logarithm (base 10) of an expression |
| SQRT(expression) | Returns the square root of an expression |
| SIN(expression) | Returns the trigonometric sine of an angle (in degrees) |
| COS(expression) | Returns the trigonometric cosine of an angle (in degrees) |
| TAN(expression) | Returns the trigonometric tangens of an angle (in degrees) |
| COT(expression) | Returns the trigonometric cotangens of an angle (in degrees) |
| ASIN(expression) | Returns the angle of asin (in degrees) |
| ACOS(expression) | Returns the angle of acos (in degrees) |
| ATAN(expression) | Returns the angle of atan (in degrees) |
| ACOT(expression) | Returns the angle of acot (in degrees) |
| ATAN2(y,x) | Returns the angle of atan2 (in degrees) |
| SINH(expression) | Returns the hyperbolic sine of a value |
| COSH(expression) | Returns the hyperbolic cosine of a value |
| TANH(expression) | Returns the hyperbolic tangens of a value |
| COTH(expression) | Returns the hyperbolic cotangens of a value |
| SEC(expression) | Returns the secant (in degrees) |
| CSC(expression) | Returns the cosecant (in degrees) |
| SECH(expression) | Returns the hyperbolic secant (in degrees) |
| CSCH(expression) | Returns the hyperbolic cosecant (in degrees) |
| ASINH(expression) | Returns the angle of hyperbolic sine (in degrees) |
| ACOSH(expression) | Returns the angle of hyperbolic cosine (in degrees) |
| ATANH(expression) | Returns the angle of hyperbolic tangens of a value |
| RAD(expression) | Converts an angle measured in degrees to an approximately equivalent angle measured in radians |
| DEG(expression) | Converts an angle measured in radians to an approximately equivalent angle measured in degrees |
| FACT(expression) | Retuns the factorial value of an integer. Will return 1 for 0 or a negative number |
2.9 If/Else Statement
T-Plan Robot supports if/else statements with similar functionality and syntax used by Java. The format is:
if (<boolean expression>) {
<commands>
} else if (<boolean expression>) {
<commands>
} else {
<commands>
}
The 'else if' and 'else' branches are optional. While the number of 'else if' branches are not limited, there can be just one 'else' construction. Note that the enclosing curly braces '{' and '}' must be on the same line as their associated if/else/else if keyword exactly as is displayed above.
The right curly brace '}' terminating the whole structured block is the only exception and it must be alone on a single line. Example:
# Look for an image on the remote desktopCompareto "pattern.png" method="search"# Exit if the image is not found,if ({_EXIT_CODE} > 0) { Exit 1 # If the image was found more times, take a screenshot and add a warning to the HTML report} else if ({_SEARCH_MATCH_COUNT} > 1) { Screenshot unexpected.png Warning "Unexpected behavior - the template image was found {_SEARCH_MATCH_COUNT} times!" image=unexpected.png}
If/else statements can be nested and combined with other constructions like the for statement as is usual in any other structured programming language.
2.10 For Statement
T-Plan Robot Enterprise supports for statements which allow to iterate over a range of values or loop as long as a particular condition is satisfied. There are two general forms of the for statement.
1. Conditional For Statement
First variant of the for statement executes as long as the specified Boolean expression results true:
for (<statement1>; <boolean expression>; <statement2>) {
<commands>
}
As the Boolean expression is being evaluated before every loop, the commands inside the loop will not be executed at all if the expression results in false right from the beginning.
Statements statement1 and statement2 are evaluated using the Eval command and should have a syntax like '<variable>=<numeric expression>'. They can be also empty. The following examples are equivalent and loop for values of variable 'index' ranging from 0 to 5. Both code snippets will type '012345':
for (index=0; {index}<6; index={index}+1) { Type {index} }Eval index=0for ( ; {index} < 6; ) { Type {index} Eval index={index}+1}
Version 2.3 and newer also supports a simpler syntax where the variable calls inside the statement header omit the curly braces, such as for example:
for (index=0; index<6; index=index+1) {
}
2. For Statement Iterating over a Predefined Set of Values
This form allows to iterate over a predefined set of values:
for <variable name> in <list of space-separated values> {
<commands>
}
The following example will type a sentence "I speak English, Spanish, Brazilian Portuguese."
Type "I speak "
for language in English Spanish "Brazilian Portuguese" {
if ("{language}" == "Brazilian Portuguese") {
Type "{language}."
} else {
Type "{language}, "
}
}
The value set can be also specified by a variable. Version 3.0.1 and higher support values containing spaces specified through a variable. The following code shows the previous example with the value set specified through variables.
Note that the variable call must NOT be enclosed with double quotes because it would be handled as a single value.
Type "I speak " Var VALUES="English Spanish \"Brazilian Portuguese\""for language in {VALUES} {
if ("{language}" == "Brazilian Portuguese") {
Type "{language}."
} else {
Type "{language}, "
}
}
Execution of the for statement can be interrupted by a break command. The current loop can be skipped by the continue command. If there are nested loops the break/continue commands will apply to the innermost for statement.
The following example illustrates how to use a combination of for and waitfor to hold on execution until the remote desktop stops to update. #
# Infinite loop
for (; 0 == 0; ) {

    # Wait for at least 20% update of the remote screen.
    # If it doesn't update for 10 seconds, break the loop.
    Waitfor update extent=20% timeout="10s" ontimeout="break"
}
2.11 Return Values
Since v1.3 all commands return an integer value which is available as a variable called _EXIT_CODE. Value of 0 (zero) usually means success while any other number indicates a failure. See the documentation of particular commands for defined exit code values and their meanings.
Return values (also called "exit codes") can be effectively used to control the script execution and define how to handle both expected and unexpected results. The compareto command e.g. returns 0 when image comparison passes and non-zero value otherwise. The waitfor command returns 0 when the expected event is received and non-zero value when timeout is reached. The following example illustrates how to use these return values.
# Alt+F2 opens the Run Program window on Gnome
Press Alt+F2 wait=3s
# Start the Gnome Text Editor
Typeline gnome-text-editor
# Wait for the remote desktop update
Waitfor update extent=30% timeout="10s"
# If Waitfor returns non-zero value, the timeout was reached
# and the text editor probably failed to open
if ({_EXIT_CODE} > 0) {
# Take a screenshot
Screenshot failure.png
# Send the screenshot via E-mail to the tester
Sendmail to="tester@dummyserver.com" from="robot@dummyserver.com" server="mail.dummyserver.com" subject="Gnome editor failed to open!" attach="{_REPORT_DIR}/failure.png"
# Pause the execution and wait for the tester to fix it
Pause "Paused because Gnome Text Editor failed to start"
}
Note that the if/else, for and break calls do not return any value. If you access the _EXIT_CODE variable after one of these commands, it will rather contain exit code of the last previously executed command.
2.12 Java Code Blocks
Java code blocks allow calling Java code directly from TPR scripts. It was designed to support cases when it is desired to stick to the scripting language, but a certain custom functionality is needed.
To make Java code blocks work properly, make sure to run Robot on a JDK through the "java -classpath <libs> com.tplan.robot.ApplicationSupport" command rather than the "java -jar robot.jar" one. The latter syntax fails to populate the 'CLASSPATH' for the Java compiler on some environments which results in failures to compile and execute Java source code. See the startup chapter of the Release Notes document for more information.
The general syntax of a Java code block follows. Be aware that support of the import clauses was delivered in v2.2. Prior versions must reference classes by fully qualified name or add the imports to the test class template managed in preferences.
java { <import clauses> <Java code>} endjava
Each such a block is internally converted to a Java script extending DefaultJavaTestScript class and the Java code inside the block is inserted into its test() method. The class template is exposed in the Java code block configuration and may be customized through the Preferences window. The following example shows an example:
Java Code Block | Resulting Java Script Class |
|---|---|
java { | import com.tplan.robot.scripting.*; |
This mechanism has a few practical impacts:
- As Java code blocks require access to Java compiler, T-Plan Robot must run on Java Development Kit (JDK) or it must be configured with a valid JDK installation path (v2.3.3 and newer). If the tool runs just on Java Runtime Environment (JRE) and no JDK is available the compiler will report an error. Refer to chapter 1 of the Release Notes document for instructions.
- Avoid using too many Java code blocks in your script. Be aware that each one must be dynamically compiled in the memory before use and it may degrade performance of your script and the whole tool. Should you want to create reusable parametrized pieces of precompiled Java code, explore the run command functionality.
- The template by default imports all classes from the com.tplan.robot.scripting, java.io and java.util packages. If you want to use a class from another package, place the import clause before the Java code. Other alternatives are to either reference the class by fully qualified name (such as for example java.awt.Point) or go to the Java code block preferences and add the import to the class template. If you choose the template way, make sure to reapply it when the script is migrated to another machine.
- As each Java code block behaves as a standalone Java class, local variables and objects created in one block are not visible in another one. If you need to share an object across multiple Java blocks, store them into the context. It is basically a map which exists for the whole time of script compilation or execution and holds references to important automation framework objects. To store an object to the context use getContext().put(), to retrieve an object use getContext(). get(). Make sure to use a unique key so that you don't overwrite reference of an already existing framework object. For more information see the ScriptingContext interface specification.
- Java code blocks may share global variables with the TPR script through the context's getContext().getVariable() and getContext().setVariable() methods. As the code block extends DefaultJavaTestScript class, it may also call its methods corresponding to the scripting language commands.
The following example illustrates sharing of variables. The script first sets the template path to "C:/templates". The Java code retrieves the path through the context, lists all PNG files in the directory and stores them as numbered variables called FILE<n> together with the file counter FILECNT to the context variables. When the TPR script resumes, it iterates over the listed files and performs image comparison against each PNG file.
Var _TEMPLATE_DIR="C:\templates"# This line declares dummy values of variables populated by the Java code.# It prevents the compiler from reporting error in the for() loop and CompareTo command.Var FILECNT=0 FILE1=dummy.pngjava { File files[] = getContext().getTemplateDir().listFiles(); int i = 0; for (File file : files) { if (file.isFile() && file.getName().endsWith(".png")) { i++; getContext().setVariable("FILE"+i, file.getName()); } } getContext().setVariable("FILECNT", Integer.toString(i));} endjavafor (i=1; {i}<{FILECNT}+1; i={i}+1) { Compareto "{FILE{i}}" method=search}
3. Command Syntax
3.1 Desktop Commands
3.1.1 Browser
Browser - Automate a Selenium driven web browser (since v5). An overview of the technology and configuration steps are being maintained in a separate document. The command supports the following actions:
- "Browser open" opens the selected web browser and loads the specified web page. The browser can be a local one or a remote one (Selenium Grid, supported since 6.3). Since version 8 the command can also open a new tab or a window.
- "Browser find" searches the web page for an element (an HTML tag) by the specified criteria and applies an optional action to it (click, type, submit, clear).
- If the command does NOT specify an action and the element is not found it allows the script to continue. The search result (found/not found) is indicated to the script by the command exit code and the existence of the _WEB variables containing the element attributes.
- If the command specifies the action and the element is not found it terminates the script. This behaviour is consistent with the Click and Drag commands.
- To script actions like "apply action to an element if it exists and continues" use a pair of "Browser find" commands where the first one verifies the element existence and the second one applies the action.
- "Browser switch" switches among tabs or windows and/or updates the variables describing them. Supported since v8.
- "Browser close" closes the tab, window or the whole browser and eventually terminates the Selenium session.
Starting with release 8 most Browser command operations populate a set of variables describing the available tabs and windows as follows. You may also force refresh them by running "Browser switch" without any additional parameters:
| Variable Name | Description |
|---|---|
| _BROWSER_WINDOW_COUNT | Number of available windows/tabs. |
| _BROWSER_WINDOW_NUMBER | Ordinary number of the current window. |
| _BROWSER_WINDOW_ID | The current window/tab ID. It is a unique string assigned to each window or tab by Selenium. |
| _BROWSER_WINDOW_ID<n> | ID of the n-th window where 'n' is between 1 and the number of windows specified by _BROWSER_WINDOW_COUNT. |
| _BROWSER_WINDOW_TITLE | The current window/tab title. |
| _BROWSER_WINDOW_TITLE<n> | Title of the n-th window where 'n' is between 1 and the number of windows specified by _BROWSER_WINDOW_COUNT. |
| _BROWSER_WINDOW_URL | The current window/tab URL. |
| _BROWSER_WINDOW_URL<n> | URL of the n-th window where 'n' is between 1 and the number of windows specified by _BROWSER_WINDOW_COUNT. |
SYNOPSIS
Local browser:
Browser open browser=<browser_code> [url=<web_page>] [args=<CLI_arguments>] [opt-<name>=<value>]
Remote browser:
Browser open browserName=<browser_code> hub=<hub_address> [url=<web_page>]
Open a new URL in an already opened browser:
Browser open url=<web_page> [target=<self|window|tab>]
* Red colour indicates obligatory parameters
OPTIONS
browser=<browser_code>
- The browser code name. The currently supported values are:
- "ie" - Microsoft Internet Explorer
- "edge" - Microsoft Edge
- "firefox" - Firefox (Gecko)
- "chrome" - Google Chrome
- "safari" - Safari (Mac OS X)
- "chromium" - requires the Chromium web driver plugin to be installed (v7.0+)
url=<web_page>
- The web page to be loaded, for example "https://www.t-plan.com".
args=<CLI_arguments>
- CLI arguments to be passed to the browser process if supported by the browser type. Supported since v7.0. See the CLI Arguments discussion in the Selenium document.
opt-<name>=<value>
- A preference value to be passed to the browser process if the browser type supports it. Supported since v7.0. For example, Chrome uses the "download.default_directory" preference to set the default download directory. To redirect your downloads to C:\MyStuff use opt-download.default_directory="C:\MyStuff".
hub=<hub_address>
- The Selenium Grid hub address.
browserName=<browser_name>
- The hub recognized browser name.
target=<self|window|tab>
- Where to open the specified web page, one of "self" (open in the current window), "window" or "tab" (open in a new window/tab). The default value is "self". Supported since v8.
Browser find [timeout=<time_interval>] [elaction=<action>] [elnumber=<element_number>] [eltext=<text>] [elindex=<dropdown_item_index>] [elvalue=<dropdown_item_value>] [continue=<true|false>] [<attributes>]
OPTIONS
timeout=<time_value>
- Optional time to keep looking for the element. It must be a valid time value.
- If no timeout is specified the command looks for the element just once.
- If the timeout is specified and is greater than zero the command will keep trying to find the element until the time expires or the element is found.
elaction=<action>
- Optional action to apply to the resulting element. If the search produces multiple elements you may use the elnumber parameter to select the target element. Supported actions are:
- "click" - Click the element. It applies only to clickable elements such as links, buttons etc.
- "type" - Type the text specified by the eltext parameter. Applicable to text elements only.
- "clear" - Clear the element text. Applicable to text elements only.
- "submit" - Submit the form.
- "select" - Select a drop-down item by one of the visible text (eltext), item index (elindex) or its value specified by the "value" attribute of the "option" HTML tag (elvalue).
elnumber=<element_number>
- The ordinal number of the element to target with the action specified by elaction. The default value is 1 (use the first element). If the number of elements is lower than elnumber the command throws an error.
eltext=<text>
- If the elaction action is "type" the parameter specifies the text to type into the text element. If the action is "select" the parameter is used to specify the visible text of the drop-down to be selected. It must be used together with the elaction=type parameter.
elindex=<dropdown_item_index>
- Index of the drop-down item to select. Indexing starts from zero. Applicable only to drop down elements represented by the "select" HTML tag.
elvalue=<dropdown_item_value>
- Value of the drop-down item to be found and selected. It is specified through the "value" attribute of the "option" HTML tag. Applicable only to drop down elements (the "select" HTML tag).
continue=<true|false>
- Specifies how to handle the failure. If the element is not found and this parameter is not specified or is false the command terminates the script. If the parameter is true the script is allowed to continue and the command returns a non-zero exit code.
<attributes>
- The list of attributes (search criteria) in the form of name=value pairs such as:
- "xpath=<xpath_expression>" - Perform search by the XPath expression. When this option is used no other attribute may be specified.
- "css=<css_selector>" - Search by the CSS selector. When this option is used no other attribute may be specified.
- "id=<element_id>" - Search by the element ID.
- "class=<class(es)>" - A CSS class or a list of space-separated classes the element must be of.
- "tagname=<tag_name>" - An HTML tag name such as "a", "div", "img" etc.
- "text=<text>" - The exact element text.
- "parttext=<partial_text>" - Find element(s) whose text contains the specified partial text. Be aware that the element text is inherited by its parent elements so these criteria are not unique. For example, to get the text of the whole page search for the "HTML" or "body" tag.
- "link=<link_text>" - Search for a link of the specified text.
- "partlink=<partial_link_text>" - Search for a link whose text contains the specified string.
- Besides the parameters supported by Selenium, the command accepts any HTML tag attributes and their values. For example, to identify a form button by its name use name=<name>.
For an informative overview of HTML, attributes see the Mozilla dev docs. Support of attributes may be browser-specific and some of them may fail to recognize.
Browser switch [id=<window_ID>] [title=<title_or_part>] [number=<window_number>] [url=<URL_or_part>] [continue=<true|false>]
- Switch to the tab or window identified by exactly one of the supported parameters of title, URL, number or window ID. If no identification parameter is specified the command refreshes the window variables.
OPTIONS
id=<window_ID>
- The window/tab ID. It is a unique string assigned to each tab or window by Selenium. You may get the available IDs from the window variables.
title=<title_or_part>
- The window/tab title or its part. See the window variables for the list of available titles. The title search is case sensitive. For example, if you have a tab titled "Google" then you may switch to it using title="Goo". If there are multiple tabs matching the specified title then the first one found will be selected. If no matching tab is found the command terminates the script unless the "continue=true" parameter is specified.
number=<window_number>
- The ordinal number of the window/tab starting with 1 (one). The order of windows is determined by Selenium and it typically reflects the order in which they were created. The number of currently available windows is reflected by the _BROWSER_WINDOW_COUNT window variable. If the number of available windows is lower than the requested one the command terminates the script unless the "continue=true" parameter is specified.
url=<URL_or_part>
- The window/tab URL or its part. See the window variables for the list of available URLs. The search is case sensitive. For example, if you have a tab for "https://www.google.com" then you may switch to it using url="google". If there are multiple tabs matching the specified title then the first one found will be selected. If no matching tab is found the command terminates the script unless the "continue=true" parameter is specified.
continue=<true|false>
- Specifies how to handle the failure. If the target window or tab is not found and this parameter is not specified or is false the command terminates the script. If the parameter is true the script is allowed to continue and the command returns a non-zero exit code.
Browser close
* Red colour indicates obligatory parameters
OPTIONS
scope=<tab|all>
- The close scope. The value of "all" is default and it will close the whole browser (all tabs & windows) and terminate the Selenium connection. The value of "tab" will close just the current tab or window and the connection is terminated only if it there are no remaining tabs or windows.
EXAMPLES
Browser open browser=edge url=https://www.t-plan.com
3.1.2 Connect
DESCRIPTION
Connect - Connect to a desktop. The protocol, hostname or IP address and optional port are specified in the argument URL. If a connection gets established the implicit variables of _MACHINE and _DISPLAY are updated.
See the DisconnectFallback fallback procedure for information on how to set up a central point of failure for server connections.
SYNOPSIS
connect <URL> [user=<user>] [password=<password>] [force=<false|true>] [onpass=<command>] [onfail=<command>] [params=<parameters>] [paramseparator=<delimeter>]
* Red colour indicates obligatory parameters
OPTIONS
URL
- The argument must be a known connection name (since v4.2) or a valid URL in form of <protocol>://<host_or_IP>[:<port>] except for the legacy format described below. The protocol must be equal to one of the supported protocol codes. T-Plan Robot by default supports seven clients (protocols):
- Remote Frame Buffer (RFB) v3.3 client (protocol code "rfb"). It is better known as Virtual Network Computing or VNC. The client is compatible and can connect to any RFB v3.3 complying VNC server such as TightVNC, RealVNC or UltraVNC. See the Release Notes document for the list of tested environments. Client implementation details are maintained in the client documentation.
- Static Image (protocol code "file"; since v2.2) allows to load image from a file and test it the same way as a live desktop. The client supports all Java-compliant lossless image formats such as PNG, BMP, WBMP and GIF. As there's a mechanism causing the client to reload the image when the file gets updated, the client may be also used to test applications generating graphical output to an image in the file system. The connect URL is of the standard form of "file://<image_path>" with special handling of relative paths and images bundled inside a ZIP or JAR file. For details see the client documentation.
- Android over ADB (protocol code "adb", since 3.1) enables to automate Android devices over the Android Debug Bridge (ADB). For details see the client documentation.
- Local Desktop (protocol code "java", since 3.2) allows automating applications and system components displayed on the local desktop. For details see the client documentation.
- iOS Mirror (protocol code "apple", since 3.3) allows automating iOS devices (iPhone, iPad) using a combination of AirPlay screen mirroring and VNC server. Compared to a plain VNC connection, this solution has much faster screen performance and it supports OpenGL content, for example, games and graphical programs. For details see the client documentation.
- iOS Over Xcode (protocol code "xcode", since 4.3.1) allows automation of iOS devices connected both to a WiFi network and to a Mac OS X machine through the Lightning USB cable. For details see the client documentation.
- RDP Server (protocol code "rdp", since 4.3) supports automation through the RDP protocol, also known as Microsoft Terminal Services. For details see the client documentation.
As T-Plan Robot provides an interface allowing to plug in other clients, there might be more protocols supported by additional plugins.
If a port is not explicitly specified, it defaults to the protocol-specific well-known port. For example, RFB/VNC server runs by default on port 5900, Java RMI starts by on port 1099 and RDP (Windows Terminal Services) default to 3389. If you want to connect to a VNC running on Linux/Unix, you typically have to specify the port of 5901 or higher because the default RFB port is occupied by the X-Windows server.
If a protocol is omitted in the URL, the script defaults to the RFB (VNC). The port number is in this case treated as the display number which is equal to the port number minus 5900. A direct port can be specified through a double colon. For example both "localhost:1" and "localhost::5901" refer to the same local VNC server running on port 5901. The same address in the standard URL form is "rfb://localhost:5901".
user=<username>
- User name (ID) to authenticate to the desktop. This parameter is reserved for future use and/or for third party extensions and it is not used by any of the currently supported protocols.
password=<password>
- Password to authenticate to the desktop server. If the server is configured not to require a password, this parameter is ignored.
force=<false|true>
- If the same server and port (display) is already connected no reconnection is performed (force=false). To force termination of the current connection and reconnection to the server set this parameter to true. The default value is false.
onpass=<command>
- A command to execute when the server is connected successfully. It must be a single command. To call a sequence of commands either use a procedure or a subsequent if/else construction testing the command exit code.
onfail=<command>
- A command to execute when Connect fails to connect. It must be a single command. To call a sequence of commands either use a procedure or a subsequent if/else construction testing the command exit code.
params=<param_name_and_value_pairs>
- List of custom client parameters. This option together with the paramseparator one is not used in any of the currently supported protocols and they are reserved for future use and/or for custom extensions. They are intended to support the generic transfer of any login data to third party client plugins. The list may contain any number of parameter name and value pairs separated by comma (',') or a custom separator specified by the paramseparator argument.
For example, to specify two parameters PARAM_A=value_A and PARAM_B=value_B the argument should look like "PARAM_A,value_A,PARAM_B,value_B".
paramseparator=<delimeter>
- Optional separator for the list of parameter names and values specified by the params argument. If it is not specified, it defaults to comma (",").
RETURNS
The command returns 0 (zero) on success or 1 when it fails to connect for an unspecified reason. The command returns a value of 10 when it fails on an unsupported authentication method, such as for example when the UltraVNC server requests MS Logon.
EXAMPLES
Connect rfb://localhost:5901 password=test
Connect localhost:1 password=test
Connect localhost::5901 password=test
All three examples are equal and connect to a VNC server running on display number 1 (port 5901) of the local machine. Password authentication is expected. This is typical for Linux/Unix systems where port 5900 is usually occupied by the X-Windows server and VNC servers usually runs on ports 5901 and higher.
Connect "Local VNC"
- Connect to the "Local VNC" connection registered with the Connect Manager. The server URL and password will be loaded from the connection record.
Connect rfb://mywindows.companyxy.com:5902 password=mypassword force=true onfail="exit 2"
- Connect to an RFB (VNC) server running on a server called mywindows.companyxy.com. If the tool is already connected to this server, terminate the session and reconnect. If the connection fails, terminate execution of the script with an exit code of 2.
Connect file://C:\testdata\images\screen.png
- Load the specified image and display it in place of the desktop.
Connect file://C:\testdata\images\images.jar!/data/screen.png
- Load an image which is zipped as /data/screen.png in the specified JAR file (ZIP is also supported) and display it in place of the desktop.
Connect file://screen.png
- Load the specified image and display it in place of the desktop. As the URL is relative, the image will be loaded from the product installation path.
Connect file://{_SCRIPT_DIR}/screen.png
- Load an image located in the same folder as the script calling this command and display it in place of the desktop.
Connect rfb://mywindows.companyxy.com:5902 password=mypassword force=true onfail="exit 2"
- Connect to an RFB (VNC) server running on a server called mywindows.companyxy.com. If the tool is already connected to this server, terminate the session and reconnect. If the connection fails, terminate execution of the script with an exit code of 2.
Connect adb://default
- Connect to to the first Android device connected to the local PC through the USB cable.
Connect adb://MB104PY14322
- Connect to the Android device of the specified serial number through the USB cable.
Connect java://localhost
- Connect to the local desktop.
Connect apple://192.168.1.2:5901
- Connect to an iOS device using the iOS Mirror connection. The example presumes that the device is connected to the network, it has the specified IP address and it runs a VNC server on the port of 5901.
3.1.3 Disconnect
DESCRIPTION
Disconnect - Disconnect from a desktop server. If there's no connection, the command does nothing. When the connection gets closed, predefined variables _MACHINE and _DISPLAY are cleared.
SYNOPSIS
disconnect
RETURNS
The command returns 0 (zero) on success or 1 when it fails to disconnect.
EXAMPLES
Disconnect
- Disconnect from the currently connected desktop.
3.1.4 Gesture
Gesture - Design and execute a touch screen gesture (since v6.2). It is supported only by mobile device connections such as:
The command supports the following actions:
- "Gesture press" records press of a finger at the specified location to the gesture buffer.
- "Gesture move" records move (drag) of the specified finger to a new location.
- "Gesture release" records the specified finger release.
- "Gesture save" saves the gesture under the given name and clears the gesture buffer.
- "Gesture execute" performs the gesture on the connected device and clears the gesture buffer.
- "Gesture clear" clears the gesture buffer and makes it ready for design of a new gesture. This does not affect saved gestures. As the buffer gets cleared by default by "Gesture execute" and "Gesture save" you normally don't need this command.
A typical gesture scenario:
- Design your gesture using combinations of 'press', 'move' and 'release' actions. Gestures using multiple fingers will always execute them in parallel. For example, a single finger L-shape drag:
Gesture press finger=0 to=x:200,y:200
Gesture move finger=0 to=x:200,y:500
Gesture move finger=0 to=x:350,y:500
Gesture release finger=0 - One time gestures may be executed right away and discarded:
Gesture execute - Should you want to reuse the gesture save it first and then execute it by name at any time:
Gesture save name=L-shape
Gesture execute name=L-shape - Saved gestures may by started from a custom location. The default gesture start point is the 'press' location of the lowest finger ID (typically finger #0 though you may number your fingers in any way within the allowed range). For example, in our example it is [200,200]. To make it start more to the right from [350,200] use:
Gesture execute name=L-shape start=x:350,y:200
Make sure that the moved gesture fits the screen. The command will otherwise trim the gesture to the screen bounds which may change the gesture functionality.
SYNOPSIS
Gesture press finger=<fingerID> to=x:<X-coordinate>,y:<Y-coordinate>
* Red colour indicates obligatory parameters
OPTIONS
finger=<fingerID>
- The finger ID. It is a number starting from 0. The maximum number of supported fingers is subject to the connection and device but it's typically not less than 5.
to=x:<X-coordinate>,y:<Y-coordinate>
- The finger press location.
Gesture move finger=<fingerID> to=x:<X-coordinate>,y:<Y-coordinate>
* Red colour indicates obligatory parameters
OPTIONS
finger=<fingerID>
- The finger ID. It is a number starting from 0. The maximum number of supported fingers is subject to the connection and device but it's typically not less than 5.
to=x:<X-coordinate>,y:<Y-coordinate>
- The location to move (drag) the finger to from the last position.
Gesture release finger=<fingerID>
* Red colour indicates obligatory parameters
OPTIONS
finger=<fingerID>
- The finger ID. It is a number starting from 0. The maximum number of supported fingers is subject to the connection and device but it's typically not less than 5.
Gesture save name=<name> clear=<true|false>
* Red colour indicates obligatory parameters
OPTIONS
name=<name>
- The gesture name. Gesture names are case sensitive. Repeated use of the same name will overwrite the original gesture.
Saved gestures are never cleared by the 'clear' action or parameter. They are available from the moment of their creation until the script terminates. To create a set of standard gestures for your environment create a library (a script) of named gestures and link them to your script using the Include or Run command.
clear=<false|true>
- Indicates whether to clear the gesture buffer and make it ready for design of a new gesture. Clearing discards all 'press', 'move' and 'release' actions recorded so far. It does not affect saved gestures. The default value is 'true' (clear the buffer).
Gesture execute name=<name> start=x:<X-coordinate>,y:<Y-coordinate> duration=<time> clear=<true|false> count=<number> wait=<time>
* Red colour indicates obligatory parameters
OPTIONS
name=<name>
- The gesture to execute. It must be name of an existing gesture that has been created by the script and saved through 'Gesture save'. Gesture names are case sensitive.
If no gesture name is specified the command executes the content of the gesture buffer,
start=x:<X-coordinate>,y:<Y-coordinate>
- Execute the gesture from a custom start point. The default gesture start point is the 'press' location of the lowest finger ID (typically finger #0 though you may number your fingers in any way within the allowed range). This parameter allows you to perform the gesture from another location on the screen.
If the relocated gesture fails to fit the screen the command will trim it to the screen bounds. This may lead to unexpected results.
duration=<time>
- The gesture duration. The value must be either a number of milliseconds or valid time value. The default value is 500 milliseconds (0.5 seconds).
clear=<false|true>
- Indicates whether to clear the gesture buffer and make it ready for design of a new gesture. Clearing discards all 'press', 'move' and 'release' actions recorded so far. It does not affect saved gestures. The default value is 'true' (clear the buffer).
count=<number>
- How many times to perform the gesture. The default value is 1 (perform once).
wait=<time>
- Time to wait after the gesture gets executed. It has the same effect as if the following command was 'Wait <time>'. The value must be either a number of milliseconds or valid time value. The default value is 0 (don't wait). Scripts may set the default value through populating of the _GESTURE_WAIT variable with the desired delay, for example "Var _GESTURE_WAIT=1s".
Gesture clear
* Red colour indicates obligatory parameters
OPTIONS
None.
EXAMPLES
Gesture press finger=0 to=x:125,y:202
Gesture release finger=0
Gesture save name=press
Gesture execute name=press duration=1s
- Perform a 1 second long press at the specified location.
Gesture press finger=0 to=x:300,y:200
Gesture press finger=1 to=x:100,y:500
Gesture move finger=1 to=x:500,y:500
Gesture release finger=1
Gesture release finger=0
Gesture save name=rotate
Gesture execute name=rotate
- Press and hold one finger while dragging another one in the horizontal direction below it. This will for example rotate the Google Maps.
3.1.5 Mobile
The Mobile command is supported since 7.1. It delivers mobile specific features on the Android Over ADB and iOS Over Xcode connections.
The command replaces the legacy Android and iOS extensions (plugins) which were being delivered as separate products. The goal is to provide a common language for automation of mobile devices and to avoid the overhead of the plugin installation. Due to the different nature of the iOS and Android operating systems not all the Mobile command functionality is supported the same way by both connections. For example, downloading and uploading of files is supported only on Android while keyboard map operations are specific to iOS. If you intend to write a single script targeting both platforms please pay attention to the feature compatibility notes in this document.
A complete list of supported operations follows:
| Operation | Description | iOS Over Xcode | Android Over ADB | Legacy iOS/Android Plugins |
|---|---|---|---|---|
| Mobile alert | Alert handling | supported | unsupported | yes/no |
| Mobile app | Get current app ID as well as the device properties | supported | supported | yes/no |
| Mobile find | Operate UI elements | supported | supported | no/no |
| Mobile install | Install app on device | unsupported | supported | no/yes |
| Mobile keyboard | Keyboard operations | partly supported (get, dismiss, load, remap) | partly supported (get, show, dismiss) | partly (load, remap)/no |
| Mobile kill | Kill app on device | supported | supported | yes/yes |
| Mobile orientation | Screen orientation handling | supported | supported | yes/no |
| Mobile pull | Download file from device | unsupported | supported | no/yes |
| Mobile push | Upload file to device | unsupported | supported | no/yes |
| Mobile shell | Execute shell command | unsupported | supported | no/yes |
| Mobile start | Start app on device | supported | supported | yes/yes |
| Mobile uninstall | Uninstall app from device | unsupported | supported | no/yes |
The command delivers enhanced functionality of the legacy plugins plus a new feature called Mobile find. It allows to identify a UI component on the device screen by its attributes (text, type etc.s), retrieve its properties and optionally apply an action to it (click it). It is based on the ability of iOS and Android to retrieve the tree of UI components in form of an XML document. It is fairly similar to how the Browser find command identifies components in a Selenium driven web browser.
- The advantage of Mobile find is reliability. Unlike image search or OCR this method is more accurate and reliable to identify standard UI components on the screen.
- The disadvantages are speed (retrieval of the XML hierarchy is slow) and failure to identify any custom content such as graphical output (games) or mobile web browser content.
The algorithm used to identify components is also exposed to image comparison commands such as Compareto and Waitfor as a method called "mobile".The "passrate" parameter is not used and ignored by this method.The "cmparea" one is also ignored though it may change in a future release.
SYNOPSIS
Mobile alert action=get
- Test out if there's an alert window on the mobile device screen.
Mobile alert action=dismiss [button=<button>] [text=<text_to_type>] [accept=<true|false>]
- Dismiss the alert. If there's no alert do nothing.
OPTIONS
action=<get|dimiss>
- The alert action name. The currently supported values are:
- "get" - Test out if there's an alert displayed on the mobile device. If there's an alert the method populates the _MOBILE_ALERT_TEXT, _MOBILE_ALERT_BUTTON_COUNT and _MOBILE_ALERT_BUTTON[n] variables with the alert text and number of buttons and their labels.
- "dismiss" - Dismiss the alert. You may optionally specify how to close the alert using the button, text and accept parameters.
button=<button>
- Name of the button to dismiss the alert with (optional). You may use one of the button names stored to the _MOBILE_ALERT_BUTTON[n] variables by a previous call of "Mobile alert action=get". If the button is not specified the command will choose one.
text=<text_to_type>
- The text to be typed into the alert's text field before dismissing it (optional). If the alert does not contain a text field the parameter will be ignored.
accept=<true|false>
- If the button is not specified use this parameter to indicate whether you wish to accept or cancel the alert. This is taken into account only if the alert contains two or more buttons, for example "OK" and "Cancel". If the parameter is omitted the command will choose how to close the alert.
RETURNS:
The "get" action returns 0 if there's an alert and 1 if there is none. The "dismiss" action returns 0 on successful alert dismissal or 1 otherwise.
Mobile app
Retrieve the device properties into the following variables:
| Variable Name | Variable Description |
|---|---|
| _MOBILE_ACTIVE_ID | ID of the active (currently displayed) application:
|
| _MOBILE_DEVICE_MANUFACTURER | The device manufacturer such as "Apple", "Google", "Samsung" etc. Supported since 8.0.3. |
| _MOBILE_DEVICE_MODEL | The device model such as "iPhone 16", "Pixel 7" etc. Supported since 8.0.3. |
| _MOBILE_DEVICE_NAME | The device name (the one that the user can customize on the device and appears on BlueTooth). Supported since 8.0.3. |
| _MOBILE_OS_NAME | The device OS name, either "iOS" or "Android". Supported since 8.0.3. |
| _MOBILE_OS_VERSION | The device OS version. Supported since 8.0.3. |
RETURNS:
The command always returns 0.
Mobile find [timeout=<time_interval>] [action=<action>] [number=<element_number>] [continue=<true|false>] [<attributes>]
- Find a UI element on the device screen by the specified attributes and optionally click it. Attributes of the element(s) are stored to variables with the _MOBIlE_FIND prefix. When click is required use the continue parameter to determine whether to crash the script or allow it to continue when the element is not found.
The element search algorithm is also exposed to image comparison commands such as CompareTo and WaitFor. Look for the method called "mobile".
OPTIONS
timeout=<time_value>
- Optional time to keep looking for the element. It must be a valid time value.
- If no timeout is specified the command looks for the element just once.
- If the timeout is specified and is greater than zero the command will keep trying to find the element until the time expires or the element is found.
action=<action>
- Optional action to apply to the resulting element. If the search produces multiple elements you may use the number parameter to select the target element. Supported actions are:
- "click" - Click the element. It applies only to clickable elements such as links, buttons etc.
number=<element_number>
- The ordinal number of the element to target with the action specified by action. The default value is 1 (use the first element). If the number of elements is lower than number then the command throws an error and terminates the script.
continue=<true|false>
- Specifies how to handle the failure. If the element is not found and this parameter is not specified or is false the command terminates the script. If the parameter is true the script is allowed to continue and the command returns a non-zero exit code.
<attributes>
-The list of attributes (search criteria) in the form of name=value pairs such as:
- "xpath=<xpath_expression>" - Perform search by an XPath expression. When this option is used no other attribute may be specified.
- "type=<button|input|text>" - The element type, one of "button" (a standard button of any recognized type), "input" (an editable text component) or "text" (a component displaying a static text).
- "text=<text>" - The exact element text.
- "parttext=<partial_text>" - Find element(s) whose text contains the specified partial text.Besides the above parameters the command accepts any UI hierarchy tree attributes and their values. Such a search will be however iOS or Android specific. For example, to identify a currently focused on Android use focused=true.
RETURNS:
When called without the action parameter the command returns 0 if at least one element is found or 1 otherwise. The number of identified elements is stored to the _MOBILE_FIND_COUNT variable and attributes of individual elements are exposed as numbered variables with the
MOBILE FIND_ prefix.
When the action parameter is present and the action is successfully applied to an element the command returns 0. The failure behavior is subject to the continue parameter:
- If continue is not specified or is false the command throws an error and terminates the script.
- If continue is true the script is allowed to continue executing and the command returns either 1 (no elements found) or 2 (not enough elements found to match the element by number).
Mobile install [file=<app_file>] [reinstall=<true|false>]
* Red colour indicates obligatory parameters
- Install an application from the specified local file on the device. When successful the command populates the _MOBILE_INSTALLED_ID variable with the application ID which may be then used to start, kill or uninstall the app.
OPTIONS
file=<app_file>
- Path to the Android application file (.apk).
reinstall=<true|false>
- The value of true will force reinstallation if the app is already present on the device.
RETURNS:
The command returns 0 on successful completion or throws an error and terminates the script otherwise.
Mobile keyboard action=get
- Populate the _MOBILE_KEYBOARD_VISIBLE variable with true/false to indicate if the soft keyboard is visible. The command returns 0 or terminates the script on a failure to determine the keyboard status (unsupported OS, ...).
Mobile keyboard action=show
- Android only: Make an attempt to display the soft keyboard on the device and indicate the result through the exit code. Note that this functionality often fails because it is subject to whether an editable UI component is currently in focus and other conditions. Make sure to test the return code for the result. The command may throw an error and terminate the script on a failure to determine the keyboard status (unsupported OS, ...).
Mobile keyboard action=dismiss [keys=<semicolon_separated_list>]
- Make an attempt to dismiss the currently showing soft keyboard on the device and indicate the result through the exit code. Note that the keys parameter is required only on iOS and is not required and ignored on Android. The command may throw an error and terminate the script on a failure to determine the keyboard status (unsupported OS, ...).
Mobile keyboard action=load [file=<map_file>]
- iOS only: Load a stored keyboard map. If the file is not available or is in a wrong format the command throws an error and terminates the script.
Mobile keyboard action=remap
- iOS only: Perform immediate remapping of the currently displayed soft keyboard. If the soft keyboard is not displayed or an unexpected error is experienced the command throws an error and terminates the script.
* Red colour indicates obligatory parameters
OPTIONS
action=<get|show|dismiss|load|remap>
- The action name, one of "get", "show", "dismiss", "load" or "remap".
file=<map_file>
- Path to the keyboard map file (.keymap).
keys=<semicolon_separated_keys>
- The list of semicolon separated key names to tap to close the keyboard. This parameter is required only on iOS and is ignored on Android.
RETURNS:
See the individual action descriptions for the returned exit codes and error throwing.
Mobile kill [id=<application_id>] [force=<true|false>] [timeout=<time_interval>] [log=<true|false>]
- Kill the specified application or send it to the background eventually.
OPTIONS
id=<application_id>
- The application ID. On iOS it is the application bundle name, for example "com.apple.mobilesafari" for the Safari browser. On Android it is either the application package alone (the "kill" and "uninstall" actions), such as "com.android.chrome" for Chrome app or the package followed by a slash and the activity (the "start" action), for example "com.android.chrome/com.google.android.apps.chrome.Main". If the application ID is not specified the command kills the application installed recently by a call of "Mobile install" (Android only) or provided by a call of "Mobile app" (the ID is retrieved from the _MOBILE_ACTIVE_ID variable). To kill the currently displayed app use a sequence of "Mobile app" and "Mobile kill" commands. If no application ID can be resolved the command throws an error and terminates the script.
force=<true|false>
- The value of true tells the command to try harder to kill the app. The internal implementation is subject to the target OS and the flag may be even ignored. The default value is true.
timeout=<time_value>
- Optional time to wait for the shell command to finish. It must be a valid time value. It is being used only by Android where app are being killed through a shell command. The parameter is ignored by iOS.
log=<true|false>
- The value of true will log the operation output to the execution log for debugging purposes. The default value is false.
RETURNS:
The command returns 0.
Mobile orientation action=get
- Populate the _MOBILE_SCREEN_ORIENTATION_NAME and _MOBILE_SCREEN_ORIENTATION variables with the current screen orientation name and code. The names are "Portrait" (code 0), "LandscapeLeft" (1) , "UpsideDown" (2) and "LandscapeRight" (3).
Mobile orientation action=set [set=<orientation>]
* Red colour indicates obligatory parameters
- Set the screen orientation and populate the same variables as the "get" action.
OPTIONS
action=<get|set>
- The action name, one of "get" or "set".
set=<orientation>
- The target orientation identified either by the name or its numeric code. Acceptable values are "Portrait" (code 0), "LandscapeLeft" (1) , "UpsideDown" (2) and "LandscapeRight" (3). Android also supports "Auto" (code 4) to reset the screen orientation to the gyroscope indicated one.
RETURNS:
The command returns 0.
Mobile pull [remote=<remote_file>] [local=<local_file>]
* Red colour indicates obligatory parameters
- Android only: Pull (download) a file from the device to the local file system.
OPTIONS
remote=<remote_file>
- The file on the device.
local=<local_file>
- The file in the local file system.
RETURNS:
The command returns 0 on success or throws an error and terminates the script on a failure.
Mobile push [local=<local_file>] [remote=<remote_file>]
* Red colour indicates obligatory parameters
- Android only: Push (upload) a file to the device.
OPTIONS
local=<local_file>
- The file in the local file system.
remote=<remote_file>
- The file on the device.
RETURNS:
The command returns 0 on success or throws an error and terminates the script on a failure.
Mobile shell [command=<command>] [remote=<remote_file>] [timeout=<time_interval>] [log=<true|false>]
* Red colour indicates obligatory parameters
- Android only: Execute a shell command on the device. The command output is then stored to the _MOBILE_OUTPUT variable.
OPTIONS
command=<command>
- The shell command to be executed.
timeout=<time_value>
- Optional time to wait for the shell command to finish. It must be a valid time value.
log=<true|false>
- The value of true will log the operation output to the execution log for debugging purposes. The default value is false.
RETURNS:
The command returns 0 on success or throws an error and terminates the script on a failure.
Mobile start [id=<application_id>] [timeout=<time_interval>] [log=<true|false>]
- Start an application on the device. Unless the timeout is specified the app start command is kicked off but no efforts are made to verify whether the app displays correctly. The command just may indicate through the exit code whether the start process was performed properly and populate the _MOBILE_OUTPUT variable with an error output. To make sure that the app started and displayed on the screen use the timeout parameter.
OPTIONS
id=<application_id>
- The application ID. On iOS it is the application bundle name, for example "com.apple.mobilesafari" for the Safari browser. On Android it is must be the package followed by a slash and the activity, for example "com.android.chrome/com.google.android.apps.chrome.Main". If the application ID is not specified on Android the command starts the application installed recently by a call of "Mobile install" (the ID is retrieved from the _MOBILE_INSTALLED_ID variable). If no application ID can be resolved the command throws an error and terminates the script.
timeout=<time_value>
- Optional time to wait for the shell command to finish. It must be a valid time value.
log=<true|false>
- The value of true will log the operation output to the execution log for debugging purposes. The default value is false.
RETURNS:
If the timeout parameter is not specified or is set to 0 the command just kicks off the application and returns 0. The command may return 1 or another code for known error states, for example when the app is not installed.
When a timeout is set the command verifies that the app is started and displaying on the screen by testing the active app against the argument id within the specified time period. If the app fails to show it throws an error and terminates the script.
Mobile uninstall [id=<application_id>]
- Android only: Uninstall an application from the device. If the operation fails it populates the _MOBILE_OUTPUT variable with the reason.
OPTIONS
id=<application_id>
- The application ID. It is either the Android application package alone such as "com.android.chrome" for Chrome app or the package followed by a slash and the activity (the "start" action), for example "com.android.chrome/com.google.android.apps.chrome.Main". If the application ID is not specified the command uninstalls the application installed recently by a call of "Mobile install" (the ID is retrieved from the _MOBILE_INSTALLED_ID variable). To uninstall the currently displayed app use a sequence of "Mobile app" and "Mobile uninstall id="{_MOBILE_ACTIVE_ID}" commands. If no application ID can be resolved the command throws an error and terminates the script.
RETURNS:
The command returns 0 on success or 1 on failure. It throws an error and terminate the script if the app ID can not be resolved or in case of an unexpected I/O error.
3.1.6 Mouse
DESCRIPTION
Mouse - Perform a mouse event. This command can automate a wide range of mouse actions such as a mouse pointer movement, mouse click, press, release, drag and mouse wheel events. The command also supports custom drags composed of a sequence of mouse press, mouse move and mouse release events (since 2.0.2). Should you see any composed events (clicks, drags) fail, please see the Mouse command preferences for calibration parameters.
The current mouse pointer coordinates are available in the script through the _MOUSE_X and _MOUSE_Y dynamic variables (since version 2.1).
SYNOPSIS
mouse [<modifier_1>+...+<modifier_N>+]<event_id> [btn=<button_name>] [modifiers=<modifier_1>+...+<modifier_N>] [to=[x:<x>][,y:<y>]] [from=[x:<x>][,y:<y>]] [center=[x:<x>][,y:<y>]] [start=<number>] [end=<number] [count=<number>] [wait=<time>]
* Red colour indicates obligatory parameters
OPTIONS
modifier
- Any combination of modifiers Shift, Alt and Ctrl separated by the plus '+' sign, e.g. 'Ctrl+Alt+Shift'.
event_id
- Supported events are:
- "move", a mouse pointer move from the optional destination to the target point,
- "click", one or more clicks at the target point using the specified mouse button,
- "press", a mouse button press (without release),
- "release", a mouse button release (logically requires a preceding press event),
- "drag", mouse drag from the optional destination to the target point using the specified mouse button,
- "swipe", a mouse drag with adjusted timing for devices with a touch display (such as Android or iOS devices),
- "wheelup", one or more mouse wheel rotation steps upwards (wheel rotating away from user),
- "wheeldown", one or more mouse wheel rotation steps downwards (wheel rotating towards user),
- "pinch", one or more pinch events where two fingers move towards a shared center point on a touch screen (also known as "pinch close"). This event is supported just on certain environments, for example on Apple iOS devices running the T-Plan Server connected over the iOS Mirror connection type,
- "zoom", one or more zoom events where two fingers move away from a shared centre point on a touch screen (also known as "pinch open"). This event is supported just on certain environments, for example on Apple iOS devices running the T-Plan Server connected over the iOS Mirror connection type.
btn
- This parameter is used to identify the mouse button to click, press, release or drag with. Allowed values are "left", "middle" and "right".
modifiers
- This parameter provides an alternative way of specifying the mouse event modifiers (the other way is to place modifiers before the event ID). The value may be any combination of Shift, Alt and Ctrl separated by the plus '+' sign, e.g. "Ctrl+Alt+Shift". If modifiers are specified with the event ID as well, this parameter prevails.
to=[x:<x>][,y:<y>]
- The target coordinates.
- If the event is "move" they define where to move the mouse pointer (target point).
- If the event is "click", "press", "release", "wheelup" or "wheeldown" the mouse pointer will be first moved to this location and then the associated action is performed.
- If the action is "drag" or "swipe" the mouse pointer will be dragged from its actual position (or from the position specified by the from option) to this target location.
The coordinates have the format of 'x:<x>,y:<y>', where each coordinate can be specified in pixels (e.g. 'x:225') or as a percentage (e.g. 'x:23%'). If x or y is omitted, the current mouse pointer location will be used to determine the missing coordinate.
from=[x:<x>][,y:<y>]
- Start coordinates.
- If the action is "
drag"or "swipe"the mouse pointer will be dragged from this position to the coordinates specified by the to option. - If the event is
"click","press","release","wheelup"or"wheeldown", this parameter will be ignored.
The coordinates have the format of 'x:<x>,y:<y>', where each coordinate can be specified in pixels (e.g. 'x:225') or relatively as a percentage (e.g. 'x:23.5%'). Relative coordinates are rounded if they are not an integer. If x or y is omitted, the current mouse pointer location will be used to determine the missing coordinate.
center=[x:<x>][,y:<y>]
- The pinch/zoom center point (optional). It is used only for the "pinch" and "zoom" actions. If the parameter is omitted the action will default to the screen centre.
The coordinates have the format of 'x:<x>,y:<y>', where each coordinate can be specified in pixels (e.g. 'x:225') or relatively as a percentage (e.g. 'x:23.5%'). Relative coordinates are rounded if they are not an integer. If x or y is omitted, the current mouse pointer location will be used to determine the missing coordinate.
start=<number> end=<number>
- The pinch/zoom start and end distances. It is used only for the "pinch" and "zoom" actions. The parameters must be always specified together. If they are omitted the action will calculate default values based on the center point position and the current screen size.
The distances specify how many pixels the fingers are apart at the beginning ("start") and the end ("end") of the gesture.
When the event is "pinch" the start distance must be naturally greater than the end one, because the fingers move closer to each other.
The "zoom" event requires the opposite setting. The distances must be specified in a way that the fingers don't get too close to each other (30 pixels at a minimum) or closer than 10 pixels to the screen borders.
count=<number>
- How many times the mouse event should be performed. The default value is 1. This value makes sense only with the click, wheel, pinch and zoom events and it is ignored by other event types.
wait=<time>
- Time to wait after the events are sent. It has the same effect as if the following command was 'Wait <time>'. The value must be either a number of milliseconds or valid time value. The default value is 0 (don't wait). Scripts may set the default value through populating of the _MOUSE_WAIT variable with the desired delay, for example "Var _MOUSE_WAIT=1s".
RETURNS
The command returns 0 (zero) on success or 1 when it fails, for example for an I/O error.
EXAMPLESMouse click count=2
- Perform a mouse double click at the current mouse pointer coordinates.
Mouse move to=x:25,y:122
- Move the mouse pointer to the given coordinates
Mouse move to=x:{_MOUSE_X}+50
- Move the mouse pointer 50 pixels to the right from its current position.
Mouse drag from=x:10%,y:450 to=x:22.5%,y:450 wait=2s
- Drag the mouse pointer from the given start position to the destination position and wait for two seconds. The x coordinate is given in the relative form. If your display resolution is e.g. 800x600 pixels, the 'x:10%' will be equal to 'x:60' and 'x:22.5%' will be 'x:135'.
Mouse swipe from=x:161,y:124 to=x:161,y:226
- Swipe the touch screen from the start position to the destination one.
Compareto "icon.png" method=search onfail="Exit 1"
Mouse move to=x:{_SEARCH_X}+10,y:{_SEARCH_Y}+10
Mouse press
Mouse move to=x:{_SEARCH_X}+110 wait=500
Mouse release
- Example of a "composed drag" applied to an object located through image comparison. The script first searches the desktop for an object represented by the icon.png template. If it is found, the mouse pointer is moved to the area (plus ten pixels in each direction) and the object is dragged 100 pixels to the right using a sequence of press, move and release events.
Mouse pinch
- Pinch the screen. If the current connection supports pinch it will zoom out the current application.
Mouse zoom center=x:220,y:450 start=125 end=180
- Zoom in the screen. If the current connection supports pinch it will zoom in the current application. The command uses a custom center point and start and end distances.
3.1.7 Paste
Paste - Paste (insert) text using the system clipboard. Instead of typing the text character by character on the keyboard the command copies it into the clipboard and simulates pressing of Ctrl+V (Command+V on Mac OS X) to trigger the system Paste action. This is much faster than typing the text through Type/Typeline.
The command targets connections which support clipboard operations, such as the Local Desktop one. For other connections, the command silently falls back to the Type command functionality.
SYNOPSIS
paste <text> [wait=<time>] [count=<number>]
* Red colour indicates obligatory parameters
OPTIONS
text
- The text to paste. If the text contains spaces or equal signs '=', it must be enclosed in double-quotes, e.g. "This is a text containing spaces". If you need to include the double-quote character into your text, place a leading backslash before it, e.g. "This is double-quote - \"". If you need to display a backslash followed by a double quote, use '\\"', e.g. "This is a backslash followed by a double quote - \\"".
Supported text characters are subject to limitations applied by the desktop client (protocol). For example, the RFB (VNC) protocol cannot transfer characters outside of the Latin-1 (ISO 8859-1) character set. On the contrary, the native Java client can transfer only characters which can be generated on the local keyboard regardless of the character set they belong to. Read the particular client documentation for more information.
wait=<time>
- Time to wait after the text gets pasted. It has the same effect as if the following command was 'Wait <time>'. The value must be either a number of milliseconds or valid time value.
count=<number>
- How many times the command should be repeated. The default value is 1 (paste just once).
RETURNS
The command returns 0 (zero) on success or 1 when it fails, for example for an I/O error.
EXAMPLES
Paste "hello world!"
-Paste 'hello world!'.
3.1.8 Press
DESCRIPTION
Press - Send a key to the desktop. It is analogical to pressing a key on the keyboard.
SYNOPSIS
press [<modifier_1>+...+<modifier_N>+]<key | modifier> [location=<standard|numpad|left|right>] [release=<true|false>] [count=<number>] [wait=<time>]
* Red colour indicates obligatory parameters
OPTIONS
key
- Name of the keyboard key to press. Most key names correspond to what is written on the keyboard, e.g. 'A', 'Insert', 'Tab' etc. The key may also consist of modifiers only. Keys are not case sensitive and may be specified in any character case.
Key names are internally derived from the VK_ key code constants declared in the java.awt.event.KeyEvent class where the identifier itself is the string after the VK_ prefix. For example, as there is a VK_ENTER constant, the key name may be "ENTER", "Enter" or "enter". As the names are in fact extracted from the KeyEvent class at runtime using Java Reflection API, the range of supported keys may differ depending on the version of Java used to execute T-Plan Robot. A complete map of the supported key names may be obtained through the Supported Keys Window.
The key may be optionally preceded by any combination of the Shift, Alt and Ctrl modifiers separated by the plus '+' sign, for example, "Ctrl+Alt+Delete". Modifier names are not case sensitive.
Be aware that the names map rather to particular physical keys and not to the characters they represent. For example, the pressing of the standard '-' minus key generates a different internal keycode than the one on numpad. These two cases may be also represented by two Press commands, "Press -" (standard) and "Press SUBTRACT location=numpad" (numpad). In most cases, the target system interprets them in the same way but there may be situations when it fails. For example, control plus ("Press Ctrl++") is generated as a sequence of \[press Ctrl, press '+', release '+', release Ctrl\]. As such a key combination is impossible to create on a US keyboard where one needs to press Shift as well to get the standard '+' ASCII character (0x2b), this sequence may or may not be interpreted correctly by the desktop. If the key is not recognized try using the numpad one instead ("Press Ctrl+ADD location=numpad"). To get the key name for your particular Numpad key open the Supported Keys Window and press it while the focus is on the "Press a key.." text field. It is recommended to specify the location=numpad parameter though it may also work without it.
The command accepts besides key names also most plain ASCII characters since 2.0.3. It is possible to use commands like "Press * " or "Press @". In addition, it supports the mapping of these characters onto the numeric keyboard through the localion="numpad" parameter. For example, pressing of the "0" key on the numeric keypad required to call "Press NUMPAD0" while the new version also supports more intuitive "Press 0 location=numpad". This also applies to other numpad keys such as ADD (mapped to plus, '+'), SUBTRACT (minus, '-'), MULTIPLY (asterisk, '*' ), DIVIDE (slash, '/'), DECIMAL (period, '.') and SEPARATOR (comma ',' ).
Transferable keys and key combinations are further on subject to limitations applied by the desktop client (protocol). For example, the RFB (VNC) protocol cannot transfer characters outside of the Latin-1 (ISO 8859-1) character set and support of Windows native keys such as Win and ContextMenu is supported just by some products. On the contrary, the native Java client can transfer only characters which can be generated on the local keyboard regardless of the character set they belong to. Read the Release Notes and particular client documentation for more information.
location=<standard|numpad|left|right>
- Key location. This option makes sense only with keys which are present on a typical keyboard more than once. Examples of such keys are the digit keys '0'-'9' (standard location and num pad) or modifier keys (Ctrl and Alt on the keyboard left and right). Supported location values are standard (default), numpad, left and right. Note that the command doesn't verify whether the \[key,location\] pair makes sense. For example, alphabet characters are present on most keyboards just once and the only logically valid location is the default standard one. Most clients, however, use the location only as a hint and ignore it by keys where it is not applicable.
release=<true|false>
- Supported since 2.3.4. When this parameter is present the command performs just a keypress (release=false) or a key release (release=true) instead of the full pres-release sequence. This allows to automate long keypresses and/or composed press and mouse events. If you use this parameter to simulate a press make sure that you release the key properly when it is not needed any more.
count=<number>
- How many times the key should be sent. The default value is 1. Delays among multiple press actions are defined by a value in the Press Command user preferences.
wait=<time>
- Time to wait after the events are sent. This parameter is useful if the server needs some time to react on the pressed key/keys. It has the same effect as if the following command was 'Wait <time>'. The value must be either a number of milliseconds or valid time value. The default value is 0 (don't wait). Scripts may set the default value through populating of the _PRESS_WAIT variable with the desired delay, for example "Var _PRESS_WAIT=1s".
RETURNS
The command returns 0 (zero) on success or 1 when it fails.
EXAMPLESPress Ctrl+Alt+Del
- Press the Ctrl+Alt+Del key on the desktop.
Press Tab count=5 wait=2s
- Simulate pressing of the Tab key five times and then wait for two seconds before proceeding to the next command.
Press Ctrl location=right
- Press the right Ctrl key.
Var KEY_TO_PRESS=Alt+F4
<...>
Waitfor update area=x:340,y:220,w:240,h:160 extent=80% timeout=10s ontimeout="Var KEY_TO_PRESS=Right"
Press {KEY_TO_PRESS} wait=2s
- This example illustrates how to solve unwanted popup windows. If a window pops up at the given coordinates, the 'Press {KEY_TO_PRESS}' command ensures that it gets closed using Alt+F4. If the window doesn't show up, the Alt key gets pressed which usually doesn't cause any harm to the window.
3.1.9 Type, Typeline
DESCRIPTION
Type, Typeline - Type text on the desktop. The Typeline command is just a convenient one which types the text and then presses Enter. This has the same effect as a combination of 'Type <text>' and 'Press Enter'.
SYNOPSIS
type <text> [wait=<time>] [count=<number>]
typeline <text> [wait=<time>] [count=<number>]
* Red colour indicates obligatory parameters
OPTIONS
text
- The text to type. If the text contains spaces or equal signs '=', it must be enclosed in double-quotes, e.g. "This is a text containing spaces". If you need to include the double-quote character into your text, place a leading backslash before it, e.g. "This is double-quote - \"". If you need to display a backslash followed by a double quote, use '\\"', e.g. "This is a backslash followed by a double quote - \\"".
Supported text characters are subject to limitations applied by the desktop client (protocol). For example, the RFB (VNC) protocol cannot transfer characters outside of the Latin-1 (ISO 8859-1) character set. On the contrary, the native Java client can transfer only characters which can be generated on the local keyboard regardless of the character set they belong to. Read the particular client documentation for more information.
wait=<time>
- Time to wait after the text gets typed. This parameter is useful if the server needs some time to react on the pressed key/keys. It has the same effect as if the following command was 'Wait <time>'. The value must be either a number of milliseconds or valid time value. The default value is 0 (don't wait). Scripts may set the default value through populating of the _TYPE_WAIT or _TYPELINE_WAIT variable with the desired delay, for example "Var _TYPE_WAIT=1s".
location=<standard|numpad|left|right>
- Key location. When specified the command makes an attempt to map the typed characters onto the specified keyboard location. Though supported location values are standard (default), numpad, left and right, this option makes sense only with the numeric pad which is the only keyboard part containing characters accepted by the command.
Support of this parameter is intended to make testing of mobile devices easier. Numeric keys on mobile devices (especially mobile phones) are often mapped to numpad keys and it is inconvenient to handle each keypress through the Press command. For example, to type and call a phone number +0123456789 on the mobile one can simply use "Typeline +0123456789 location=numpad".
count=<number>
- How many times the command should be repeated. The default value is 1 (type the text/type the line just once).
RETURNS
The command returns 0 (zero) on success or 1 when it fails, for example for an I/O error.
EXAMPLES
Type hello
- Type 'hello'.
Typeline "mkdir /tmp/mydir" wait=2s
- If you run this in an active Linux/Unix terminal window, it will invoke the 'mkdir /tmp/mydir' OS command and wait for two seconds before proceeding to the next command.
Type "100*4" location=numpad
- Type the formula on the numeric keyboard.
Typeline "+111222333444" location=numpad
- Type the formula on the numeric keyboard and press Enter. When the system under test is a mobile device with keyboard mapped onto the num pad such as a Nokia phone with Symbian OS, it will place a call to the specified number.
3.2 Administrative & Execution Control Commands
3.2.1 Alert
DESCRIPTION
Alert - Pop up an alert window on the local machine. The window can be customized to contain custom buttons and/or editable fields. It can also self-dispose after the specified time out.
The command populates these variables:
| Variable Name | Description |
|---|---|
| _ALERT_BUTTON | Name of the button that the user selected to close the window |
| _ALERT_FIELD_<n> | Value of the n-th editable text field |
| _ALERT_FIELD_COUNT | Number of editable fields |
SYNOPSIS
Alert <text> [title=<text>] [buttons=<list>] [fields=<list>] [values=<list>] [timeout=<time_value>] [location=x:<x_coord>,y:<y_coord>] [size=w:<width>,h:<height>]
* Red colour indicates obligatory parameters
OPTIONS
<text>
- The text to display. If it starts with the <html> prefix it will be treated as HTML code.
title=<text>
- The window title (optional).
buttons=<list>
- The button label or a semicolon separated list of button names (optional). Name of the selected button is returned in the _ALERT_BUTTON variable. If the parameter is not specified the window will contain a single "OK" button.
fields=<list>
- A semicolon separated list of text field names (optional). This allows to design a query requiring the user to enter a value or a set of values.
values=<list>
- A semicolon separated list of values for the text fields specified in "fields" (optional). It should have the same length.
timeout=<time_value>
- The window disposal timeout (optional). It must be a time value. If not specified the window will keep displaying until closed by the user.
location=x:<x_coord>,y:<y_coord>
-Target location on the screen (optional), for example "x:100,y:100". Starting with 7.0.4 the X and/or Y coordinates may be also specified as percentages of the current screen size, for example "x:40%,y:35%". If the location is not specified the window gets centered on the screen.
size=w:<width>,h:<height>
- The window size (optional), for example "w:300,h:350". Starting with 7.0.4 the width and/or height may be also specified as percentages of the current screen size, for example "w:30%,y:10%". If the size is not specified the window will be sized to fit the content.
RETURNS
The command returns number of the selected button where the first button is 1.
EXAMPLES
Alert "<html><body><center><h1>Login</h1></center>Please enter your credentials:</body></html>" buttons="OK;Cancel" fields="User name;Password"
if ("{_ALERT_BUTTON}" == "OK") {
Var user="{_ALERT_FIELD_1}"
Var password="{_ALERT_FIELD_2}"
// Login code here
}
- Example of a login window. The alert will look like:
3.2.2 Break
DESCRIPTION
Break - immediately terminate the innermost for loop and proceed to the first command after the loop's enclosing right curly brace '}'. If the command is used outside of a for loop it reports a syntax error.
To skip the current loop without breaking the for command use the continue command.
SYNOPSIS
break
RETURNS
The command doesn't modify the exit code and leaves its value on the one returned by the previously executed command.
EXAMPLES
# Infinite loop
for (; 0 == 0; ) {

    # Wait for at least 20% update of the remote screen.
    # If it doesn't update for 10 seconds, break the loop.
    Waitfor update extent=20% timeout="10s" ontimeout="break"
}
- Use a combination of for, Waitfor and break to hold on execution until the remote desktop stops to update.
3.2.3 Click
DESCRIPTION
Click is a combination of Waitfor match and Mouse click commands. It searches the desktop for a component image, a solid colour object or a text and clicks it. If the object is not found it exits the script.
SYNOPSIS
Click <comparison_method> [timeout=<time>] [cmparea=<[x:<x>][,y:<y>][,w:<width>][,h:<height>]>] [number=<component_number>] [btn=<button>] [modifiers=<modifiers>] [count=<number>] [wait=<time>] [<method specific options>]
* Red colour indicates obligatory parameters
comparison_method
- Supported methods are:
- 'image' - search for a component by the image or an image collection using the search2 method,
- 'object' - search for a component by its colour using the object method,
- 'ocr' - recognize text on the screen using OCR (the tocr method) and find the specified string or pattern.
COMMON OPTIONS
timeout=<time>
- Timeout specifying how long to wait for the component to appear on the screen at a maximum. The value must be either a number of milliseconds or valid time value. The default value is 30 seconds.
cmparea=[x:<x>][,y:<y>][,w:<width>][,h:<height>]
- The rectangular area of the desktop to limit the comparison to. If you omit this parameter the whole remote desktop will be processed. The area coordinates have the format of 'x:<x>,y:<y>,w:<width>,h:<height>', where each coordinate can be specified in pixels (for example. "x:225") or as a percentage ("x:23%"). If any of x, y, width or height are omitted, T-Plan Robot will use the full-screen values to determine the missing parameters (x:0, y:0, w:<screen_width>, h:<screen_height>).
number=<component_number>
- The number of the component on the screen to apply the click to. Components (objects) located on the screen are sorted in the reading order, from the top to the bottom and from the left to the right. The default value is 1 (click the first located component). If the number of components found on the screen is lower than the specified number the command exits the script.
move=[x:<x>][,y:<y>]
- Specifies the click location relatively from the centre of the target object (since 4.2). This allows clicking a nearby location instead of the object itself. If the comparison method is an image the parameter overrides the image click point and uses the image centre as the base point. For example, the command of "Click image template=button.png move=x:-40" will click 40 pixels to the left from the button centre.
btn=<button>
- The mouse button to click. Allowed values are "left", "middle" and "right".
modifiers=<modifiers>
- The mouse event modifiers (optional). The value may be any combination of Shift, Alt and Ctrl separated by the plus '+' sign, e.g. "Ctrl+Alt+Shift".
count=<number>
- How many times to click. The default value is 1.
continue=<number>
- The value of true will not terminate the script if the object is not found (since 4.2). The default value is false (terminate on failure). Since release 4.4.2 the command also observes the value of the _CLICK_CONNECT variable and uses it as the default value. For example, to make all Click commands in a script not terminate the script by default set the variable at the beginning to true ("Var _CLICK_CONTINUE=true").
step=<step_name>
- Simple integration with the Step command (since 4.2). When specified it creates a test step of the given name with the result of pass (object found and clicked) or fail (object not found).
wait=<time>
- Time to wait after the click. It has the same effect as if the following command was 'Wait <time_in_ms>'. The value must be either a number of milliseconds or valid time value. The default value is 0 (don't wait). Scripts may set the default value through populating of the _CLICK_WAIT variable with the desired delay, for example "Var _CLICK_WAIT=1s".
Click image template=<image_collection> [passrate=<pass_rate_in_%>] [<search2_specific_params>] [<common options>]
* Red colour indicates obligatory parameters
SPECIFIC OPTIONS - IMAGE
template=<image_collection>
- An image collection - one or more image file names or folders with images separated by a semicolon (';') to be compared to the remote desktop image. On Linux/Unix make sure the file name doesn't contain semicolon because the list would be incorrectly parsed. File names can be either relative (e.g. img.png) or absolute (e.g. /root/report/img.png). If you use a relative path, the image will be searched in the directory defined by the _TEMPLATE_DIR variable. Supported image formats are subject to the Java version. Java 1.6 supports at least PNG, JPG, GIF and BMP.
Template images will be compared with the remote desktop image in the specified list order. If a template comparison produces a positive result (either match or mismatch depending on the specified event), the condition is considered to be met and the command finishes with an exit code of 0 and skips any remaining templates in the list. Predefined variable _COMPARETO_TEMPLATE_INDEX may be then used to determine the index of the matching template image. See image comparison specific variables for a complete list of supported variables.
passrate=<pass_rate_in%>_
- The pass rate for image comparison. It must be a number between 0 and 100 which may optionally be followed by the percentage character (for example "passrate=95" or "passrate=95%"). If this parameter is omitted, the default search2 pass rate of 50% will be used.
search2_specific_params
- Any parameters supported by the search2 comparison method (optional).
Click object [<object_specific_options>] [<common options>]
SPECIFIC OPTIONS - OBJECT
object_specific_params
- Any parameters supported by the object comparison method (optional). It is typically necessary to specify at least the object colour.
Click ocr [<tocr_specific_options>] [<common options>]
SPECIFIC OPTIONS - OCR
tocr_specific_options
- Any parameters supported by the tocr comparison method. It is necessary to specify the target text to apply the click to either through the text or pattern options.
RETURNS
The command always returns 0 on success or exits the script on failure returning the error code from the specified comparison method.
EXAMPLES
Click image template="google_button.png" number="2"
- Click the second button specified by the google_button.png image on the screen. If the button is not found or the number of buttons on the screen is lower than two the command will fail the script.
Click object tolerance="10" color="255;0;0" max="w:20"
- Click an object which is red and its width is not greater than 20 pixels. Tolerance ensures that the method will find more shades of red.
Click ocr text="Cancel" distance="1"
- Read the text on the screen using OCR and click the word "Cancel". The distance ensures that the word will be found even if the OCR engine omits or fails to recognize a single character, for example, "Cancel" etc.
3.2.4 Compareto
Compareto - The Compareto command is intended to perform a one-time comparison of the current remote desktop image and a single image or an image collection using the specified image comparison method. An optional action may be executed based on the result either in the "onfail" and "onpass" parameters or through testing of the command exit code using an if/else structure. T-Plan Robot Enterprise 4.4.2Beta contains six image comparison methods which are in details described in the Image Comparison Capabilities chapter:
- Image Search v2 ("search2", since v3.0) is the successor of the "search" method and performs a tolerant search of the desktop screen for the object represented by the template image(s).
- Image search ("search", since v2.0) performs a tolerant search of the desktop screen for the object represented by the template image(s).
- Object search ("object", since v2.2) searches objects on the screen by a single RGB colour or a range of similar colours.
- Text OCR ("tocr", since 2.2) performs optical character recognition (OCR) on the desktop image using the OCR engine of choice.
- Image-Based Text Recognition ("text", since 3.0) extracts text from the screen using a collection of pre-saved character images.
- Histogram based comparison (code "default", since v2.0) is the legacy algorithm comparing histograms of the desktop image and the specified template image(s).
Besides the method-specific variables the command populates a set of COMPARETO prefixed variables as follows:
Variable Name | Description |
|---|---|
_COMPARETO_TEMPLATE=<file> | Image file (absolute path) used for last image comparison. |
_COMPARETO_RESULT=<number> | Comparison result percentage. It is always a number between 0and 100. If the method used for comparison supports the output result it indicates how much the images matched. |
_COMPARETO_PASS_RATE=<number> | Pass rate percentage used for the last image comparison. It is always a number between 0 and 100. |
_COMPARETO_TIME_IN_MS=<milliseconds> | Time in milliseconds spent by the image comparison. If there's a list of templates, the value represents a summary time of all performed comparisons. |
_COMPARETO_TEMPLATE_INDEX=<number> | Index of the template in the template list which produced the pass result. Indexing starts from zero. |
_COMPARETO_TEMPLATE_WIDTH=<number> | On successful comparison, the variables contain dimensions of the matching template image. Supported since 2.0.2. |
_COMPARETO_SOURCE_X=<number> | Source coordinates of the last compared template. These variables are populated only for templates created with version 2.2 and higher. |
_COMPARETO_CLICK_X=<number> | Click point of the last compared template image. The coordinates by default point to the centre of the component located through the "search" image comparison algorithm or to the custom relative location. |
The command further supports one input variable which if defined controls the order of processing of the images loaded from image collections:
Variable Name | Description |
|---|---|
_COMPARETO_SORT_MODE=<number> | Desired sort mode to be applied to template images loaded from directories. |
To make image comparison more reliable consider the factors listed in the Image Comparison Recommendations chapter. For information on how to set up a central point of failure for image comparisons see the ComparisonFailureFallback fallback procedure.
To display comparison result in the HTML report generated by the Report command use Screenshot. If you want to wait until the screen matches your template image, use 'Waitfor match'. Both Screenshot and 'Waitfor match' commands use the methods of the Compareto command internally and support the same parameters.
SYNOPSIS
compareto <image_collection> [passrate=<pass_rate_in_%>] [onpass=<command>] [onfail=<command>] [method=<comparison_method>] [methodparams=<custom_params>] [cmparea=[x:<x>][,y:<y>][,w:<width>][,h:<height>]] [<method_specific_params>]
* Red colour indicates obligatory parameters
OPTIONS
image_collection
- An image collection - one or more image file names or folders with images separated by a semicolon (';') to be compared to the remote desktop image. On Linux/Unix make sure the file name doesn't contain semicolon because the list would be incorrectly parsed. File names can be either relative (e.g. img.png) or absolute (e.g. /root/report/img.png). If you use a relative path, the image will be searched in the directory defined by the _TEMPLATE_DIR variable. Supported image formats are subject to the Java version. Java 1.6 supports at least PNG, JPG, GIF and BMP.
Template images will be compared with the remote desktop image in the specified list order. If a template comparison produces a positive result (either match or mismatch depending on the specified event), the condition is considered to be met and the command finishes with an exit code of 0 and skips any remaining templates in the list. Predefined variable _COMPARETO_TEMPLATE_INDEX may be then used to determine the index of the matching template image. See image comparison specific variables for a complete list of supported variables.
passrate=<pass_rate_in_%>
- The pass rate for image comparison. It must be a number between 0 and 100 which may optionally be followed by the percentage character (for example "passrate=95" or "passrate=95%"). If this parameter is omitted, the default pass rate defined by the method or in the Robot preferences will be used (default values are 95% for the "default" and 100% for the "search" and "search2" methods).
onpass=<command>
- A command to be executed when the comparison succeeds (the selected method reports success). It must be a single command. To call a sequence of commands to use either a procedure or a subsequent if/else construction testing the command exit code.
onfail=<command>
- A command to be executed when the comparison fails (the selected method reports failure). It must be one single command. If you need to define a sequence of command to be executed, use a procedure.
method=<comparison_method>
- The method (algorithm) to be used for image comparison. It must be one of the supported method names (codes) described in the Image Comparison Capabilities chapter or the name of a third party method enabled through the plugin interface. If omitted the command will use the default one.
methodparams=<custom_params>
- Custom parameters to be passed to the image comparison algorithm. As the T-Plan Robot 2.0 default image comparison algorithms don't support any custom parameters, you don't need to specify this parameter unless you write your own algorithm.
cmparea=[x:<x>][,y:<y>][,w:<width>][,h:<height>]
- The rectangular area of the desktop to limit the comparison to. If you omit this parameter the whole remote desktop will be processed. The area coordinates have format of 'x:,y:,w:,h:', where each coordinate can be specified in pixels (for example. "x:225") or as a percentage ("x:23%"). If any of x, y, width or height are omitted, T-Plan Robot will use the full-screen values to determine the missing parameters (x:0, y:0, w:, h:).
method_specific_params
- See the documentation of individual comparison methods for the list of supported method-specific parameters.
RETURNS
The command returns 0 (zero) when the comparison passes, 1 when it fails and 2 when the template image is not found or cannot be read.
EXAMPLES
Compareto netscape.png passrate=95% onfail="exit 1"
- Compare the image of the current remote desktop to image netscape.png using the "default" image comparison method. If there is not at least 95% match, terminate the script execution using the Exit command and return exit code 1.
Compareto button1.png;button2.png method=search
if ({_EXIT_CODE} == 0) {
  Mouse click to="x:{_SEARCH_X}+5,y:{_SEARCH_Y}+5"
}
- Search the remote desktop image for a button matching either button1.png or button2.png. If it is found, click on it. The command adds 5 pixels to the x and y coordinates to make sure you click in the middle of the button.
Compareto "search.png" method="search"
for (i=1; {i}<{_SEARCH_MATCH_COUNT}+1; i={i}+1) {
  # Nested variables compose the variable names of a suffix and an index
  Mouse click to=x:{_SEARCH_X_{i}},y:{_SEARCH_Y_{i}}
}
- Search the remote desktop image for an icon represented by the template image search.png and click onto each of the occurrences.
Var _TOCR_LINE_COUNT=0
Compareto method="tocr" cmparea="x:33,y:2,w:200,h:22"
for (i=1; {i}<{_TOCR_LINE_COUNT}+1; i={i}+1) {
Typeline "{_TOCR_LINE{i}}"
}
- Extracts text from the specified desktop area using OCR and types it onto the desktop.
Compareto method="tocr" cmparea="x:33,y:2,w:200,h:22" pattern="[aA]pplication.*"
if ({_EXIT_CODE} > 0) {
  Exit 1
}
- Use regular expression to exit the script when the text recognized through Tesseract OCR doesn't start either with the 'Application' or 'application' word.
Compareto method="object" color="FF0000" draw="true"
- Find all solid colour red objects (RGB = (256, 0, 0)) on the screen and highlight them in the GUI.
Compareto circle.png method="object" color="00FF00" tolerance="100" passrate="80%" draw="true" rotations="30"
- Find all green-like objects which are at least 80% similar to the one in the circle.png image and highlight them in the GUI. The tolerance parameter defines the size of the palette of acceptable green colours. As the rotations parameter is set to 30, the algorithm will search the screen for objects rotated in 12-degree steps (360 degrees / 30).
3.2.5 Continue
DESCRIPTION
Continue - skip the current innermost for loop iteration. If the command is used outside of a for loop it reports a syntax error. Supported since 4.1.3.
To break (exit) the whole for loop use the break command.
SYNOPSIS
continue
RETURNS
The command doesn't modify the exit code and leaves its value on the one returned by the previously executed command.
EXAMPLES
# Increment X for each even loop (the resulting SUM will be 5)Var SUM=0
for (i=0; i<10; i={i}+1) { if ({i} % 2 == 1) {
continue
}
Eval SUM={SUM}+1
}
3.2.6 Date
DESCRIPTION
Date - Read, write and calculate dates. The command allows to take the current date or parse the input one, perform an optional time increase/decrease operation and save the result in the specified format to the _DATE variable or to the specified custom one.
The command populates these variables:
| Variable Name | Description |
|---|---|
| _DATE | The output date formatted by the specified format. |
| _DATE_MS | The output date in milliseconds elapsed since 1 Jan 1970 UTC. |
SYNOPSIS
date [date=<date>] [informat=<pattern>] [outformat=<pattern>] [add=<time_value>] [var=<name>]
OPTIONS
date=<date>
- The input date string (optional). If not specified the command defaults to the current date.
informat=<pattern>
- A java.text.SimpleDateFormat compliant format to be used to parse the input date (optional). If not specified the command defaults to the _DATE format specified in the Language screen of the Preferences window.
outformat=<pattern>
- A java.text.SimpleDateFormat compliant format to be used to for the output date (optional). If not specified the command defaults to the _DATE format specified in the Language screen of the Preferences window.
add=<time_value>
- A time value to add to or subtract from the input date (optional). For example, the value of "-1d" will subtract one day.
var=<name>
- A variable name to save the output date to (optional). It defaults to _DATE.
RETURNS
The command returns 0 (SUCCESS) or 1 if the format is invalid or the input date failed to parse.
EXAMPLES
Date outformat="EEEE d MMMM y" var="TODAY"
- Save today's date in the specified format to the TODAY variable, for example "Wednesday 13 May 2020".
Date add="-1d" outformat="EEEE" var="YESTERDAY"
- Save the yesterday's day name to the "YESTERDAY" variable, for example "Tuesday".
Date date="2020-05-08T00:00:00.000Z" informat="yyyy-MM-dd'T'HH:mm:ss.SSS" outformat="d/M/y" var="ISODATE"
- Parse the specified ISO date and save it in a simple day/month/year format to the "ISODATE" variable.
3.2.7 Drag
DESCRIPTION
Drag is a combination of Waitfor match and Mouse drag commands. It searches the desktop for a source component by an image, by a solid colour or by a text and drags it to a location specified by relative coordinates or to the target component located by another image search. If the object is not found it exits the script.
The command is fairly similar to the Click one.
SYNOPSIS
Drag <comparison_method> [shift=x:<relativeX>,y:<relativeY>] [template2=<target_component_template>] [number2=<target_component_number>] [timeout=<time>] [cmparea=<[x:<x>][,y:<y>][,w:<width>][,h:<height>]>] [number=<component_number>] [btn=<button>] [modifiers=<modifiers>] [count=<number>] [continue=<true|false>] [step=<step_name>] [wait=<time>] [<method specific options>]
* Red colour indicates obligatory parameters
comparison_method
- Supported methods are:
- 'image' - search for a component by the image or an image collection using the search2 method,
- 'object' - search for a component by its colour using the object method,
- 'ocr' - recognize text on the screen using OCR (the tocr method) and find the specified string or pattern.
COMMON OPTIONS
timeout=<time>
- Timeout specifying how long to wait for the component to appear on the screen at a maximum. The value must be either a number of milliseconds or valid time value. The default value is 30 seconds.
cmparea=[x:<x>][,y:<y>][,w:<width>][,h:<height>]
- The rectangular area of the desktop to limit the comparison to. If you omit this parameter the whole remote desktop will be processed. The area coordinates have format of 'x:<x>,y:<y>,w:<width>,h:<height>', where each coordinate can be specified in pixels (for example. "x:225") or as a percentage ("x:23%"). If any of x, y, width or height are omitted, Robot will use the full-screen values to determine the missing parameters (x:0, y:0, w:<screen_width>, h:<screen_height>).
number=<component_number>
- The number of the source component on the screen to apply the drag to. Components (objects) located on the screen are sorted in the reading order, from the top to the bottom and from the left to the right. The default value is 1 (drag the first located component). If the number of components found on the screen is lower than the specified number the command exits the script.
move=[x:<x>][,y:<y>]
- Specifies the start mouse press location relatively from the centre of the target object (since 4.2). This allows to start dragging a nearby location instead of the object itself. If the comparison method is an image the parameter overrides the image click point and uses the image centre as the base point. For example, the command of "Drag image template=button.png move=x:-40 shift=x:100,y:100" will start dragging 40 pixels to the left from the button centre.
btn=<button>
- The mouse button to drag. Allowed values are "left", "middle" and "right".
modifiers=<modifiers>
- The modifiers to hold during the drag (optional). The value may be any combination of Shift, Alt and Ctrl separated by the plus '+' sign, e.g. "Ctrl+Alt+Shift".
shift=x:<relativeX>,y:<relativeY>
- Relative coordinates specifying where to drag the component to from its current location. The target (drop) location may be alternatively specified through template2.
template2=<target_component_template>
- The drop component. When specified the command performs an image search using search2 for the specified component and drags the object to its location. The number2 parameter may be used to specify the drop component number if there are more than one on the screen. When template2 is specified the shift parameter should not be present.
number2=<target_component_number>
- Target component ordinary number. Components (objects) located on the screen are sorted in the reading order, from the top to the bottom and from the left to the right. The default value is 1 (drop at the first located component). If the number of components found on the screen is lower than the specified number the command exits the script. To be used only together with the template2 parameter.
continue=<number>
- The value of true will not terminate the script if the object is not found (since 4.2). The default value is false (terminate on failure). Since release 4.4.2 the command also observes the value of the _DRAG_CONNECT variable and uses it as the default value. For example, to make all Drag commands in a script not terminate the script by default set the variable at the beginning to true ("Var _DRAG_CONTINUE=true").
step=<step_name>
- Simple integration with the Step command (since 4.2). When specified it creates a test step of the given name with the result of pass (object found and dragged) or fail (object not found).
wait=<time>
- Time to wait after the click. It has the same effect as if the following command was 'Wait <time_in_ms>'. The value must be either a number of milliseconds or valid time value. The default value is 0 (don't wait). Scripts may set the default value through populating of the _DRAG_WAIT variable with the desired delay, for example, "Var _DRAG_WAIT=1s".
Drag image template=<image_collection> [passrate=<pass_rate_in_%>] [<search2_specific_params>] [<common options>]
* Red colour indicates obligatory parameters
SPECIFIC OPTIONS - IMAGE
template=<image_collection>
- An image collection - one or more image file names or folders with images separated by a semicolon (';') to be compared to the remote desktop image. On Linux/Unix make sure the file name doesn't contain semicolon because the list would be incorrectly parsed. File names can be either relative (e.g. img.png) or absolute (e.g. /root/report/img.png). If you use a relative path, the image will be searched in the directory defined by the _TEMPLATE_DIR variable. Supported image formats are subject to the Java version. Java 1.6 supports at least PNG, JPG, GIF and BMP.
Template images will be compared with the remote desktop image in the specified list order. If a template comparison produces a positive result (either match or mismatch depending on the specified event), the condition is considered to be met and the command finishes with an exit code of 0 and skips any remaining templates in the list. Predefined variable _COMPARETO_TEMPLATE_INDEX may be then used to determine the index of the matching template image. See image comparison specific variables for a complete list of supported variables.
passrate=<pass_rate_in%>
-The pass rate for image comparison. It must be a number between 0 and 100 which may optionally be followed by the percentage character (for example "passrate=95" or "passrate=95%"). If this parameter is omitted, the default search2 pass rate of 50% will be used.
search2_specific_params
- Any parameters supported by the search2 comparison method (optional).
Drag object [<object_specific_options>] [<common options>]
SPECIFIC OPTIONS - OBJECT
object_specific_params
- Any parameters supported by the object comparison method (optional). It is typically necessary to specify at least the object colour.
Drag ocr [<tocr_specific_options>] [<common options>]
SPECIFIC OPTIONS - OCR
tocr_specific_options
- Any parameters supported by the tocr comparison method. It is necessary to specify the target text to apply the click to either through the text or pattern options.
RETURNS
The command always returns 0 on success or exits the script on failure returning the error code from the specified comparison method.
EXAMPLES
Drag image template="lever.png" shift="x:100"
- Find the first lever component on the screen and drag it 100 pixels to the right.
Drag image template="column.png" number="2" template2="column.png" number2="3"
- Example of swapping of two table columns. The command will locate the second column header in the table and drags it onto the third one. If the column is not found or the number of columns on the screen is lower than three the command will fail the script.
Drag object tolerance="10" color="0;255;0" max="w:20,h:20" shift="x:50,y:-100"
- Find a green object which is not greater than 20x20 pixels and drag it 50 pixels rightwards and 100 pixels upwards. Tolerance ensures that the method will find more shades of green.
Drag ocr text="Flower" shift="y:220"
- Read the text on the screen using OCR and drag the word "Flower" 220 pixels to the bottom.
3.2.8 Eval
Eval - Define a script variable where the value is evaluated as a numeric expression. See the Numeric Expressions chapter of this manual for more info. The behaviour is otherwise exactly the same as the Var command.
SYNOPSIS
eval <var_name_1>=<numeric_expression_1> \[<var_name_2>=<numeric_expression_2> ... <var_name_N>=<numeric_expression_N>\]
* Red colour indicates obligatory parameters
OPTIONS
var_name
- A name for the variable. The name is case sensitive and must not contain spaces.
numeric_expression
- A numeric expression or a string which results in a numeric expression after all variable calls located in the argument are resolved. If it contains spaces it must be enclosed in double-quotes, e.g. "1 + 1". See the Numeric Expressions chapter of this manual for more info on expression syntax and supported numeric operators.
RETURNS
The Eval command in always returns 0 (zero) up to version 2.3.2. Version 2.3.3 and newer return 0 if the numeric expression was evaluated correctly or a value other than 0 if the expression could not be evaluated, for example when it contains the call of a variable which doesn't exist. This mechanism allows testing of whether the value was populated correctly and branch the code through the if/else statement checking the _EXIT_CODE variable value.
EXAMPLES
Eval POSITION=2*(10+1)
- Create a variable POSITION with a value of 22.
Eval SUM={SUM}+10if ({_EXIT_CODE} != 0) { Exit 1}
- Increase the existing variable of SUM by 10. If the variable doesn't exist the script will terminate with the exit code of 1.
Var A=1 B=2 C=3
// As Var resolves the variable calls and concatenates
// the strings the ABC1 value will be a string of "123+1".
Var ABC1="{A}{B}{C}+1"
// As Eval resolves the variable calls and evaluates the result
// as a numeric expression the ABC2 value will be "124".
Eval ABC2="{A}{B}{C}+1"
- This example demonstrates the difference between how the Var and Eval commands construct the variable value.
3.2.9 Exec
DESCRIPTION
Exec - Execute an OS command on the local system (meaning on the machine which runs T-Plan Robot). The argument must be a single command, for example 'ls -l' on Unix/Linux. Due to a limitation of the interface between Java and the underlying OS pipes and redirection of the output are not allowed in the command. If you need to save the output to a file, use the outfile parameter. If you need to use pipes or redirection, put the command into a shell script or a batch file and make the Exec command call it instead.
If you need to execute a Windows command which is provided by the command line interpreter, you need to specify the interpreter in the Exec command. This applies to commands like dir, cd, copy, md, mkdir, rd, rmdir, del, erase etc. A complete list of commands depends on the Windows system and is available at the Microsoft site. Another good source is the COMMAND.COM page at Wikipedia. An example of running 'dir' on Windows would then looks like:
Exec "cmd.exe /C dir"
As each call to the underlying operating system requires some overhead, it is more efficient to create a shell script (Linux/Unix) or a batch file (.bat on MS Windows) where a sequence of OS commands need to be executed in one go. The following example shows the call of a batch file 'list.bat' located in the script directory on Windows. The batch file accepts a directory as a parameter and lists its contents into a file called dir.txt. Note that as the script path may contain spaces, it is necessary to enclose both the batch file and the parameter with double quotes which have to be escaped because they are inside a script command argument.
The list.bat file:
@echo off dir %1 > %1\dir.txt
The Exec call:
Exec "\"{_SCRIPT_DIR}\list.bat\" \"C:\Program Files\" "
Environment variables are visible to scripts in form of _ENV_ prefixed variables. You may see them for example in the Variables tab of the tool panel.
- Up to release 7.2.9 they are read only and any variable changes are not being passed to the process created by Exec.
- Starting with 7.2.10 you may set these variables for the process.
This example demonstrates setting of a variable on MS Windows. The echo command will print the variable value which will be logged to the execution log:
Var _ENV_Hello =Hello!
Exec "cmd /c echo Var Hello value: %Hello%"
Log "{_EXEC_OUTPUT}"
If you need to revert the change for the next process then simply delete the variable using "Varg delete":
Varg "delete" name="_ENV_Hello"
Exec "cmd /c echo Var Hello value: %Hello%"
Log "{_EXEC_OUTPUT}"
The Exec command populates four _EXEC prefixed variables as follows:
Variable Name | Description |
|---|---|
_EXEC_OUTPUT=<text> | The standard output of the executed command (the text which is printed into the console). The variable is not created if the command is configured not to wait until the process finishes (nowait=true). |
_EXEC_ERROR=<text> | Error output of the executed command (the error messages which are printed into the console). The variable is not created if the command is configured not to wait until the process finishes (nowait=true). |
_EXEC_COMMAND=<command> | Last executed OS command (the Exec command argument). |
_EXEC_VALUE=<number> | Integer exit code of the executed OS command. |
_EXEC_PROCESS_ID=<number(s)> | The ordinary number assigned to the process started with "Exec nowait=true".It may be used later to kill it with "Exec kill={_EXEC_PROCESS_ID}". Supported since v3.5.2. |
SYNOPSIS
exec <command> \[count=<number>\] \[nowait=<false|true>\] \[onpass=<command>\] \[onfail=<command>\] \[outfile=<file_name>\] \[wait=<time>\] \[kill=<process(es)>\]{_} {_}\[autokill=<false|true>\]
exec kill=<process(es)> \[wait=<time>\]
* Red colour indicates obligatory parameters
OPTIONS
command
- The OS command to be executed on the local system. See the command description for OS-specific details.
count=<number>
- How many times to execute the command. The default value is 1 (execute once).
nowait=<false|true>
- A flag specifying whether Exec should make the script wait until the OS command finishes (supported since v3.4). The default value is false which makes it wait.
When the value is set to true the Exec command does not wait for the result and the script continues immediately after the process is started. The _EXEC_OUTPUT and _EXEC_ERROR variables are not populated because the output is not known when the Exec command returns the control to the calling script. The _EXEC_ERROR variable may be created if the underlying OS fails to start the specified command and reports it immediately to Robot.
onpass=<command>
- A T-Plan Robot command to be executed if the execution succeeds (when exit code 0 is returned). It must be one single command. If you need to define a sequence of command to be executed, use a procedure or an if/else construction based on the Exec command return value.
onfail=<command>
- A T-Plan Robot command to be executed if the execution fails (i.e. non-zero exit code is returned). It must be one single command. If you need to define a sequence of command to be executed, use a procedure or an if/else construction based on the Exec command return value.
outfile=<file_name>
- Optional file name to save the command output to. If you specify just the file name, it will be created in the current working directory (the directory where Robot was started from). To set the path relative to the script location or Robot's install directory use the _SCRIPT_DIR or _INSTALL_DIR variable. For example, to store the output file to the script folder use outfile="{_SCRIPT_DIR}\out.txt".
wait=<time>
- Optional time to wait after the command is executed. The default value is 0 (don't wait). Scripts may set the default value through populating of the _EXEC_WAIT variable with the desired delay, for example "Var _EXEC_WAIT=1s".
kill=<processes>
- Kill process(es) identified by the specified ordinary number or a semicolon-separated list of numbers. Supported since v3.5.2. Whenever the Exec command executes with nowait=true it gives the started process an ordinary number. The number can be then used to kill the process. Killing can't be applied to processes started without the nowait parameter or with nowait=false. Such processes are also not being numbered.
Numbering starts at 1. Complicated scripts which execute multiple calls of "Exec nowait=true" may learn the process number from the _EXEC_PROCESS_ID variable. Example:
// Start myapp.exe and save its ID
Exec "myapp.exe" nowait="true"
Var MYAPP_ID="{_EXEC_PROCESS_ID}"
...
Exec kill="{MYAPP_ID}"
NOTE: On Windows, it is only possible to kill the immediate child process using Exec Kill due to the way Windows OS internally organizes and accesses processes. Therefore, in order to kill sub (grandchild) processes please use CMD taskkill e.g.: Exec "cmd.exe /C taskkill /f /im <processName>".
autokill=<false|true>
- A flag specifying whether to kill the process after the script finishes (supported since v3.5.2). It is applied only to processes started with nowait=true. The default value is false (do not kill).
RETURNS
The command returns 0 (zero) if the command is successfully executed or the exit code of the OS command otherwise.
EXAMPLES
Exec "ls -l"
- List the contents of the current directory (Unix/Linux). The listing will be available under the _EXEC_OUTPUT variable.
Exec "date"
Screenshot image.png desc="This screenshot was taken on {_EXEC_OUTPUT}."
- Use the date OS command to insert a time stamp into a screenshot description (Unix/Linux).
Exec "C:\Program Files\Internet Explorer\iexplore.exe http://www.google.com/"
Exec "rundll32 url.dll,FileProtocolHandler http://www.google.com/"
- Both commands should start Internet Explorer on Windows and open the Google site.
Report index.html
Exec "mozilla file://{_REPORT_FILE}"
- Create an HTML report and open it in a Mozilla browser on the local machine. The _REPORT_FILE variable is populated by the Report command and contains the full report file path.
// Directory to work with.
Var DIR=/tmp
// List the directory contents (Linux/Unix).
// For Windows replace the "ls" command with "cmd.exe /C dir /B"
Exec "ls {DIR}"
// Split the directory listing by lines
String split "{_EXEC_OUTPUT}" pattern="\r?\n"
for (i=1; {i}<{_STRING_COUNT}+1; i={i}+1) {
// Replace floating point from index (not needed on 2.3.3+)
String replace "{i}" pattern="[.].*" replacement=""
Var f="{_STRING{i}}"
// If the file is a .png or a .jpg image display it for 3 seconds
if ("{f}" endswith ".png" || "{f}" endswith ".jpg") {
Connect "file://{DIR}/{f}"
Wait 3s
}
}
- Perform an image slide show on a directory. The Exec command is here called to list contents of a directory which is then parsed using "String split" to individual files (one file per line is expected). The parsed strings (file names) are then checked for a known image extension and displayed in the Robot's desktop view for 3 seconds.
3.2.10 Exit
Exit - Terminate the script, procedure or structured block of code and return an exit code. If an exit command with the 'process' scope is called during script execution, it will terminate T-Plan Robot and return the indicated exit code to the underlying operating system. See the documentation on T-Plan Robot CLI Options and its automatic script execution examples for more information.
SYNOPSIS
exit <exit_code_number> [scope=<process|file|procedure|block>] [desc=<description>]
OPTIONS
exit_code_number
- Mandatory exit code. It must be an integer. A value of zero is usually used to indicate success while non-zero values indicate an error or unexpected result or behaviour. If the command is called to terminate the whole script and there's a report file created by the Report command it will display the exit code of 0 as "passed/successful" and all other codes are presented as failures. The exit code is also passed to the underlying operating system and can be used to identify the reason for the script termination by third-party frameworks.
scope=<process|file|procedure|block>
- Controls scope of the exit command. The default value is a process which terminates the script execution. If the execution is an automated one and there are no more running automated processes, the command also terminates the JVM (Java Virtual Machine) and returns the specified exit code to the underlying operating system.
The file value terminates the currently executed file. If a script is being executed from another script using the Run command, only the called script is terminated and control is returned to the master script.
The procedure value exits from the innermost procedure. If no procedure is executed, the Exit command is ignored.
The block value exits from the innermost structured block of code, i.e. one of the if/else of for statements. If the command gets called out of any such a statement, it is ignored.
desc=<description>
- Optional description supported since v2.3. It is only used if the exit scope is not specified or is equal to the process. The command then saves the description under the _EXIT_DESC variable which is picked up and displayed by the reporting framework (such as the Enterprise Report Provider).
RETURNS
The command returns the exit code which is specified as its argument.
EXAMPLES
Exit 10
- Terminate the executed script and return 10 as the exit code.
Typeline myapplication
Waitfor update extent=40% timeout=20s ontimeout="Exit 2" cumulative=true
- This is a typical usage of the Exit command. It shows a situation when you start a GUI application called myapplication from a terminal window. Let's suppose that the myapplication window has a fixed size equal to at least 40% of the screen size. If the GUI starts properly, the script will continue. The Waitfor command will otherwise wait for 20 seconds and then terminate the script with an exit code of 2.
3.2.11 Imagedoctor
DESCRIPTION
Imagedoctor - Control behaviour of the Image Doctor wizard. Supported since v3.5.
SYNOPSIS
include <action>* Red colour indicates obligatory parameters
OPTIONS
action
- The action must be one of
- "on" - set on the Image Doctor,
- "off" - set off the Image Doctor,
- "skip" - make Image Doctor ignore eventual failure of the next image comparison command. This is equivalent to setting off Image Doctor before the command and setting it back on after it.
RETURNS
The command always returns 0 (zero).
EXAMPLES
Imagedoctor off
- Set off, Image Doctor. No image comparison failure will be processed until it gets set back on.
Imagedoctor skipCompareto method="tocr" cmparea="x:33,y:2,w:200,h:22"Compareto "search.png" method="search2"
- Make the Image Doctor wizard ignore eventual failure of the OCR. The second "search2" comparison is out of the scope of the "skip" action and it will be processed in case of failure provided that the Image Doctor is on.
3.2.12 Include
DESCRIPTION
Include - Include another script or compiled Java code.
When the argument is a TPR script in the language described by this document, the command will load ONLY procedures and variables from the script into the execution context and make them available to the calling script. This principle allows to build libraries with globally used variables and procedures and link them to scripts.
When the argument is a Java resource meaning a JAR or ZIP file or a classpath (directory structure containing .class files), the command adds it to the Java classpath and makes any compiled Java code it contains available for instantiation. This mechanism was introduced in v2.2 and it is intended to support dynamic loading of compiled Java scripts which may be subsequently called by the class name through the Run command.
Be aware that a dynamic update of the classpath affects the whole Java Virtual Machine (JVM) instance. If there are multiple automated testing processes, loading of such a resource makes its classes instantly available to all of them. If the file or path is already present on the classpath, the command does nothing and repeated calls of the same Include command cause no harm. Once the resource is loaded, eventual changes in the file system are not synchronized with the JVM. This means that it is not possible to apply changes to the resource code and recompile while Robot is running and it must be restarted to pick up any updates in the included library.
The name of the included file or path can be also specified dynamically through a variable. This eventually allows passing of the library name externally via the '-v' CLI option.
SYNOPSIS
include <file_or_Java_resource>* Red colour indicates obligatory parameters
OPTIONS
file
- A TPR script file or a Java resource (JAR/ZIP file or a classpath) to be included. Filename can be either relative (e.g. sayHello.tpr) or absolute (e.g. /root/scripts/sayHello.tpr). T-Plan Robot will check if the file exists and is readable during every script compilation and report an error if not. The file can be also specified via a variable (see examples).
RETURNS
The command always returns 0 (zero). If the specified file is not found, T-Plan Robot reports a syntax error rather than returning a non-zero return value.
EXAMPLES
Include sayHello.tpr
- Load all variables and procedures from a script called sayHello.tpr which is located in the same directory as the script calling this command.
Include /root/scripts/sayHello.tpr
- Load all variables and procedures from a script called sayHello.tpr which is located in the /root/scripts/ directory.
Var PROFILE=profile1.tpr
Include {PROFILE}
- Include a script specified by a variable. If you have more scripts with different configurations, you may then include another script from CLI using '-v PROFILE=profile2.tpr'.
Include C:\projects\TestLib\testlib.jarRun mypackage.MyTestScript
- Load a Java library (JAR file) from the specified location and execute a script from there. This presumes that the JAR file contains a package (directory) called "mypackage" with a compiled class called MyTestScript which is a valid Java script (it extends the DefaultJavaTestScript class or at least implements the JavaTestScript interface). See the Run command below for more information.
3.2.13 MoveTo
DESCRIPTION
Similar to the Click command, MoveTo is a combination of Waitfor match and Mouse move commands. It searches the desktop for a component image, a solid colour object or a text and moves the mouse pointer to it. If the object is not found it exits the script.
SYNOPSIS
MoveTo <comparison_method> [timeout=<time>] [cmparea=<[x:<x>][,y:<y>][,w:<width>][,h:<height>]>] [number=<component_number>] [modifiers=<modifiers>] [wait=<time>] [<method specific options>]
* Red colour indicates obligatory parameters
comparison_method
- Supported methods are:
- 'image' - search for a component by the image or an image collection using the search2 method,
- 'object' - search for a component by its colour using the object method,
- 'ocr' - recognize text on the screen using OCR (the tocr method) and find the specified string or pattern.
COMMON OPTIONS
timeout=<time>
- Timeout specifying how long to wait for the component to appear on the screen at a maximum. The value must be either a number of milliseconds or valid time value. The default value is 30 seconds.
cmparea=[x:<x>][,y:<y>][,w:<width>][,h:<height>]
- The rectangular area of the desktop to limit the comparison to. If you omit this parameter the whole remote desktop will be processed. The area coordinates have the format of 'x:<x>,y:<y>,w:<width>,h:<height>', where each coordinate can be specified in pixels (for example. "x:225") or as a percentage ("x:23%"). If any of x, y, width or height are omitted the app will use the full-screen values to determine the missing parameters (x:0, y:0, w:<screen_width>, h:<screen_height>).
number=<component_number>
- The number of the component on the screen to move the mouse to. Components (objects) located on the screen are sorted in the reading order, from the top to the bottom and from the left to the right. The default value is 1 (click the first located component). If the number of components found on the screen is lower than the specified number the command exits the script.
move=[x:<x>][,y:<y>]
- Specifies the move location relatively from the centre of the target object. This allows to move the mouse to a nearby location instead of the object itself. If the comparison method is an image the parameter overrides the image click point and uses the image centre as the base point. For example, the command of "MoveTo image template=button.png move=x:-40" will move the pointer 40 pixels to the left from the button centre.
modifiers=<modifiers>
- The mouse event modifiers (optional). The value may be any combination of Shift, Alt and Ctrl separated by the plus '+' sign, e.g. "Ctrl+Alt+Shift".
continue=<number>
- The value of true will not terminate the script if the object is not found. The default value is false (terminate on failure). The command also observes the value of the _MOVETO_CONNECT variable and uses it as the default value. For example, to make all MoveTo commands in a script not terminate the script by default set the variable at the beginning to true ("Var _MOVETO_CONTINUE=true").
step=<step_name>
- Simple integration with the Step command. When specified it creates a test step of the given name with the result of pass (object found and the mouse pointer was moved to it) or fail (object not found).
wait=<time>
- Time to wait after the move gets completed. It has the same effect as if the following command was 'Wait <time_in_ms>'. The value must be either a number of milliseconds or valid time value. The default value is 0 (don't wait). Scripts may set the default value through populating of the _MOVETO_WAIT variable with the desired delay, for example "Var _MOVETO_WAIT=1s".
Moveto image template=<image_collection> [passrate=<pass_rate_in_%>] [<search2_specific_params>] [<common options>]
* Red colour indicates obligatory parameters
SPECIFIC OPTIONS - IMAGE
template=<image_collection>
- An image collection - one or more image file names or folders with images separated by a semicolon (';') to be compared to the remote desktop image. On Linux/Unix make sure the file name doesn't contain semicolon because the list would be incorrectly parsed. File names can be either relative (e.g. img.png) or absolute (e.g. /root/report/img.png). If you use a relative path, the image will be searched in the directory defined by the _TEMPLATE_DIR variable. Supported image formats are subject to the Java version. Java 1.6 supports at least PNG, JPG, GIF and BMP.
Template images will be compared with the remote desktop image in the specified list order. If a template comparison produces a positive result (either match or mismatch depending on the specified event), the condition is considered to be met and the command finishes with an exit code of 0 and skips any remaining templates in the list. Predefined variable _COMPARETO_TEMPLATE_INDEX may be then used to determine the index of the matching template image. See image comparison specific variables for a complete list of supported variables.
passrate=<pass_rate_in%>_
- The pass rate for image comparison. It must be a number between 0 and 100 which may optionally be followed by the percentage character (for example "passrate=95" or "passrate=95%"). If this parameter is omitted the default search2 pass rate of 50% will be used.
search2_specific_params
- Any parameters supported by the search2 comparison method (optional).
Moveto object [<object_specific_options>] [<common options>]
SPECIFIC OPTIONS - OBJECT
object_specific_params
- Any parameters supported by the object comparison method (optional). It is typically necessary to specify at least the object colour.
Moveto ocr [<tocr_specific_options>] [<common options>]
SPECIFIC OPTIONS - OCR
tocr_specific_options
- Any parameters supported by the tocr comparison method. It is necessary to specify the target text to move to either through the text or pattern options.
RETURNS
The command always returns 0 on success or exits the script on failure returning the error code from the specified comparison method.
EXAMPLES
Moveto image template="google_button.png" number="2"
- Move to the centre of the second button specified by the google_button.png image on the screen. If the button is not found or the number of buttons on the screen is lower than two the command will fail the script.
Moveto object tolerance="10" color="255;0;0" max="w:20"
- Find a red object not wider than 20 pixels and move the mouse pointer to its centre. The tolerance ensures that the method will find more shades of red.
Moveto ocr text="Cancel" distance="1"
- Read the text on the screen using OCR and move to the first word of "Cancel". The distance ensures that the word will be found even if the OCR engine omits or fails to recognize a single character, for example, "Cencel" etc.
3.2.14 Pause
DESCRIPTION
Pause - Pause the script execution. If T-Plan Robot is executing in GUI mode, the Pause button/menu item gets selected and the user can deselect the button or the menu item to resume the execution.
If the script is being executed in CLI mode, a message is printed out into the console and the user can press a key to resume the execution.
The Pause command can be used e.g. to pause execution when a runaway behaviour is detected.
Though the usual way is to exit the script with an error exit code (e.g. 'Exit 1'), some test suites may prefer to send an e-mail to the responsible person, pause the execution and wait for human help.
SYNOPSIS
pause <description>
OPTIONS
description
- Optional description of the reason why the script was paused. This description will be displayed in the report (if defined) and printed out to the console in case of CLI mode execution.
RETURNS
The command always returns 0 (zero).
EXAMPLES
Compareto "application.png"
if ({_EXIT_CODE} > 0) {
    # Cry for help - send a screenshot via E-mail and pause
    Screenshot runaway.png
  Sendmail to="tester@dummyserver.com" from="robot@dummyserver.com" server="mail.dummyserver.com" subject="Runaway behavior detected - see attached picture. Please help!" attach="{_REPORT_DIR}/runaway.png"
    Pause "Runaway behavior detected"
}
- When image comparison fails, send a screenshot by E-mail to the tester and pause the execution.
3.2.15 Run
Run - Execute another script which may be one of:
- TPR script in the format described by this specification (typically a .tpr file). T-Plan Robot will process its commands as if they were written in the calling script, which means that all procedures, variables, screenshots and report generators defined by the executed script will remain in the execution repository and can be accessed once the Run command finishes. Exit command with the scope set to file can be used to return from a script executed through Run to the main script.
- Java source file (must be a .java file; supported from version 2.2). The class must be a valid T-Plan Robot Java script which extends the DefaultJavaTestScript class or at least implements the JavaTestScript interface. The Run command compiles the source code, instantiates the class and executes its test() method. As this call requires access to Java compiler, T-Plan Robot must run on Java Development Kit (JDK) or be configured with a path to the JDK installation supported since 2.3.3). If the tool runs just on Java Runtime Environment (JRE) and no JDK is available the tool will report an error. Refer to chapter 1 of the Release Notes document for instructions.
- Java class name (supported from version 2.2). It must be a fully qualified Java class name (package+class name) corresponding to a valid T-Plan Robot Java script which extends the DefaultJavaTestScript class or at least implements the JavaTestScript interface. The class must have the default (parameterless), constructor. The Run command instantiates the class by name and executes its test() method. As this method doesn't involve compilation of Java code, it is very fast with a minimum performance overhead and it is recommended for production scenarios.
The compiled class code must be placed on the T-Plan Robot classpath in one of the three supported ways:- Load the code (JAR, ZIP or classpath) through the Include command. This way makes the script load the code dynamically and make it available to the current Java/Robot instance.
- Add the JAR, ZIP or classpath to the "-classpath" parameter of the Robot's start command described in the Release Notes. This will make the code available to the particular Java/Robot instance.
- Put the JAR file with the code to <java-home>\lib\ext (Windows) or <java-home>/lib/ext (Linux/Unix) of the Java installation used to execute Robot. This will make the code available to any instance of Java started from this installation (and thus to all Robot instances as well).
Version 2.2 also delivers support of optional parameters in form of <name>=<value> pairs specified on the command line after the mandatory file/class argument. These parameters are exposed to the executed script as local variables which are valid only inside the executed script or Java class. In TPR scripts the parameters may be called by name as standard variables. On the side of Java code, they may be retrieved through the getContext().getVariable() method or through the set of convenience methods getVariableAsXXX() defined in the ScriptingContext interface.
Run commands can be effectively used to implement generic snippets of code (libraries) or to separate test code of individual test cases. The Java support enhancements delivered in version 2.2 allow to implement a library of parametrized Java routines and call them from TPR scripts. This is an efficient way of how to add custom functionality to the scripting language without having to go through the Plugin mechanism.
SYNOPSIS
run
run <file_or_class> [<param1>=<value1> ... <paramN>=<valueN>]
* Red colour indicates obligatory parameters
OPTIONS
file
- The file can be one of:
- A TPR script file (.tpr) or a Java script file (.java). The file can be either relative to the current script file (for example sayHello.tpr) or absolute (/root/scripts/sayHello.tpr). T-Plan Robot will check if the file exists and is readable during every script validation and report an error if not.
- A fully qualified Java script class name (for example org.mytests.DoSomething). The specified class must be on the Java classpath. For details see the command description.
<param>=<value>
- An optional list of parameters and their values. They will be made available to the executed file in the form of local variables.
RETURNS
Run always returns the code returned by the last executed command. If the specified file is not found, T-Plan Robot reports a syntax error rather than returning a non-zero return value.
EXAMPLES
Run sayHello.tpr
- Execute a script called sayHello.tpr which is located in the same directory as the script calling this command.
Run /root/scripts/sayHello.tpr
- Execute a script called sayHello.tpr which is located in the /root/scripts/ directory.
Run /root/scripts/MyTest.java
- Executes the specified Java source code file. It must be a class extending com.tplan.robot.scripting.DefaultJavaTestScript or at least implementing the com.tplan.robot.scripting.JavaTestScript interface. The file is first compiled using the Java Compiler API into the byte code format and then instantiated and executed. This will work only if T-Plan Robot runs on Java from a JDK distribution or is configured with a valid path to a JDK installation (v2.3.3 and newer).
Run com.testsuite.MyDummyTestScript server="rfb://localhost:5901" pass="welcome"
- Instantiates a Java script class and executes it. The class must be on the Java classpath and it must extend com.tplan.robot.scripting.DefaultJavaTestScript or at least implement the com.tplan.robot.scripting.JavaTestScript interface. The two parameters on the command line are made inserted into the context as variables; it is however up to the executed class to use them or not.
Var SCRIPT_TO_EXECUTE=sayHello.tpr
Run "{SCRIPT_TO_EXECUTE}"
- Execute a script specified by a variable.
3.2.16 String
String - Process or parse text. The command applies a text processing function to the argument text. While basic string "test" operations such as "contains", "startswith", "endswith" or "matches" may be performed in if/else statements through boolean expressions, the String command rather targets more complicated processing of text consisting of a sequence of one or more operations.
If the argument text contains variable calls they will be resolved (replaced with values) before the text is processed. The command populates a set of _STRING prefixed variables as follows:
Variable Name | Description |
|---|---|
_STRING=<operationResult> | Result of the performed operation for all operations except for "String split".If the command uses the "var" parameter to define a custom output variable the default _STRING variable is not created. |
_STRING_COUNT=<stringCount> | The number of tokens resulting from the "String split" operation. |
_STRING<n>=<token> | The n-th token (substring) from the "String split" operation where <n> is between 1 and _STRING_COUNT. If the command uses the "var" parameter to define a custom output variable basename the default _STRING<n>variables are not created. |
Result of the operation is by default saved to the _STRING variable or to the custom variable specified through the optional 'var' parameter. If the operation produces multiple values (such as the 'split' operation), each value is saved to a numbered variable such as _STRING1, _STRING2 etc. or to similarly numbered set of variables derived from name specified by the 'var' parameter. The number of values is then stored to the _STRING_COUNT variable.
The command has a basic structure of:
String <operation> "<text>" [<parameters>]
Supported operations in alphabetical order are listed below. Their names are in most cases derived from method names of the java.lang.String Java class.
- indexof - Returns the index within the text of the first occurrence of the substring specified through the 'string' parameter. Since v3.5.2 the command may also perform a fuzzy text search similar to the functionality provided by the "tocr" comparison method. Indexing starts from zero. If the specified string is not found, the result is -1. For example, 'String indexof "Demo text" string=text' will set the _STRING variable to 5. This operation is typically used in combination with the 'substring' one to text parsing. If you need to test the existence of a substring in the given text and you are not interested in its position it is easier to take advantage of the 'contains' Boolean operator.
- length - Returns the text length (number of characters). For example, 'String length "Demo" ' will set the _STRING variable to 4.
matches - Matches the text to a java.util.regex.Pattern compliant regular expression specified through the 'pattern' parameter and produces a boolean result (either 'true' or 'false'). For example, 'String matches "a20" pattern="[a-z][0-9]*" ' sets the _STRING variable to 'true' because the regular expression matches any sequence consisting of a lower case character followed by a sequence of digits. The 'matches' operation is also supported in form of a boolean operator for easy use with the if/else statements.
Since v3.5.2 the command also allows to perform fuzzy text matching. See the "matches" command for details.
- replace - Returns a new text resulting from replacing all occurrences of a value specified by the 'string' parameter in the text with the string provided in the 'replacement' parameter. The operation may be also used with 'pattern' instead of 'string' to perform replacement of all occurrences matching the specified java.util.regex.Pattern regular expression. For example, 'String replace "fox" string=f replacement=s' will set the _STRING variable to 'sox'.
- split - Splits the text into a set of strings around matches of the given string ('string' parameter) or java.util.regex.Pattern regular expression ('pattern'). For example, 'String split "brown fox" string=" " ' will produce two values, _STRING1=brown and _STRING2=fox and sets the _STRING_COUNT variable to 2.
- substring - Returns a substring of the text which is defined by the input 'start' and/or 'end' index numbers. Indexing starts from zero and the value of 0 refers to the text beginning (first character). For example, 'String substring "someone" start=4' will set the _STRING variable to 'one'.
- tostring - Creates a new text from one or more semicolon-separated numeric ASCII or Unicode values. This can be used to produce special characters and/or characters of national alphabets. For example, 'String tostring "49;43;49" ' will set the _STRING variable to '1+1'.
- trim (since 2.3.3) - Removes all leading and trailing whitespace characters (spaces, new line characters etc.). For example, 'String trim " apple " ' will set the _STRING variable to 'apple'.
String indexof "<text>" string=<text> [start=<index>] [end=<index>] [distance=<number>] [var=<variable_name>]
* Red colour indicates obligatory parameters
OPTIONS
text
- The text to process.
string
- The string to search for in the text.
start
- Optional start index to start the search from. It must be a number or a valid numeric expression. Indexing starts from zero where zero refers to the text beginning (the first character). The default start index value is 0.
end
- Optional end index to end the search at. It must be a number or a valid numeric expression. The default value is the text length (the end of the text).
distance
- Optional distance used in conjunction with the "string" parameter to perform tolerant text search (supported since 3.5.2). When the parameter is set to the default value of 0 (no distance) the command falls back to plain string search where the argument text is searched for the first occurrence of the provided string.
The tolerant (fuzzy) text search is performed for the distance values of 1 and higher. The text is searched for an occurrence of a string which is similar enough to the specified one. The tolerance (similarity) is based on the Levenshtein distance. It is defined as the minimum number of edits needed to transform one string into the other, with the allowable edit operations being insertion, deletion, or substitution of a single character. The distance approximately specifies how many characters may be omitted or not recognized properly at a maximum to consider the sample text equivalent.
To perform fuzzy text matching instead of search, use the String matches command.
var
- Optional name of the variable to store the resulting index to. If this parameter is not specified the result will be stored to the default _STRING variable.
RETURNS
The 'String indexof ' command returns 0 (zero) if the specified string was found in the text and 1 otherwise. The command further on stores the index (or -1 if not found) to the _STRING variable (or a custom variable specified by the 'var' parameter). Indexing starts from zero where zero refers to the text beginning (first character).
EXAMPLES
String indexof "Demo text" string="text" var=result
- Get position (index) of "text" in "Demo text" and store the result of 5 into the "result" variable.
String indexof "Demo text" string="test" var=result distance=1
- Same as the previous example save that the word of "text" will be located by the specified string of "test" because it is within the distance of 1.
String length "<text>" [var=<variable_name>]
* Red colour indicates obligatory parameters
OPTIONS
var
- Optional name of the variable to store the resulting text length to. If this parameter is not specified the result will be stored to the default _STRING variable.
RETURNS
The 'String length' command always returns 0 (zero) and stores the argument text length (number of characters) to the _STRING variable or a custom variable specified by the 'var' parameter.
EXAMPLES
String length "Demo text" var=len
- Stores the length of "Demo text" (9) into the "len" variable.
String matches "<text>" pattern="<regular_expression>" [var=<variable_name>]
String matches "<text>" string="<text>" [distance=<number>] [var=<variable_name>]
* Red colour indicates obligatory parameters
OPTIONS
pattern
- A java.util.regex.Pattern compliant regular expression. The regular expression of "." matches by default any character except for the line terminator. This behaviour may be changed through command preferences.
Be aware that the expression must match the whole text. The command will NOT search the text for its portion that would match the expression. For example, to search the text for the "*.test.*" word, you have to use the expression of ".test.". Meaning "the word of 'test' which may or may not contain any (.*) preceding and/or trailing text".
string
- A string to search the text for (supported since 3.5.2).
distance
- Optional distance used in conjunction with the "string" parameter to perform tolerant text matching (supported since 3.5.2). When the parameter is set to the default value of 0 (no distance) the command falls back to plain string comparison where the argument text is tested whether it is equal to the provided string.
The tolerant (fuzzy) text matching is performed for the distance values of 1 and higher. The text is tested whether it is similar enough to the specified string. The tolerance (similarity) is based on the Levenshtein distance. It is defined as the minimum number of edits needed to transform one string into the other, with the allowable edit operations being insertion, deletion, or substitution of a single character. The distance approximately specifies how many characters may be omitted or not recognized properly at a maximum to consider the sample text equivalent.
Be aware that the specified string must match the whole argument text. To perform a fuzzy text search to find a string similar to the specified one use String indexof instead.
var
- Optional name of the variable to store the resulting Boolean flag (true/false) to. If this parameter is not specified the result will be stored to the default _STRING variable.
RETURNS
The 'String matches' command returns 0 (zero) if the text matches the regular expression or 1 when not. The command further on stores the result as 'true' or 'false' to the _STRING variable or a custom variable specified by the 'var' parameter.
EXAMPLES
File open file="C:\data.txt"Var result=-1for (i=1; {i}<{_FILE_LINE_COUNT}+1; i={i}+1) {
File read line={i}
String matches "{_FILE_READ}" pattern="[a-z]*"
if ({_EXIT_CODE} == 0) {
       Var result={i}
Break }}
- Open a data file, read it line by line and match each one against the specified regular expression. If the line matches, save the line number to the "result" variable and stop.
// Create a sample text
Var TEXT= "this is sample text"

// This command will return 0 (pass) because the specified
// pattern will match any text containing "simple" or "sample"
String "matches" "{TEXT}" pattern=".*s[ia]mple.*"

// This will return 0 because the text does not contain "simple"
String "matches" "{TEXT}" string="simple"

// This will return 0 because the text contains "sample"
// which has only one character different from "simple"
String "matches" "{TEXT}" string="simple" distance=1
- Test the sample text in various ways.
String replace "<text>" string="<text>" replacement="<text>" [var=<variable_name>]
String replace "<text>" pattern="<regular_expression>" replacement="<text>" [var=<variable_name>]
* Red colour indicates obligatory parameters
OPTIONS
replacement
- The new string (replacement).
string
- The old string (to be replaced in the text).
pattern
- A java.util.regex.Pattern compliant regular expression representing the strings to be replaced. The regular expression of "." matches by default any character except for the line terminator. This behaviour may be changed through command preferences.
var
- Optional name of the variable to store the resulting new text to. If this parameter is not specified the result will be stored to the default _STRING variable.
RETURNS
The 'String replace' command returns 0 (zero) if at least one replacement has been performed or 1 when no replacement has been done and the resulting text equals to the original one. The new text is stored to the _STRING variable or a custom variable specified by the 'var' parameter regardless of whether it has been changed or not.
EXAMPLES
String replace "bad fat cat" string="b" replacement="s"
- Updates the _STRING variable with "sad fat cat" and returns 0 because the string has been updated.
String replace "bad fat cat" pattern="[bf]a[td]" replacement="cat"
- Updates the _STRING variable with "cat cat cat" and returns 0 because the string has been updated.
String split "<text>" pattern="<regular_expression>" [var=<variable_name>]
* Red colour indicates obligatory parameters
OPTIONS
string
-The delimiter (separator) to split by.
pattern
-A java.util.regex.Pattern compliant regular expression to split by. The regular expression of "." matches by default any character except for the line terminator. This behaviour may be changed through command preferences.
var
-The optional base name of the variables to store the resulting strings to. If this parameter is not specified the result will be stored to the default numbered _STRING<number> variables.
RETURNS
The 'String split' command always returns 0 (zero). Each parsed value is saved to a numbered variable such as _STRING1, _STRING2 etc. or to similarly numbered set of variables derived from name specified by the 'var' parameter. The number of values is then stored to the _STRING_COUNT variable.
EXAMPLES
String split "bad fat cat" string=" " var="s"
- Split the text by spaces. As a custom variable base name of "s" is specified the command produces a set of three variables s1="bad", s2="fat" and s3="cat". The _STRING_COUNT variable will be set to 3.
String split "bad, fat cat" pattern="[,]* "
- Split the text by spaces which may be optionally preceded by a comma. Similarly to the previous example, the command produces a set of three variables _STRING1="bad", _STRING2="fat" and _STRING3="cat". The _STRING_COUNT variable will be set to 3.
// Directory to work with.
Var DIR=/tmp

// List the directory contents (Linux/Unix).
// For Windows replace the "ls" command with "command.com /C dir /B"
Exec "ls {DIR}"

// Split the directory listing by lines
String split "{_EXEC_OUTPUT}" pattern="\r?\n"

for (i=1; {i}<{_STRING_COUNT}+1; i={i}+1) {

  // Replace floating point from index (not needed on 2.3.3+)
  String replace "{i}" pattern="[.].*" replacement=""

  Var f="{_STRING{i}}"

  // If the file is a .png or a .jpg image display it for 3 seconds
  if ("{f}" endswith ".png" || "{f}" endswith ".jpg") {
    Connect "file://{DIR}/{f}"
    Wait 3s
  }
}
- Perform an image slide show on a directory. The "String split" command is here used to split the directory listing to individual files (one file per line is expected). The parsed strings (file names) are then checked for a known image extension and displayed in the Robot's desktop view for 3 seconds.
String substring "<text>" end=<index> [start=<index>] [var=<variable_name>]
* Red colour indicates obligatory parameters
OPTIONS
start
- Start index (a number or a valid numeric expression). Indexing starts from zero where zero refers to the text beginning (the first character). The default value is 0.
end
- End index (a number or a valid numeric expression). The default value is the text length (end of text).
var
- The optional base name of the variables to store the resulting substring to. If this parameter is not specified the result will be stored to the default _STRING variable.
RETURNS
The 'String substring' command returns 0 (zero) when the start and end indices refer to valid positions in the text. If the start position is invalid (meaning it is less than zero or equal to or larger than the text length), the command sets the start index to 0 and returns 1. Otherwise, if the end position is invalid (meaning it is less than the start position or larger than the text length), the command sets the end index to the default value of text length and returns 2. Regardless of the returned value the _STRING variable (or the custom one passed through the 'var' parameter) is always populated with a new substring between the start and end positions.
EXAMPLES
String substring "bad fat cat" start="4" var="s"
- Removes the first four characters and sets the "s" variable to "fat cat".
String length "bad fat cat" var="len"String substring "bad fat cat" start="{len}-3" end="{len}-2"
- Cuts the third last character ("c") into the _STRING variable.
* Red colour indicates obligatory parameters
OPTIONS
unicode
- One numeric Unicode/ASCII code or a semicolon-separated list of codes to be converted into a string. As each code in the list is being parsed through the java.lang.Integer.decode() method, it may be a decimal number, hexadecimal (with leading '0x' or '#', such as '0xF0' or '#F0') or octal. For example, the '@'character may be specified as '64' (decimal), '0xF0', '#F0' (hexadecimal) or '0100' (octal). For the list of character, codes see the ASCII and Unicode tables on Wikipedia.
var
- The optional base name of the variables to store the resulting string to. If this parameter is not specified the result will be stored to the default _STRING variable.
RETURNS
The 'String tostring' command returns 0 (zero) on success and 1 when one or more codes do not correspond to valid ASCII/Unicode characters. The command on success populates the _STRING variable (or the custom one passed through the 'var' parameter) with the converted string.
EXAMPLES
String tostring "104;101;108;108;111" var="s"
- Populates the "s" variable with "hello".
String tostring "0xF1" var="s"Var tomorrow="ma{s}ana"
- Sets the "tomorrow" variable to "mañana".
* Red colour indicates an obligatory parameter
OPTIONS
var
- The optional base name of the variables to store the resulting string to. If this parameter is not specified the result will be stored to the default _STRING variable.
RETURNS
The 'String trim' command always returns 0 (zero). The command on success populates the _STRING variable (or the custom one passed through the 'var' parameter) with the trimmed string.
EXAMPLES
String trim " Hello! " var="s"
- Sets the "s" variable to "Hello!".
3.2.17 Var
DESCRIPTION
Var - Define a script variable. See the Variables chapter for a general description of script variable support.
For the creation of formatted text (multiple lines, tabs, ...) use the Varf command. To evaluate (calculate) value of a numeric expression and store it to a variable use the Eval command.
Variables starting with an underscore ('_') are so-called predefined variables. They are typically provided by T-Plan Robot or by its commands and contain useful values providing information about the execution context and operation results. A non-exhaustive table of the most important ones follows.
Who Creates and When | Variable Name | Description |
|---|---|---|
| Robot when the client receives a clipboard change from desktop server | _SERVER_CLIPBOARD_CONTENT=<text> | Content of the remote desktop clipboard. It is typically populated after the server clipboard changes, for example as a result of a copy action (Ctrl+C) performed on the remote desktop. This mechanism is referred to as the "server to client transfer". Version 3.4 and higher supports bi-directional clipboard update. The script may set the variable using the Language Reference or Eval command to change the server clipboard content. This mechanism is referred to as the "client to server transfer". The ability to transfer text to/from the clipboard is subject to the connection type and the server vendor. The VNC connection type supports bi-directional transfer where the server is either UltraVNC or RealVNC. TightVNC doesn't support the client to server transfer, and it requires an additional utility to enable the server to client transfer. Other servers are available. The Local Desktop connection supports the bi-directional transfer of data. As the local clipboard is being checked using a polling mechanism every 200ms, it is necessary to make the script wait at least 200ms after pressing the Ctrl+C, to make sure the variable gets populated properly. The clipboard content may also change after a call of Type, Typeline or Press which partially rely on the local clipboard to perform the keyboard output. Other connection types do not support clipboard transfer. For more clipboard related functionality see the Waitfor clipboard command. |
| Robot when the client receives a clipboard change from desktop server | _SERVER_CLIPBOARD_CONTENT_TEXT=<text> | This variable follows the same rules as the _SERVER_CLIPBOARD_CONTENT one above save for two exceptions. If the clipboard contains an HTML document or a chunk of HTML code the variable gets populated with the plain text content extracted from the HTML. Otherwise, the content of the two variables is equal. The setting of this variable also won't update the server clipboard. Supported since 4.1.1. |
| Robot when script execution is started or when a script is compiled. | _DATE=<yyyyMMdd> | Date of the execution starts in the "yyyyMMdd" format. For example, May 8, 2005, will be defined as "20050508". The format may be customized in the Language panel of user preferences. To get the current date see the _CURDATE variable below. |
| _TIME=<HHmmss> | Time of the execution starts in the "HHmmss" 24-hrs. format. For example, 3:10:33 pm will be defined as "151033". The format may be customized in the Language panel of user preferences. To get the current time in milliseconds see the _CURTIME variable below. Should you need a formatted version of current time use _CURDATE with a custom format. | |
| _FILE=<file> | The absolute path of the executed script, e.g. "/root/test.txt". | |
| _FILENAME=<filename> | The script file name, e.g. "test.txt". | |
_REPORT_DIR=<path> | The target directory for screenshots and reports. All screenshots and reports will be saved to this directory unless they are specified via absolute path. The explicit setting of this variable in the script overrides the default path which is defined as follows:
| |
| _REPORT_FILE=<file> | Absolute path to the report (if the report is being created by the script). Supported since v4.0. | |
| _REPORT_FILE_RELATIVE=<file> | Path of the report file relatively to the report folder specified by _REPORT_DIR. Supported since v4.1.3. | |
_LOG_FILENAME=<filename> | File name for the execution log file. It defaults to log.html. Supported since 7.2.6. | |
_TEMPLATE_DIR=<path> | Source directory containing template images for image comparison. Commands employing image comparison will search this directory for all templates specified by relative path. The explicit setting of this variable in the script overrides the default path which is defined as follows:
| |
| _SCRIPT_DIR=<path> | Directory where the currently executed script is located (absolute path). | |
| _WARNING_COUNT=<number> | The number of warnings which have been generated by the Warning command during the script execution. | |
_CURDATE_FORMAT=<format> | Date/time format for the _CURDATE dynamic variable. It must be a string complying with the java.text.SimpleDateFormat specification. For example, setting the variable to "yyyy" will cause any later use of _CURDATE to produce "2010" (the current year in 4-digit format). The setting of this variable to an empty string will revert the format to the default value. | |
_RANDOM_MIN=<integer_number> | Minimum and maximum values for the random value generator used for the dynamic variable _RANDOM. Default values are 1 and 100000. | |
_RGB_X=<x_coordinate> | Coordinates used to retrieve RGB from the desktop image. Users are advised to set these two variables to the desired coordinates to retrieve the pixel colour through the _RGB dynamic variable. | |
_INSTALL_DIR=<installation_path> | Installation directory. It is equal to the location of the robot.jar file. The directory is absolute and does not end with the file separator. Supported since v2.3. | |
_ENV_<variable_name>=<value> | Environment variables. These are OS-specific variables provided by the hosting operating system. These variables may not be populated if such an option is selected in the Scripting->Language panel of the Preferences window. Supported since v2.3. | |
_EXECUTION_SPEED_FACTOR=<float_number> | The factor to multiply all the 'wait' and 'timeout' script times with. This allows to speed up or slow down the script execution. The variable is initialized to the value specified in the Preferences->Execution panel. The default value is 1 which means '100%'. For example, to slow down the script and make all wait times 50% longer set the value to '1.5'. Supported since 3.2. | |
_FS=<local_OS_file_separator> _FPS=<local_OS_file_path_separator> | The local OS file separator (backslash '\' on Windows, slash '/' on Linux/Unix) and the file path separator (semicolon ';' on Windows, colon ':' on Linux/Unix). The separators enable to construct OS independent relative paths and path lists to allow to execute a script from any system. For example, if the relative Windows path of "..\data" is specified as "..{_FS}data" the script will work correctly also on any Unix/Linux system. | |
_STEP_SUMMARY_FORMAT=<format> | Format of the step summary produced by the _STEP_SUMMARY dynamic variable. The format can be any string defining how to append a single Step result to the summary. Rules: - All occurrences of "{<param>}" where <param> is a valid lowercase Step command parameter name (name, expected, actual, instruct, notes) or the result the keyword will be replaced with the corresponding Step attribute. - If the <param> string is in upper case (for example {RESULT}) it will be replaced with the upper case attribute value. - The string of "\n" will be replaced with the new line character. The default format of:
will produce a summary like: Step "Click button1": PASSSupported since 3.5.1. | |
| Robot whenever the variable is used. As values of these variables are created at the time of the variable call, they are called "dynamic variables". | _CURTIME=<time_in_milliseconds> | Whenever this variable is used, it is dynamically replaced by the current system time in milliseconds since midnight of January 1, 1970, UTC. You may use this variable to calculate how long the command or a block of commands took to execute or to measure the performance of the remote system. |
| _CURDATE=<formatted_time_and_date> | Produces a readable current time and/or date. The format may be specified in the script through the _CURDATE_FORMAT variable. If the variable is not set the format defaults to the value in user configuration (see the Language panel of user preferences). If neither the preference is set the format defaults to the default Java one produced by java.util.Date().toString(). | |
| _CURRENT_FILE=<script_file> | The current script file which contains the code that is currently being executed. Scripts may use this variable for logging or tracking purposes. Supported since 6.2.1. | |
| _CURRENT_FILENAME=<script_file_name> | The current script file name. Supported since 6.2.1. | |
_MOUSE_X=<X_coordinate> | Return current mouse pointer X, Y coordinates. If the tool is not connected to a desktop or no mouse event has been registered yet since the connection, the coordinates return [0, 0]. | |
_RANDOM=<random_integer> | Whenever used the variable produces a random integer number. The range is by default set to [1, 100000] and maybe changed through the _RANDOM_MIN and _RANDOM_MAX variables (see above). | |
_RGB=<RGB_color> | Whenever used the variable retrieves current colour of the desktop image pixel pointed to by coordinates specified by the _RGB_X and _RGB_Y variables. This can be used to test whether a location on the screen contains a particular colour or not. Users are advised to set the _RGB_X and _RGB_Y variables to the target coordinates and then call the _RGB variable to retrieve the colour. The pixel value is returned in HTML-style format string, 6 characters long, with R, G, B components specified in this order as lower case hexadecimal values (2 characters per component). For example the white color of RGB(255, 255, 255) is presented as "ffffff" while the green color of RGB (0, 255, 0) produces "00ff00". A typical example testing whether the pixel at [234,128] is green:
| |
_STEP_SUMMARY=<step_summary> | A plain text summary of step results (one line per step) recorded within the script so far. For example:After execution of the code above the SUMMARY variable will contain: The summary format can be customized at the script scope through the _STEP_SUMMARY_FORMAT variable or globally through the Step command preferences. When both ways are used the variable has higher priority. Supported since 3.5.1. | |
_IOS_DEVICES=<list> | The variable expands into a semicolon separated list of names of mobile devices attached to the local USB ports on Mac OS X. Supported since 5.0.6. Whenever called the variable populates additional variables: _IOS_DEVICE_COUNT=<number> | |
| Robot when script execution is started. Also updated by Connect and Disconnect commands. | _MACHINE=<servername> | Desktop server machine name to which Robot is connected. The variable is empty if there is no connection. |
| _PORT=<portnumber> | Desktop server port number. If the connected desktop doesn't use a TCP/IP connection (such as drivers attached directly to local displays), the variable is empty. | |
| _PROTOCOL=<protocolname> | Name (code) of the current desktop connection protocol in upper case, for example, "RFB", "ADB" or "JAVA". | |
| _URL=<desktop_url> | Desktop URL containing protocol, machine (host) name and optionally port number. | |
| _DESKTOP_WIDTH=<width_in_pixels> | Width of the currently connected remote desktop (in pixels). | |
| _DESKTOP_HEIGHT=<width_in_pixels> | Height of the currently connected remote desktop (in pixels). | |
_DISPLAY_COUNT=<number_of_displays> | The number of displays (screens) managed by the connection. Supported since 4.3.1. As of this release, the only multi-display capable connection is the Local Desktop one. All other connections show the count as 1 (one). | |
| _DISPLAY_X_<n>=<number_in_pixels> _DISPLAY_Y_<n>=<number_in_pixels> _DISPLAY_W_<n>=<number_in_pixels> _DISPLAY_H_<n>=<number_in_pixels> | Coordinates (x, y, width and height) of the n-th display. Numbering starts at 1 and is subject to the local OS. Connections that do not support multiple displays set the X and Y coordinates to zero and the width and height are set to the desktop ones. Supported since 4.3.1. | |
| RFB (VNC) Client when connected or disconnected | _DISPLAY=<servername>:[<display#>] | Display variable which is useful for display redirection on Unix/Linux systems. It is in the "server:port" format, e.g. "mymachine:2" defines a machine called 'mymachine' running a VNC server on port 5902. The variable is empty if there is no VNC connection. |
| Waitfor command when an update event complying with the given criteria occurs | _X=<number_in_pixels> | The 'x' coordinate of the last update event that met the criteria. |
| _Y=<number_in_pixels> | The 'y' coordinate of the last update event that met the criteria. | |
| _W=<number_in_pixels> | The 'width' coordinate of the last update event that met the criteria. | |
| _H=<number_in_pixels> | The 'height' coordinate of the last update event that met the criteria. | |
| Waitfor command after every execution | _TIMEOUT=<true|false> | If timeout is defined and reached, the Waitfor command will set this variable to 'true', otherwise to 'false'. |
| Report command whenever a report gets generated | _REPORT_FILE=<file> | Report file (absolute path), e.g. '/root/report.html'. |
| _REPORT_FILENAME=<filename> | Report file name, e.g. 'report.html'. | |
| _REPORT_FILE_RELATIVE=<file> | Report file path relative to the report (output) directory, for example, 'MyTestScript.tpr.2a12fd2/report.xml'. Supported since 4.1.3. | |
| Commands performing search for a component or text on the screen such as Compareto, Screenshot , Waifor match/mismatch, Click and Drag | _COMPARETO_TEMPLATE=<file> | Image file (absolute path) used for last image comparison. |
| _COMPARETO_RESULT=<number> | Comparison result percentage. It is always a number between 0 and 100. It indicates how much the images matched. | |
| _COMPARETO_PASS_RATE=<number> | Pass rate percentage used for the last image comparison. It is always a number between 0 and 100. | |
| _COMPARETO_TIME_IN_MS=<milliseconds> | Time in milliseconds spent by the image comparison. If there's a list of templates, the value represents a summary time of all performed comparisons. | |
| _COMPARETO_TEMPLATE_INDEX=<number> | Index of the template in the template list which produced the pass result. Indexing starts from zero. | |
| _COMPARETO_TEMPLATE_WIDTH=<number> _COMPARETO_TEMPLATE_HEIGHT=<number> | Dimensions of the matching template image. Since v4.4 the variables are populated with the last template image used when the comparison fails. | |
| _COMPARETO_SOURCE_X=<number> _COMPARETO_SOURCE_Y=<number> | Source coordinates of the last compared template. These variables are populated only for templates created with version 2.2 and higher. See the Image Meta Data chapter for details. | |
| _COMPARETO_CLICK_X=<number> _COMPARETO_CLICK_Y=<number> | Click point of the last compared template image. The coordinates by default point to the centre of the component located through the "search" image comparison algorithm or to the custom relative location. See the Image Meta Data chapter for details. | |
| _COMPARETO_CLICK_X_<n>=<number> _COMPARETO_CLICK_Y_<n>=<number> | Click point of the last compared template image of the <n>-th match. The coordinates by default point to the centre of the component located through the "search" image comparison algorithm or to the custom relative location defined by the click point when the template image was created. See the Image Meta Data chapter for details. | |
| _COMPARETO_DISPLAY_NO=<display_number> _COMPARETO_DISPLAY_NO _<n>=<display_number> | The number of the display the topmost or the n-th match was located on. Numbering starts with 1 and is subject to the local OS. Supported since 4.3.1. As of this release the only multi-display capable connection is the Local Desktop one. All other connections show the number always as 1 (one). | |
| User (customizable) | _COMPARETO_SORT_MODE=<number> | Desired sort mode to be applied to template images loaded from directories. See the Image Collections chapter for details. |
_DESKTOP_SIZE=w:<width>;h:<height> | The target size of the iOS screen mirrored through the iOS Mirror connection. Whenever the Var command setting this variable is executed it will resize the mirrored screen to ensure that image comparison of template images created against the particular screen size will work correctly. Read the iOS Mirror connection document for details. | |
| Compareto command, Screenshot comparisons and 'Waifor match' calls when "search" comparison method is used | _SEARCH_MATCH_COUNT=<number> | Number of matches found through image search. It is always an integer greater than or equal to zero. |
| _SEARCH_X=<number> | The 'x' coordinate of the first match. If the template image was not found, the value is -1. | |
| _SEARCH_Y=<number> | The 'y' coordinate of the first match. If the template image was not found, the value is -1. | |
| _SEARCH_X_<n>=<number> _SEARCH_Y_<n>=<number> | The 'x' and 'y' coordinates of the n-th match where n is between 1 and the value of _SEARCH_MATCH_COUNT. | |
| Compareto command, Screenshot comparisons and 'Waifor match' calls when "object" comparison method is used | _OBJECT_COUNT=<number> | The number of objects located through the "object" image comparison method. |
| _OBJECT_X_<n>=<number> _OBJECT_Y_<n>=<number> _OBJECT_W_<n>=<number> _OBJECT_H_<n>=<number> | The 'x' and 'y' coordinates, width and height of the n-th object where n is between 1 and value of _OBJECT_COUNT. | |
| Exec command after every execution | _EXEC_OUTPUT=<text> | The standard output of the executed command, i.e. messages which are printed into the console. |
| _EXEC_ERROR=<text> | Error output of the executed command, i.e. error messages which are printed into the console. | |
| _EXEC_COMMAND=<command> | Last executed OS command, i.e. the Exec argument. | |
| _EXEC_VALUE=<number> | Integer exit code of the executed OS command. | |
Image comparison commands such as Compareto, Screenshot , Waifor match/mismatch, Click and Drag | _LAST_CMP_COMMAND=<command> | Text of the last executed image comparison command. Supported since v4.4.2. |
| Script during execution | _TPR_LAST_COMMAND_1=<command> | Text of the last 3 executed commands with all variable calls resolved and substituted. Supported since 6.1. |
| Script at execution start, updated by the Log command | _LOG_WARNING_COUNT=<number> _LOG_SEVERE_COUNT=<number> | Number of logs of the WARNING and SEVERE levels produced during the script execution. Supported since 6.3.1. |
You may use the Variable Browser window to view the list of variables which are present in the current execution repository.
SYNOPSIS
var <var_name_1>=<value_1> [<var_name_2>=<value_2> ... <var_name_N>=<value_N>]
* Red colour indicates obligatory parameters
OPTIONS
var_name
- A name for the variable. The name is case sensitive and must not contain spaces.
value
- Variable value. If the value contains spaces, it must be enclosed in double-quotes, e.g. "This is a text containing spaces". If you need to include the double-quote character into your variable value, place a leading backslash before it, e.g. "This is a double quote \"". If you need to include a backslash followed by a double quote, use '\\"', e.g. "This is a backslash followed by a double quote - \\"".
RETURNS
The Var command always returns 0 (zero).
EXAMPLES
      Var
    PATH=/tmp  path=/tmp  DESCRIPTION=
    "Path to change to"  EMPTY=
- Create four variables PATH, path, DESCRIPTION and EMPTY with the given values.
      Compareto

      "search.png"
    method=
    "search"
    for (i=1; {i}<{_SEARCH_MATCH_COUNT}+1; i={i}+1) {


        # Nested variables compose the variable names of a suffix and an index


        Mouse

      click
    to=x:{_SEARCH_X_{i}},y:{_SEARCH_Y_{i}}

    }
- An example of nested variable references searching the remote desktop image for an icon represented by the template image search.png and clicking onto each of the occurrences.
3.2.19 Varg
DESCRIPTION
Varg - Define ("Varg set") or delete ("Varg delete") a variable with the specified visibility scope. Supported since v6.3.
The command is an extension of the Var command:
- Var can only create/set variables with the local (inside a code block) or script visibility. Varg adds support of session (global) variables which allow scripts or workitems to share data.
- Var determines the visibility scope from the context. A variable defined in the main script body will have the script visibility while a variable defined inside a structured code block (if/else, for, procedure) will be a local one. On contrary Varg works with an explicit scope. This approach is more flexible because you may for example create script variables inside structured blocks.
- Varg introduces the ability to delete variables. This is useful where the script needs to branch on a variable existence (the 'exists' boolean operator). As the script XML report stores variables it can be also used to remove sensitive data.
There's a CLI option called --variable-session to create a session variable on the automation start.
SYNOPSIS
Varg set name=<variableName> [value=<variableValue>] [scope=<visibilityScope>]
* Red colour indicates obligatory parameters
OPTIONS
name=<variableName>
- The variable name. It is case sensitive and it may not contain spaces or the equals character ('=').
value=<variableValue>
- The variable value.
scope=<variableScope>
- The visibility scope, one of:
- local - The variable will be visible only within the code block it is declared in, for example inside a for, if/else or procedure.
- script - Visible within a single script and all scripts called from it.
- session - Available to all scripts within the same session. The variable will exist until the application gets terminated.
Lower scopes have higher priority. For example, a local variable will override a session one of the same name. If the scope is omitted it defaults to the 'script' one.
Varg delete name=<variableName> [scope=<visibilityScope>]
* Red colour indicates obligatory parameters
OPTIONS
name=<variableName>
- Name of the variable to delete. It is case sensitive and it may not contain spaces or the equals character ('=').
scope=<variableScope>
- The visibility scope, one of 'local', 'script' or 'session'. If the scope is omitted the command will delete all variables of the specified name across all scopes.
RETURNS
The Varg command always returns 0 (zero).
EXAMPLES
Varg set name="S" value="Hello" scope="session"
- Create or set a session variable called 'S'.
Varg delete name="S" scope="session"
- Delete the session variable created in the previous example. Leave all other variables of the same name that exists at the local or script scopes.
3.2.18 Varf
DESCRIPTION
Varf - Define one or more variables where the value may contain Java escape sequences allowing to insert new lines, tabs or special Unicode characters. Supported since v3.5.1.
SYNOPSIS
varf <var_name_1>=<value_1> [<var_name_2>=<value_2> ... <var_name_N>=<value_N>]
* Red colour indicates obligatory parameters
OPTIONS
var_name
- A name for the variable. The name is case sensitive and may not contain spaces.
value
- Variable value. If the value contains spaces, it must be enclosed in double quotes, e.g. "This is a text containing spaces". Escape sequences will be converted as follows:
\b /* \u0008: backspace BS */
\t /* \u0009: horizontal tab HT */
\n /* \u000a: linefeed LF */
\f /* \u000c: form feed FF */
\r /* \u000d: carriage return CR */
\" /* \u0022: double quote " */
\' /* \u0027: single quote ' */
\\ /* \u005c: backslash \ */
\uNNNN will be converted to the appropriate Unicode character as long as NNNN is a valid Unicode character hexadecimal value
RETURNS
The Varf command always returns 0 (zero).
EXAMPLES
Varf MULTILINE="Line #1\nLine #2"
- Populate the MULTILINE variable with two lines of text (the '\n' sequence will be converted to new line).
Varf MULTILINE="Line #1\u000aLine #2"
- Same example as above where the new line character is specified through escaped Unicode (new line is ASCII 10, 0x0a).
3.2.20 Wait
DESCRIPTION
Wait - Wait for a specified amount of time. Use this command to pause the script execution for a specified period of time.
SYNOPSIS
wait <time>
* Red colour indicates obligatory parameters
OPTIONS
time
- Time to wait before proceeding to the next command. It must be a number greater than zero. A plain number is by default interpreted as milliseconds. See syntax of time values for the specification of time formats.
RETURNS
The command always returns 0 (zero).
EXAMPLES
Wait 30000
Wait 30s
Wait 0.5m
- All three commands are equivalent and make the script wait for 30 seconds (aka 30,000 milliseconds or half a minute) before proceeding to the next command.
3.2.21 Waitfor
DESCRIPTION
Waitfor - Pause execution of a script and wait for an RFB event or state of the remote desktop image. Currently supported events are screen update, bell (desktop server emitted a beep through the printing of the ASCII character 0x07), delivery of text copied on the remote system (desktop server clipboard change) and match/mismatch (waiting for a positive or negative image comparison result).
Support for particular events is subject to protocol capabilities. T-Plan Robot has an open and flexible architecture allowing to plug-in clients with just a subset of capabilities commonly provided by remote desktop technologies. If a Waitfor event is not supported by the selected desktop protocol the script will report an error. The following table lists the capabilities of the two supported protocols:
Waitfor Event | RFB Client ("rfb") | Static Image ("file") |
|---|---|---|
"update" (Screen update) | Yes | Yes (through detection of the image file changes) |
"bell" (Beeps) | Yes | No |
"clipboard" (Clipboard changes) | Yes (may require the vncconfig or autocutsel utility to run on server. See the Release Notes for more.) | No |
"match" (Positive image comparison result) | Yes | Yes |
"mismatch" (Negative image comparison result) | Yes | Yes |
All Waitfor commands populate the following variable:
Variable Name | Description |
|---|---|
_TIMEOUT=<true|false> | If the timeout is defined and reached, the Waitfor command will set this variable to 'true', otherwise to 'false'. |
The Waitfor update command populates additional variables:
Variable Name | Description |
|---|---|
_X=<X-coordinate> | The X, Y coordinates and the width and height of the last update event that met the criteria. These variables are populated just forWaitfor update. |
The Waitfor match and mismatch commands maintain result compatibility with the Compareto command and populate two more variable groups:
- All the _COMPARETO prefixed variables specified in the Compareto command,
- Variables populated by the selected image comparison method.
Though the Waitfor clipboard describes the _SERVER_CLIPBOARD_CONTENT variable it is not created by the Waitfor command and it is being populated by the core framework independently from any commands.
SYNOPSIS
Waitfor <event_id>[<event specific options>] [timeout=<time>] [ontimeout=<command>] [onpass=<command>] [count=<number>] [wait=<time>]
* Red colour indicates obligatory parameters
event_id
- Supported event IDs are 'bell', 'update', 'match' ,'mismatch' and 'clipboard'.
- A bell event indicates that your server beeped, i.e. an application printed out the bell character (ASCII 0x07).
- An update means that you wait for an update of the remote desktop image, for example for a window to pop up. If the expected event is received, the Waitfor command resumes script execution and updates the execution context with variables representing the update coordinates (see the table of Waitfor predefined variables).
- The match event makes the command wait until the selected comparison method produces a positive result (waits until the desktop matches). The mismatch event makes the command wait as long as the method produces a positive result (wait until the desktop stops matching).
- Clipboard waits for delivery of the remote server clipboard content. When a text gets selected on the remote desktop and a copy action is invoked (e.g. through Ctrl+C), some desktop servers send the text to the client. Once the message is received, the remote clipboard content is available through the _SERVER_CLIPBOARD_CONTENT variable (see also the Var command).
COMMON OPTIONS
timeout=<time>
- Timeout specifying how long to wait at a maximum. The value must be either a number of milliseconds or a valid time value. The default value is not set and the command will wait indefinitely if the timeout value is not specified.
ontimeout=<command>
- A command to be executed when the timeout is reached. It must be one single command. If you need to define a sequence of command to be executed, use a procedure.
onpass=<command>
- A command to be executed when the condition is met (when the expected event is received or the image comparison fails to return the expected result). It must be a single command. To call a sequence of commands, use either a procedure or a subsequent if/else construction testing the command exit code.
count=<number>
- How many events to wait for. The default value is 1. This parameter is ignored by image comparison events (Waitfor match/mismatch).
wait=<time>
- Time to wait after the Waitfor condition is met. It has the same effect as if the following command was 'Wait <time_in_ms>'. This parameter is ignored if the timeout defined by the timeout parameter is reached. The value must be either a number of milliseconds or a valid time value. The default value is 0 (don't wait). Scripts may set the default value through populating of the _WAITFOR_WAIT variable with the desired delay, for example "Var _WAITFOR_WAIT=1s".
Waitfor bell [<common options>]
SPECIFIC OPTIONS - BELL
None.
Waitfor update [area=[x:<x>][,y:<y>][,w:<width>][,h:<height>]] [extent=<number>[%]] [cumulative=<false|true>] [<common options>]
SPECIFIC OPTIONS - UPDATE
area=[x:<x>][,y:<y>][,w:<width>][,h:<height>]
- The screen area to wath for updates. This parameter is applicable only to the update event and enables user to define a custom area and watch it for updates. The area coordinates have format of 'x:<x>,y:<y>,w:<width>,h:<height>', where each coordinate can be specified in pixels (e.g. 'x:225') or as a percentage (e.g. 'x:23%'). If any of x, y, width or height is omitted, Robot will use the full-screen values to determine the missing parameters, i.e. 'x:0, y:0, w:<screen_width>, h:<screen_height>'. You may also define the update area using the status bar Update Coordinates feature.
extent=<number>[%]
- Extent (scope) of the screen update. This parameter is applicable only to the update event and defines how large the screen update must be. The value can be either a number of updated pixels (e.g. 'extent=400') or percentage (e.g. 'extent=22%'). If a custom area is defined by the area parameter, the percentage/pixel value will be computed against this area.
cumulative=<false|true>
- Switches on/off cumulative updates. If your desktop server prefers gradual screen updates and sends many small image fragments instead of a larger expected one, switch this feature on and Robot will summarize all partial updates falling into the defined area. The default value is false.
As Windows VNC servers are known to update the screen in a series of smaller updates it is recommended to set the mode to true.
Waitfor match | mismatch [template=<image_collection>] [passrate=<pass_rate>%] [interval=<comparison_interval>] [method=<comparison_method>] [methodparams=<custom_params>] [cmparea=[x:<x>][,y:<y>][,w:<width>][,h:<height>]] [<common options>] [<method_specific_params>]
* Image collection is obligatory only if it is required by the selected image comparison algorithm (parameter "method"). See the Compareto command specification for details.
SPECIFIC OPTIONS - MATCH AND MISMATCH
template=<image_collection>
- An [image collection|#imgcol] - one or more image file names or folders with images separated by a semicolon (';') to be compared to the remote desktop image. On Linux/Unix make sure the file name doesn't contain semicolon because the list would be incorrectly parsed. File names can be either relative (e.g. img.png) or absolute (e.g. /root/report/img.png). If you use a relative path, the image will be searched in the directory defined by the [_TEMPLATE_DIR variable|#_template_dir]. Supported image formats are subject to the Java version and installed extensions (such as the Java Advanced Imaging library, JAI). Java 1.6 supports at least PNG, JPG, GIF and BMP.
Template images will be compared with the remote desktop image in the specified list order. If a template comparison produces a positive result (either match or mismatch depending on the specified event), the condition is considered to be met and the command finishes with an exit code of 0. Predefined variable _COMPARETO_TEMPLATE_INDEX may be used to determine the index of the matching template in the list. See [image comparison specific variables|#compareto_vars] for more.
Image comparison should not be performed against images with lossy compression such as JPEG. Use PNG or BMP instead. They preserve 100% of the image information and guarantee reliable and stable comparison results. Image comparison is discussed in the [Compareto command specification|#compareto].
interval=<time>
-This parameter defines the time interval for image comparisons. The default value is 3 seconds which means that the desktop image will be compared against the given template image(s) every 3 seconds. A plain number is by default parsed as milliseconds. See the syntax of time values paragraph for more time formats. The default value can be configured in the Waitfor preferences panel of the Preferences window.
passrate=<pass_rate>%
- The pass rate for image comparison. It must be a number between 0 and 100 which may optionally be followed by the percentage character (for example "passrate=95" or "passrate=95%"). If this parameter is omitted, the default pass rate defined by the method or in the Robot preferences will be used (default values are 95% for the "default" and 100% for the "search" and "search2" methods).
method=<comparison_method>
- - The method (algorithm) to be used for image comparison. It must be one of the supported method names (codes) described in the Image Comparison Capabilities chapter or the name of a third party method enabled through the plugin interface. If omitted the command will use the default one.
methodparams=<custom_params>
- Custom parameters to be passed to the image comparison algorithm. As T-Plan Robot 2.0 default image comparison algorithms don't support any custom parameters, you don't need to specify this parameter unless you write your own algorithm.
cmparea=[x:<x>][,y:<y>][,w:<width>][,h:<height>]
- The rectangular area of the desktop to be limit the comparison to. If you omit this parameter the whole remote desktop will be used. The area coordinates have the format of 'x:,y:,w:,h:', where each coordinate can be specified in pixels (for example. "x:225") or as a percentage ("x:23%"). If any of x, y, width or height are omitted, T-Plan Robot will use the full-screen values to determine the missing parameters (x:0, y:0, w:, h:).
Waitfor clipboard [<common options>]
SPECIFIC OPTIONS - CLIPBOARD
None.
RETURNS
The command generally returns 0 (zero) when the condition (event) is met. Non-zero value (usually 1) is returned when the timeout is reached. 'Waitfor match' and 'Waitfor mismatch' mimic behaviour of the Compareto command and return 0 (zero) when the comparison passes, 1 when it fails and 2 when the template image is not found or cannot be read.
EXAMPLES
Typeline "export MYDOC=`find / -name mydoc.txt`; sleep 1; echo -e '\007\007'"
Waitfor bell count=2
Typeline "gnome-text-editor $MYDOC"
- This is a typical example of how to use the bell event on a Unix/Linux system. Let's suppose that you need to find a file on your hard drive and edit it. The first command will run the search in a terminal window and proceed to the Waitfor command. Once the search finishes, two bell characters are printed using the echo OS command and your machine beeps twice. This will cause the Waitfor command to proceed and run the third command which will open the document in a Gnome text editor.
Please note the 'sleep 1' command in the first line. If your desktop server is very fast and your machine running T-Plan Robot is somewhat slower, it may happen that the document search finishes before T-Plan Robot manages to proceed to the Waitfor command. The 'sleep 1' prevents this problem because the server will wait 1 second before printing the two bell characters.
procedure terminate {
    Screenshot error.jpg
    Report report.html
    Exit {1}
}
Typeline myapplication
Waitfor update extent=40% timeout=20s ontimeout="terminate 2"
- This is a typical usage of the 'Waitfor update' command. It shows a situation when you are starting a GUI application called myapplication from a terminal window. Let's suppose that the application window has a fixed size equal to at least 40% of the screen size. If the GUI starts properly, the script will continue. The Waitfor command will otherwise wait for 20 seconds and then will run the exit procedure with the given exit code.
Waitfor match template=application.png;application2.png passrate=95% interval=5s timeout=5m ontimeout="exit 1"
- Compare the remote desktop image to images application.png and application2.png every 5 seconds until there's at least 95% match with one of them. If this condition is not met within 5 minutes, terminate the script execution using the Exit command and return exit code 1.
Press Ctrl+C
Waitfor clipboard timeout=5s
if ({_EXIT_CODE} == 0) {
  Screenshot copied_text.jpg desc="Received text copied on the remote desktop: {_SERVER_CLIPBOARD_CONTENT}"
}
- Pressing of Ctrl+C on the remote desktop typically copies selected text to the remote system clipboard. Some desktop servers are capable of sending this text to the clients. Robot can decode such a message and provide the text into the script in the form of the _SERVER_CLIPBOARD_CONTENT variable. The example above shows how to verify reception of the copied text through Waitfor clipboard and how to use it e.g. in the description of a screenshot.
3.3.1 Log
DESCRIPTION
Log - Log a message to the script execution log file. For details see the Execution Log help topic.
Release 4.4.2 delivered execution history logging. It logs steps performed by the script in details and saves screenshots to document the progress of I/O operations. It is useful for tracking of script failures. To avoid the production of large amounts of data the logger stores just a configurable number of the most recent logs and prints them to the execution log (log.html) after the script execution finishes. For instant dump of the history logs, use the history parameter, for example when your script detects a recoverable failure.
Release 4.4.3 enhanced the history log with the option to print out the history logs to the console/terminal. The messages are printed out on the fly as they are generated without any limits. This is useful for integration with 3rd party frameworks which observe the output.
The history logging and console output are off by default. To enable them to navigate to the Log command preferences. The console output may be also controlled from a script by setting of the _LOG_HISTORY_TO_TERMINAL variable to true as follows:
Var _LOG_HISTORY_TO_TERMINAL=trueThe variable overrides the console output preference setting. It works only when the main history logging flag in preferences is enabled.
Starting with 7.2.6 the default log file name of "log.html" may be customized. To do so set this variable at the beginning of your script:
Var _LOG_FILENAME=mylog.htmlSYNOPSIS
log "<text>" [level=<logLevel>] [terminal=<true|false>] [history=<true|false>]
* Red colour indicates obligatory parameters
OPTIONS
text
- The log text. As the execution log file is generated in the HTML format it may contain HTML markup.
level=<logLevel>
- Optional log level, one of "SEVERE", "WARNING", "INFO", "CONFIG", "FINE", "FINER" and "FINEST". The default value is "INFO" or the custom value specified in the Log command preferences.
Levels allow filtering the log file by the message priority. The default filter level (also called "minimum level") is "INFO" which means that the log will record only messages of this or higher level. This allows building scripts with detailed logging with an option to set off part of the logs later on through a simple change of one of the corresponding preference.
terminal=<true|false>
- The value of true will make the command copy the message to the terminal (command prompt). The default value is 'false'. Supported since v4.1.3.
history=<true|false>
- The value of true will make the command record the most recent script history into the log file. This includes the most recent detailed logs and debug screenshots. Use it to track what had happened before the script produced an error. If the script history recording feature is disabled in the Log command preferences the parameter is ignored. The default value is 'false'. Supported since v4.4.2.
RETURNS
The command always returns 0 (zero).
EXAMPLES
Log "Suspicious image search coordinates: _SEARCH_X={_SEARCH_X}, _SEARCH_Y={_SEARCH_Y}" level="WARNING"
- Create a warning log.
3.3.2 Report
DESCRIPTION
Report - Create and start a report provider for the executed script. It is an object which builds a report from the script execution data such as results, screenshots and warnings. Report providers are customizable plugins and their functionality, life cycle and output format are implementation specific. See the Plugin API for more information on how to customize reports. The default provider started by the command is configurable in the Report preferences and defaults to the 'enterprise'.
The command populates relies on the _REPORT_DIR variable setting to define the target folder to store the report files to. It creates and populates the following variables:
Variable Name | Description |
|---|---|
_REPORT_FILE=<file> | Absolute path to the first specified report file (if a report is being created by the script). Supported since v4.0. |
REPORT_FILE<n>=<file> | Absolute path to the N-th report file. Numbering starts at 1. Supported since v4.1.3. |
REPORT_FILE<extension>=<file> | Absolute path to the report file with the specified extension in upper case. For example, if the report files are specified as "results.xml;results.html" there will be the variables of _REPORT_FILE_XML and _REPORT_FILE_HTML. |
_REPORT_FILE_RELATIVE=<file> | Path of the first report file relatively to the project report folder. As the report gets by default stored to a unique folder under the project report directory (see _REPORT_DIR) this variable allows capturing the name of the dynamically created folder. For example, a script called MyTestScript.tpr containing the command of "Report report.xml" will set the variable to a path like "MyTestScript.tpr.2a12fd2/report.xml". Relative project paths are intended to simplify linking to reports exposed on the web. When you put the project report folder to the webserver document root you may take advantage of this variable to construct the report URLs. Seethe Sendmail command examples for a use case. Supported since v4.1.3. |
REPORT_FILE_RELATIVE<n>=<file> | The relative path of the N-th report file. See the above description. Supported since v4.1.3. |
REPORT_FILE_RELATIVE<extension>=<file> | The relative path of the report file with the specified extension. See the above description. Supported since v4.1.3. |
_REPORT_FILENAME=<file> | Name of the first specified report file. |
REPORT_FILENAME<n>=<file> | Name of the N-th report file. See the above description. Supported since v4.1.3. |
REPORT_FILENAME<extension>=<file> | Name of the report file with the specified extension. See the above description. Supported since v4.1.3. |
Enterprise Report Provider
This provider supports both HTML, XML and ZIP formats. Its code is "enterprise". It copies exactly behaviour of the default provider (except for the scope parameter) and it even reuses all of its configuration parameters. The difference is however in the way how the test output is processed to generate the resulting report file. Unlike the default provider, this one also supports the Script, Step and Timer test results and it is tightly integrated with the script execution log.
When the output format is set to XML (an .xml file is specified in the command argument), the provider generates a simple XML file with all test outputs. Its format is specified in the provider's Java API documentation. As XML reports are linked with an XML style sheet (XSL), they may be displayed by web browsers and they provide exactly the same view of the report as the HTML files generated by the default provider. As the interpretation of the XML data into an HTML view is on the web browser side, the XML output is fast and efficient. The XML file may be in addition reused for export of test results to third party applications.
The tool provides a mechanism in the user preferences to replace the default XSL file with a custom one. This allows customizing the way how web browser displays the XML data. The provider offers additional configurable options affecting mainly performance and allows to customize the frequency of report generating.
If the output is set to HTML, the provider in fact generates the XML output first and then employs the XSL transformation to produce an HTML file. This operation is inefficient and usually very slow. As the provider, in this case, creates the same HTML content as the default one, it is recommended to use the default one instead unless there are custom changes applied to the XSL file.
Since the 4.1.3 the provider accepts multiple report files (semicolon separated). This may be used to create both the HTML and XML reports. It can also create a ZIP file with the report folder contents.
Default Report Provider
The default provider is a legacy report generator creating simple HTML reports. It is compatible with the previous VNCRobot 1.x versions and also T-Plan Robot Version 2. Its provider code is "default". It has the following lifecycle:
- Every execution of the Report command creates and starts a new instance of report provider. It immediately generates the very first HTML report using the predefined script variables and internal list of screenshots and warnings. It also inserts some report specific variables into the execution context.
- A status daemon is created and started. It wakes up periodically after a predefined period of time (typically 10 seconds) and takes a screenshot of the remote desktop. A link to this image is provided in the HTML report and enables users to view the recent state of the desktop.
- The provider then registers for change notifications with the internal list of output objects. Whenever a new screenshot is taken or a warning is created, the provider wakes up and rebuilds the report to include the new object.
- When the execution of the script finishes, the status daemon wakes up and refreshes the status image to reflect the exit state. Then the provider wakes up for the last time and rebuilds the report to reflect the execution result based on the exit code (see the Exit command).
The default report provider always processes all images and warnings taken during script execution. It means that even if you call the Report command at the very end of your script, the HTML report will list all screenshots and warnings including those that were taken before the Report command was executed. The list of images can be currently restricted only depending on the image origin (see the scope parameter below).
HTML reports may also contain a table of results of performed image comparisons. This feature can be configured in the T-Plan Robot Preferences window to display all or just failed comparison results executed through the Screenshot commands.
Note that image comparisons performed through the Compareto and Waitfor match/mismatch commands are never listed. The rationale is that you have to create a screenshot anyway to provide a functional link in the table. See the sample report at the link listed above for an example.
The default provider also inserts specific values at the end of HTML reports. They are embedded in HTML comments and they are not displayed in the browser. They provide information about the report state, length of execution, number of failed image comparisons etc. These values can be parsed by third-party applications in order to interpret the report state and result. A list of provided variables with sample values follows:
<!-- version=1.3-20061210 --> | Indicates which T-Plan Robot version and build was used to generate this report. |
<!-- running=false --> | Indicates whether the execution of the script is running or has already finished. |
<!-- stopped=false --> | A value of 'true' indicates that execution of the script has been manually stopped by the user via Stop button in GUI mode or by Ctrl+C in CLI. |
<!-- paused=false --> | A value of 'true' indicates that the execution of the script has been either manually or programmatically (via the Pause command) paused. |
<!-- exitCode=0 --> | Exit code. Zero indicates success while any other positive number is interpreted as failure. See the Exit command. |
<!-- imageCount=3 --> | The number of images in the report. |
<!-- failedComparisons=0 --> | The number of failed image comparisons. |
<!-- warningCount=0 --> | The number of warnings added by the Warning command. |
<!-- executionTimeInSec=44 --> | Time of script execution in seconds. |
SYNOPSIS
report <file(s)> [provider=<provider_name>] [desc=<description>] [scope=<scope_id>] [onexit=<true|false>]
* Red colour indicates obligatory parameters
OPTIONS
file(s)
- File name or names to save the report to. T-Plan Robot Enterprise will then check whether the path and file can be created and report an error if not. The file extension is validated against the list of supported formats declared by the provider and a syntax error is raised on mismatch.
- The "enterprise" one supports .xml, .htm, .html and .zip files. The command accepts a single file ("results.xml") or a semicolon-separated list of files ("results.xml;results.html;archive.zip") to create multiple formats in parallel. When the ZIP file is listed it will archive the contents of the report directory (including subfolders). For performance reasons, the archive gets created just once after the script finishes. Support of ZIP and multiple input files was introduced in 4.1.3.
- The "default" provider supports .htm and .html extensions. It accepts a single file only.
Filename can be either relative (e.g. report.xml) or absolute (e.g. /root/report/report.xml). If the path doesn't exist, it is usually created (default provider) but this behaviour may be provider-specific. If you use a relative path, the report file and all associated outputs should be saved to a directory defined by the _REPORT_DIR variable.
provider=<provider_name>
- Report provider name (optional). There are two providers, the "enterprise" one (actively developed and selected by default) and the "default" one (legacy/obsolete). You may eventually create a new provider with your own name and plug it into Robot through the plugin framework.
desc=<description>
- Report description. It will be displayed in the report header. If the default provider is used, the text may contain any HTML tags.
scope=<scope_id>
- The scope parameter provides a way to define which images should be included in the report based on the screenshot creator. This parameter is supported just by the Default Report Provider and it gets ignored by the Enterprise one.
There are two acceptable values:
- all - This value is the default one. All images taken during the script execution will be included in the report.
- file - Include only those images that were taken within the current script and in procedures called by this script. Other screenshots created by the master script (i.e. a superscript calling this script) and by the scripts executed using the Run command will be excluded. This approach is suitable when you execute a number of smaller scripts using one superscript and you prefer to have a couple of shorter reports instead of a large one.
onexit=<true|false>
- The value of true will not refresh the report on the fly but create it just twice when the method gets called and then after the script gets finished. This mode is recommended for large scripts creating multiple reportable objects where frequent report refreshing may lead to degraded performance. The default value is false. Supported since v4.1.3.
RETURNS
The Report command returns 0 (zero) if the report provider is started and the first report is created and saved successfully. If any error occurs, i.e. the report file cannot be created, the command returns 1.
EXAMPLES
Report results.xml desc="This is my XML report."
- Create a report generator and start to generate an XML report. As the relative file is provided, the report will be saved to a directory defined by the value of the _REPORT_DIR variable. The provided description will be displayed in the report header.
Report results.xml;results.html;results.zip desc="This is my XML and HTML report together with a ZIP archive."
- Create a report generator and start to generate the XML and HTML reports. Create a ZIP file of the report folder once finished.
Var _REPORT_DIR=/var/apache/htdocs/robot
Report index.html scope=file
Screenshot start_state.jpg desc="Initial state of the {_MACHINE} desktop. Starting execution of the {_FILE} script..."
...
- This is a typical example of how to use the report command. The first command defines the output path for the report file and screenshots which actually resides inside the Apache document root. This is very convenient because users can watch the report online through a web browser. As both report and screenshot commands use a relative path for the outputs, everything will be saved to the output directory.
3.3.3 Screenshot
DESCRIPTION
Screenshot - Take a screenshot of the current remote desktop and save it to a file.
The Screenshot command has been closely integrated with the Compareto command. Comparison is performed when a corresponding template image is found in the template directory (see the _TEMPLATE_DIR variable) and at least one of the following conditions is met:
- The Screenshot command contains at least one parameter originating from the Compareto command - 'template', 'passrate','onpass','onfail'.
- The option 'Perform auto comparison when the template is available' in the Screenshot command preferences is switched on.
Unless you specify a template image explicitly through the 'template' parameter, the command will search the template directory for a template with matching name and extension PNG, GIF, BMP and JPG (in this order). You can switch this feature off in the Screenshot preferences to force the command to search for templates with exactly the same file name as the screenshot images.
If the command performs image comparison it populates the image comparison specific variables.
SYNOPSIS
screenshot <file> [desc=<description>] [area=[x:<x>][,y:<y>][,w:<width>][,h:<height>]][attach=<list_of_files>] [template=<image_collection>] [passrate=<pass_rate>%] [onpass=<command>] [onfail=<command>] [method=<comparison_method>] [methodparams=<custom_params>] [cmparea=[x:<x>][,y:<y>][,w:<width>][,h:<height>]] [drawresults=<true|false>] [drawdiff=<true|false>] [<method_specific_params>]
* Red colour indicates obligatory parameters
OPTIONS
file
- File name to save the image to. It MUST have a supported extension, for example "png" or "jpg". Supported image formats are subject to the Java version. Java 1.6 supports at least PNG, JPG, GIF and BMP. File name can be either relative (e.g. img.jpg) or absolute (e.g. /root/report/img.jpg). If the path doesn't exist, it is created. If you use relative path or just a file name, the image will be saved to a directory defined by the [_REPORT_DIR variable|#_report_dir].
desc=<description>
- Image description. It will be displayed in the report.
area=[x:<x>][,y:<y>][,w:<width>][,h:<height>]
- This parameter can be used to specify which part (sub image) of the remote desktop will be saved. If you omit this parameter the whole remote desktop will be processed. The area coordinates have format of 'x:,y:,w:,h:', where each coordinate can be specified in pixels (e.g. 'x:225') or as a percentage (e.g. 'x:23%'). If any of x, y, width or height is omitted, T-Plan Robot will use the full screen values to determine the missing parameters, i.e. 'x:0, y:0, w:, h:'. You may also define the comparison area using the Screenshot window.
attach=<list_of_files>
- A file or a list of semicolon (';') separated files to be attached to a report. It provides a way to link for example log files and documents to the screenshot entry in the report. The report generator will list the attachments in the screenshot title in the HTML report and creates a hyperlink for each attached file. Please note that you have to copy the files to the target location on your own as T-Plan Robot neither copies the attached files to the report directory nor validates whether they exist there.
This parameter is obsoleted as it maintained compatibility with the previous versions. It is not supported in the Java script API.
template=<image_collection>
- An image collection - one or more image file names or folders with images separated by a semicolon (';') to be compared to the remote desktop image. On Linux/Unix make sure the file name doesn't contain semicolon because the list would be incorrectly parsed. File names can be either relative (e.g. img.png) or absolute (e.g. /root/report/img.png). If you use a relative path, the image will be searched in the directory defined by the _TEMPLATE_DIR variable. Supported image formats are subject to the Java version and installed extensions (such as the Java Advanced Imaging library, JAI). Java 1.6 supports at least PNG, JPG, GIF and BMP.
Template images will be compared with the remote desktop image in the specified list order. If a template comparison produces a positive result (either match or mismatch depending on the specified event), the condition is considered to be met and the command finishes with an exit code of 0. The predefined variable _COMPARETO_TEMPLATE_INDEX may be used to determine the index of the matching template in the list. See image comparison specific variables for more.
Image comparison should not be performed against images with lossy compression such as JPEG. Use PNG or BMP instead. They preserve 100% of the image information and guarantee reliable and stable comparison results. Image comparison is discussed in the Compareto command specification.
passrate=<pass_rate>[%]
- The pass rate for image comparison. It must be a number between 0 and 100 which may optionally be followed by the percentage character (for example "passrate=95" or "passrate=95%"). If this parameter is omitted, the default pass rate defined by the method or in the Robot preferences will be used (default values are 95% for the "default" and 100% for the "search" and "search2" methods).
method=<comparison_method>
- - The method (algorithm) to be used for image comparison. It must be one of the supported method names (codes) described in the Image Comparison Capabilities chapter or the name of a third party method enabled through the plugin interface. If omitted the command will use the default one.
methodparams=<custom_params>
- Custom parameters to be passed to the image comparison algorithm. As T-Plan Robot 2.0 default image comparison algorithms don't support any custom parameters, you don't need to specify this parameter unless you write your own algorithm.
cmparea=[x:<x>][,y:<y>][,w:<width>][,h:<height>]
- The rectangular area of the desktop to be limit the comparison to. If you omit this parameter the whole remote desktop will be used. The area coordinates have the format of 'x:,y:,w:,h:', where each coordinate can be specified in pixels (for example. "x:225") or as a percentage ("x:23%"). If any of x, y, width or height are omitted, T-Plan Robot will use the full-screen values to determine the missing parameters (x:0, y:0, w:, h:).
onfail=<command>
- A command to be executed when the image comparison fails. It must be one single command. If you need to define a sequence of command to be executed, use a procedure.
onpass=<command>
- A command to be executed when the image comparison succeeds. It must be a single command. To call a sequence of commands, use either a procedure or a subsequent if/else construction testing the command exit code.
drawresults=<true|false>
- This flag controls whether results of image comparison should be painted into the captured screenshot. The default value is false (meaning "do not paint any results"). If the command doesn't employ image comparison or the specified comparison method doesn't support result painting the parameter is ignored. In the default T-Plan Robot configuration, the "default" image comparison method doesn't support result painting because it doesn't make sense with regard to the algorithm nature. The "search" method does support result painting and draws rectangles corresponding to the match locations in the colour specified in command configuration.
drawdiff=<true|false>
- This flag controls whether the pixels differing from the template image should be painted in the configured colour (green by default). The parameter was introduced in v3.4 to support image difference tracking in reports. The default value is false (meaning "do not paint the difference"). If the command doesn't employ image comparison or the specified comparison method doesn't support pixel difference tracking the parameter is ignored. This feature is supported only by the "search" and "search2" algorithms.
method_specific_params
- See the documentation of individual image comparison methods for the list of supported specific parameters.
RETURNS
The command returns 0 (zero) if the screenshot is successfully saved and eventual image comparison passes. If image comparison takes place and fails, a value of 1 is returned. If the screenshot cannot be saved (e.g. not enough space), the command returns 2.
EXAMPLES
Screenshot image.jpg
- Take a screenshot of the current remote desktop and save it as a JPEG image into a file called image.jpg in a directory defined by the value of the _REPORT_DIR variable.
Screenshot /root/images/image2.png desc="This image shows what happened after I had clicked the Start button."
- Take a screenshot of the current remote desktop and save it as a PNG image into a file called image.png to the /root/images/ directory. If the executed script generates a report, the provided description will be displayed there.
3.3.4 Script
DESCRIPTION
Script - Define start or end of a script (test case). Though the command was introduced as part of the integration with T-Plan Professional, it can be used in a generic way to define the script structure as is common in the QA industry. Script mappings are recognized by the Enterprise report provider and may be used to map the output XML data (or HTML report) onto QA documentation (such as test case specification).
A script in T-Plan terminology, in this case, is equal to a test case. Scripts in general consist of test steps, which represent a set of test instructions describing how to execute the test case. Steps may be specified in T-Plan Robot scripts through the Step command.
The command is intended to be used in pairs [Script <id> start, Script <id> end] to define a block of code which executes a test case. Any output objects generated inside such a block (such as screenshots or warnings) are then associated with the script (test case) ID and this relationship is reflected in the test result data. As a script block validity ends automatically with the file end or with declaration of another "Script start" command, declaration of the script end is optional and may be omitted.
SYNOPSIS
script <id> [start|end]  [name=<displayable_name>]
* Red colour indicates obligatory parameters
OPTIONS
id
- A unique script ID. It may be a number or text. If the test results are to be exported to a third-party test management application, the ID must be an understandable value. Export to T-Plan database (and T-Plan Professional) requires the ID to be a valid script entity number as is described in the Entity Mapping chapter of the T-Plan Robot Integration Reference.
start|end
- Indicates whether the script block starts or ends. It may be also specified as action=\[start|end\]. If the parameter is omitted, the command defaults to start.
name
- An optional displayable name for the script.
RETURNS
The Script command always returns 0 (zero).
EXAMPLES
Script 1 start name="Display http://www.t-plan.com"
Press Windows+R wait=3s
Typeline "http://www.t-plan.com"
Waitfor match template="tplanlogo.png" method=search timeout=20s
if ({_EXIT_CODE} == 0) {
  Step "Open http://www.t-plan.com in web browser" pass
} else {
  Step "Open http://www.t-plan.com in web browser" fail
  Exit 1
}
Script 1 end
- An example of script number 1 which opens the T-Plan web site in the default web browser on Windows. The script uses image search to verify that the page was displayed successfully. If the T-Plan logo is detected on the desktop the script records a passed step result. Otherwise, a failed step is recorded and the script exits with a code of 1 to indicate failure.
3.3.5 Sendmail
DESCRIPTION
Sendmail - Send an E-mail. The command acts as an SMTP client and sends E-mails with eventual attachments through an SMTP server. To receive email use the Mail command.
Supported authentication schemes are no security (public/anonymous mail servers), plain user/password authentication or OAuth2 authentication to Google or Microsoft IMAP servers (since 6.2.3). The communication may be either unencrypted or encrypted with STARTTLS (since 4.1.3). Version 4.4.3 introduced support of SSL secured SMTP (typically port 465). The connection type is picked up automatically based on the port and doesn't have to be specified by the command. If the server is using a custom port you may have to set the security type manually in the command preferences.
Optional attachments are sent in the Base64 encoding.
If default values of from, to, server, user and passwd are provided in the Sendmail preferences they may be omitted in the command.
SYNOPSIS
sendmail [from=<sender_address>]  [to=<recipient_address>]  [server=<server[:port]>]  [cc=<recipient_address>]  [bcc=<recipient_address>]  [subject=<subject>]  [text=<mail_body>]   [attach=<attachments>]  [user=<userId>]   [security=<none|password|google|microsoft>]  [passwd=<password>]  [delayed=<true|false>]  [debug=<true|false>]
* Parameters are obligatory unless valid default values are provided through Sendmail preferences
OPTIONS
from=<sender_address>
- The sender E-mail address or a comma separated list of addresses, for example john.doe@company.com.
to=<recipient_address(es)>
- The recipient E-mail address, for example jane.doe@company.com.
cc=<recipient_address(es)>
- The Carbon Copy (CC) E-mail address or a comma separated list of addresses (since 5.0.3).
bcc=<recipient_address(es)>
- The Blind Carbon Copy (BCC) E-mail address or a comma separated list of addresses (since 5.0.3).
server=<server[:port]>
- The SMTP server to send the mail message through. If just a hostname without a port number is used, the command attempts to connect the server on the standard SMTP port of 25.
security=<none|password|google|microsoft>
- The security type (since 6.2.3), one of:
- "none" - anonymous access.
- "password" - plain password authentication. The password may be specified through the password parameter.
- "google" - OAuth2 authentication to the GMail SMTP server.
- "microsoft" - OAuth2 authentication to the MS Outlook SMTP server.
To enable either of the OAuth2 schemes you have to download the authentication token through the Tools→OAuth Token Manager window. Tokens are long lived but may be invalidated on the user side (password change, revocation through the Google Dev Console or MS Azure account, ...) or after they are not used for a long time (typically 6 months). Downloaded tokens are encrypted and stored in the Robot configuration file.
If the security parameter is omitted the command defaults to either "none" or "password" security depending on whether the password is specified.
passwd=<password>
- The password to authenticate to the SMTP server. It is used only when the security is set to "password".
subject=<subject>
- The mail subject (title).
text=<mail_body>
- The mail body. If the text starts with "<html>" the content type is set to HTML. Otherwise, the content is sent as plain text. To indicate a line break use '\n'. If you need to use '\n' in the normal text, double the backslash character ('\\n').
attach=<attachments>
- List of attachments i.e. files to attach to the E-mail. File names must be separated by a semicolon (';'). On Linux/Unix make sure the file name doesn't contain semicolon because the list would be incorrectly parsed. If an attachment is not found, it is ignored and the mail is sent without it. It is recommended to provide the files with an absolute path.
user=<username>
- The user ID to authenticate to the SMTP server with. This option should be used together with the passwd parameter when the SMTP server specified by the server parameter requires plain password authentication.
delayed=<true|false>
- When set true the email will be delayed until after the script finishes (supported since 4.1.3). This is useful for example when the script needs to send the test results (report) by email and doing so without a delay would show the status of "Running" in the data. The default value is false (send immediately).
debug=<true|false>
- Debug flag. Use debug=true to switch on the JavaMail debugging console output. This is useful if you need to find out why the E-mail feature doesn't work.
RETURNS
The command returns 0 (zero) on success or 1 if the E-mail cannot be sent.
EXAMPLES
Screenshot scr.pngSendmail to="tester@dummyserver.com" from="robot@dummyserver.com" server="mail.dummyserver.com" subject="Screenshot of the remote desktop" text="Please check the attached screenshot."attach="{_REPORT_DIR}/scr.png"
- Take a screenshot of the current remote desktop and send it by E-mail to user tester@dummyserver.com.
Sendmail subject="Hello" text="This is a multiline E-mail.\nSecond line.\nThird line."
- Example of a multiline E-mail. This command will only work if you have set correct default values of the 'from','to' and 'server' parameters in the Sendmail command preferences.
Sendmail subject="HTML Example" text="<html><body><h1>Hi there!</h1>How are you?</body></html>"
- Example of an HTML E-mail. This command will only work if you have set correct default values of the 'from','to' and 'server' parameters in the Sendmail command preferences.
Sendmail delayed="true" subject="Script finished" text="<html><body>Script <i>{_FILENAME}</i> finished with the exit code of {_EXIT_CODE}. See the results <a href=\"http://myserver.mydomain.com/reports/{_REPORT_FILE_RELATIVE}\">here</a>.</body></html>"
- Example of an email notifying the recipient that the script has finished. As the 'delayed' parameter is set to true the mail will be sent after the script gets finished. We presume that the report directory is linked to the reports/ folder under the document root of a web server on host myserver.mydomain.com. For simplicity we also presume that you have set correct default values of the 'from', 'to' and 'server' parameters in the Sendmail command preferences.
3.3.6 Step
DESCRIPTION
Step - Define the result of a test step. A step represents one atomic instruction of a test case (script). Steps should be located inside a script block.
SYNOPSIS
step <name> [pass|fail|nt|na]  [instruct=<instructions>]  [expected=<expected_result_desc>]  [actual=<actual_result_desc>]  [notes=<notes>]
* Red colour indicates obligatory parameters
OPTIONS
name
- A displayable step name, for example, "Logon", "Open Browser" etc. It doesn't have to be unique.
pass|fail|nt|na
- Step result. It must be one of pass (passed, successful), fail (failed, unsuccessful), nt (not yet tested) or na (not available).
instruct=<instructions>
- Step instructions (optional). It is usually a brief description of what was performed to accomplish the step.
expected=<expected_result_desc>
- Description of the expected step result (optional).
actual=<actual_result_desc>
- Description of the actual step result (optional). It is typically used with failed steps to indicate the difference from the expected result.
notes=<notes>
- Additional step information (optional).
RETURNS
The Step command always returns 0 (zero).
EXAMPLES
Compareto template= "application.png"
if ({_EXIT_CODE} == 0) {
  Step "Start application" pass expected="The application GUI opens."
} else {
  Step "Start application" fail expected="The application GUI opens." actual="The application failed to start."
  Exit 1
}
- A typical example of Step usage. The snippet employs image comparison to test whether the desktop matches the application.png template or not and produces a Step pass or fail result accordingly.
3.3.7 Timer
DESCRIPTION
Timer - Manage timers and timer groups. A timer allows measuring the time elapsed by a command, block of commands or a script, usually for performance testing purposes.
A typical task for a timer is to measure the time taken by an automated task or a piece of script code. This requires to create a timer and start it before the task begins and stop it at the end of the task. Timers are typically used together with the Report command which stores test results including the time data into an XML file:
Report perftesting.xmlTimer t1 start desc="My task #1 duration"<task code>Timer t1 stop
If the resulting XML file is viewed in a web browser, it displays a summary of script timers in the form of a simple table. For example, the script above will create:
Table of timers
Number | Timer Name | Description | Value |
|---|---|---|---|
1. | t1 | My task #1 duration | 25.009 sec (25009ms) |
The XML result file can be also reused as a source of reference data. In a typical scenario, one would execute the script above to get an XML with base timer data recorded against the application which hasn't been optimized. To verify performance improvements in later automated executions modify the script as follows:
Report perftesting2.xmlTimer load="perftesting.xml"Timer t1 start desc="My task #1 duration"<task code>Timer t1 stop
The "Timer load" command parses the input XML file and records the reference data for timers defined by the script (matching is based on timer names). Reference values may be alternatively also defined through the refvalue parameter; this allows to populate the reference data from another source, for example from an MS Excel sheet (see Excel) or a plain text or CSV file (see File). When the reference data is defined, the resulting XML will display actual timers with a comparison to the reference values as follows:
Table of timers
Number | Timer Name | Description | Value | Reference Value | Change |
|---|---|---|---|---|---|
1. | t1 | My task #1 duration | 24.984 sec (24984ms) | 25.009 sec (25009ms) | 0.1% |
Important timer and timer group features:
- There's no explicit "create" command to create a timer or a timer group. Each object is created automatically when it is first specified.
- Timer and timer group names are case sensitive. For example "T1" and "t1" are two different names.
- The command accepts a single timer/group name or a comma-separated list of timers and/or groups. An object name, therefore, may not contain a comma.
- All timers and timer groups are also always global and they exist from the moment of creation until the end of script execution regardless of the place they were created at (main body, procedure, another script...).
- Timers can be started, stopped and restarted in any sequence. Restarting of a timer does not reset its value and it is treated as cumulative. To reset the timer value call the command with the "value=0" parameter.
- All running timers are stopped automatically when the script finishes.
- As the execution of scripts in GUI mode adds performance overhead (typically a few ms per measured command spent on rendering of GUI components), it is recommended to run the live scripts in CLI mode for better accuracy or timer data.
Each timer exposes its time value in milliseconds to the script in the form of a "TIMER<timerName>" variable. In the example above there will be the TIMER_t1 variable and the script may retrieve the current timer value through a variable call such as "{_TIMER_t1}". If the called variable starts with the reserved prefix of "_TIMER" but the name after it doesn't correspond to any existing timer name, it returns -1. This value may be used to test the existence of a timer.
Though timer variables can be modified through the Var or Eval commands, it has no effect on the timers themselves because their values are stored in an internal data structure. The variable is rather just a read-only copy of the internal value. To set the timer to a particular value using the value parameter.
Note that setting of a value of a running timer will stop it and to resume from the specified value the command must contain the "start" action.
For example, to make the t1 timer start from 1 second (1000ms) rather than from zero use:
Timer t1 start desc="My task duration" value="1000"
Another example shows how to create a new timer t2 with the value of timer t1 plus 1 second:
Timer t2 value="{_TIMER_t1}+1000"
As the value parameter also accepts a timer name, to create a plain copy of the t1 timer simply call:
Timer t2 value="t1"
The Timer command accepts either a single object (timer or timer group) or a comma separated list of timers (groups). To start the two timers defined above one may use:
Timer t1,t2 start
Timers may be optionally associated into groups. Grouping allows to organize timers in a logical way and perform bulk operations with them. A group should be understood as a plain list of timers equivalent to a comma-separated timer list; it has no status and it doesn't affect the appearance of test results. Grouping and ungrouping are achieved through the group and ungroup parameters which create and update groups. The following example creates two timers t1 and t2, associates them into a group called tgroup and starts/stops both timers using the group name:
Timer t1,t2 group=tgroup
Timer tgroup start
<task code>
Timer tgroup stop
To copy tgroup into a new group called tgroup2 call:
Timer tgroup group=tgroup2
One timer may be a member of multiple groups. Timers may be freely grouped or ungrouped at any time. To remove the t1 timer from both tgroup and tgroup2 use:
Timer t1 ungroup=tgroup,tgroup2
Alternatively to remove the timer from all groups use the ungroup parameter with an empty value:
Timer t1 ungroup=
To cancel a group and remove all timers from it use the following command which should be understood as a request like "take all timers listed in group tgroup and remove them from tgroup".
Timer tgroup ungroup=tgroup
When a group name is used in the Timer command argument, it expands into a list of timers and all other operations specified by the command (start, stop, value/description setting...) are applied to each timer. The following example will create and group the two timers, set their value to 1 second (1000ms), set their description to "Performance test" and start them:
Timer t1,t2 group=tgroup
Timer tgroup start value=1000 desc="Performance test"
As you may have noticed, a single command may specify one or more operations. They are performed in the following order:
- Resolve the argument into a list of timers and create those which do not exist yet
- Set the value or any other attributes (such as description),
- Ungroup if the ungroup parameter is present,
- Group if the group parameter is present,
- Load the reference data if the load parameter is present,
- Start or stop the timers identified in the first step if the start or stop parameter is present.
This order allows fitting the example above into a single line of code. In terms of processing orders the command should be understood as a request like "create timers t1 and t2, set their value and description, group them into a group called tgroup and start them":
Timer t1,t2 start value=1000 desc="Performance test" group="tgroup"
SYNOPSIS
timer <name(s)> [start|stop]  [desc=<description>]  [value=<time_millis>]  [refvalue=<time_millis>]  [load=<XML_file>]  [group=<name(s)>]  [ungroup=<name(s)]
timer load=<XML_file>
* Red colour indicates obligatory parameters
OPTIONS
name(s)
- Timer or group name or a comma-separated list of names to apply the command to. A mixture of groups and timers is also allowed. If any of the specified names contains a space, the whole list must be enclosed in double-quotes. A unique name (or names) will create a new timer (timers). If the name corresponds to a group previously created by a command called with the group parameter, it is expanded into a list of timers currently present in that group.
start|stop
- Start or stop the specified timer(s) (optional). Starting of an already started timer or stopping of a stopped one has no effect and reports no error.
desc=<description>
- Optional timer description.
value=<time_millis>
- Initial timer value in milliseconds (optional). The value may refer to the name of an existing timer. The default value is zero. The setting of a value of a started timer will stop it and it is necessary to restart it.
refvalue=<time>
- Reference time value in milliseconds. Since T-Plan Robot version 3.1.2 the value may be any time value. The parameter plays no role during the script execution and it is used exclusively for reporting purposes. When the reference value is specified, the timer entry in the resulting XML file created by the Report command will contain the reference value as well as the relative difference (percentage) from the reference data. This functionality allows tracking performance changes across the testing of two application versions.
load=<XML_file>
- The parameter loads reference data from an XML file previously generated through the Report command. If the file is relative, it is resolved in the same way as the Report file (meaning against the output path specified by the _REPORT_DIR variable). The XML is parsed for timer data and if any of the timer names corresponds to a timer created in the current script, the XML timer value is set as a reference time of the current timer. Reference times as well the difference from the actually measured values are then written into the newly generated XML. See also the refvalue parameter above. Note that loading of reference data from XML has a priority over the refvalue parameter and it will overwrite its settings.
If the load operation is called from a Timer command operating over a set of timers (the first command form as is specified in the Synopsis above), it is applied just to the specified set and all other data from XML are discarded. To load reference data of all timers at once use the second command form of "Timer load=<XML_file>". As this command stores the reference data internally, and updates all already existing as well as the to-be-created timers, the global load operation may be called anywhere in the script (not necessarily at the script beginning).
group=<group(s)>
- A group or a comma-separated list of group names to associate the timer(s) with. If any of the specified group names contains a space, the whole list must be enclosed in double-quotes. A unique name (or names) will create a new group (groups). A group name may not be the same as name of an already existing timer.
ungroup=<group(s)>
- A group or a comma-separated list of group names to remove the timer(s) from. If any of the specified group names contains a space, the whole list must be enclosed in double-quotes. If the specified timer(s) is a member of the specified group or groups, it is removed from there.
RETURNS
If the command employs the load parameter to read reference data from an XML file, it returns 0 (zero) when the XML is valid and contains at least one timer value. When the XML does not contain any timer data but the format is correct, the command returns 1 (one). If the file cannot be read or is not a valid XML file, the command returns the value of 2 (two).
Timer commands without the load parameter always return 0 (zero).
EXAMPLES
See the text above for examples.
3.3.8 Warning
DESCRIPTION
Warning - Insert a warning into the report. A warning can be associated with a specific screenshot through the image parameter. Such a warning will be displayed below the image description in the report. If there's no associated image, the warning will be displayed in the report as a single component.
When a script is being executed and there's a running report provider (i.e. the script contains a Report command), an execution of a Warning command will trigger a refresh of the report. If there's no active report provider, a warning is created in the internal tables but it is not reported in any way.
SYNOPSIS
warning <description> [image=<screenshot_name>]
* Red colour indicates obligatory parameters
OPTIONS
description
- Text of the warning to be displayed in the report.
image=<screenshot_name>
- A screenshot to be associated with the warning. The screenshot name should correspond to an image created by the Screenshot command.
RETURNS
The Warning command always returns 0 (zero).
EXAMPLES
Report index.html Exec "mozilla file://{_REPORT_FILE}" if ({_EXIT_CODE} > 0) { Warning "Mozilla failed to start. Error output: {_EXEC_ERROR}" }
- Try to open the HTML report in a Mozilla browser using the Exec command and add a warning if it fails.
Screenshot image.jpg template=template1.png onfail="Warning \"The image image.jpg doesn't seem to display what is expected.\" image=image.jpg"
- Take a screenshot and compare it to a template called template1.png. If the comparison fails, add a warning to the image description.
3.4.1 Excel
DESCRIPTION
Excel - Read from and/or write to Microsoft Excel (.xls) and (.xlsx). The command also supports files with macros (.xlsm) since 6.2.2. Macros can't be updated but they are preserved on file save.
The command allows to navigate through XLS and XLSX documents, read, write and search for cell values and deal with a subset of Excel supported formats. The command takes advantage of the Apache POI 4.0.1 framework and as such, it is subject to its limitations. The POI libraries are placed in the <installDir>/libs/poi folder and may be upgraded to a custom version eventually.
The command defines this set of actions:
- Open - opens an existing Excel document in read/write mode.
- Create - create a new Excel document and/or create a sheet.
- Select - select a sheet and/or select a cell and retrieve its value and format.
- Find - search the selected sheet for a cell by its value or a regular expression.
- Set - set sheet name or cell value (format).
- Copy - mark cells for copying.
- Paste - paste cells marked with Copy into an Excel document.
- Close - close and save the Excel document.
A typical workflow consists of the following logical steps:
- Open an existing Excel document ("Excel open") or create a new one ("Excel create"). If the script works with multiple documents at a time, each file must be tagged by an ID and all subsequent Excel commands must reference it. This step populates variables with the file name, path and structure.
- Select (open) or create a spreadsheet. Opening of an Excel document through "Excel open" automatically selects the first spreadsheet in the workbook unless the sheet is explicitly specified by the parameter. Creating a new document through "Excel create" automatically creates and selects one default spreadsheet with the default "Sheet1" name unless another name is explicitly specified. To change the spreadsheet selection later on call "Excel select". To create and select a new spreadsheet use "Excel create". Each change in spreadsheet selection populates the Sheet variable group describing the number of spreadsheets available and the name and number of the currently selected one.
- To read a cell called "Excel select" or search for a cell value using "Excel find". If the cell is found successfully, its value, type and format are provided in the form of script variables. If the cell contains a formula you may retrieve either its text or the resulting value depending on the "evaluate" parameter. Like sheets, the cell reference is cached and a sequence of commands operating over a single cell doesn't have to specify the coordinates (either row/cell number or reference) in each command instance.
- To modify a cell using the "Excel set" command. If the format is not explicitly specified, the command checks for the number or Boolean values and eventually defaults to string. If the coordinates point to a cell which doesn't exist, it is created.
- To select cells and paste them into an Excel document (the same or another one) use a sequence of "Excel copy" and "Excel paste" commands.
- To close a document and save or discard changes call the "Excel close" command. This step is optional and all documents are closed and eventually saved automatically when the script finishes.
Excel documents can be read from or written to shared network drives. A special attention should be paid to permissions. For example, to create a file in a shared folder called "data" on a network drive called "macbook.local" use:
Excel create file="\\\\macbook.local\\data\\myfile.xls"
A typical example showing both read and write operations follows. It opens an existing file Excel 2007 file, selects the second sheet and reads a value from the first cell and writes it to the second one for every row.
// Open the Excel file. Exit on any I/O error.Excel open file="C:\data\test.xlsx"if ({_EXIT_CODE} > 0) {Exit {_EXIT_CODE} desc="{_EXCEL_ERROR}"}// Select the second sheetExcel select sheet=1// Iterate over all data linesfor (index=1; {index}<{_EXCEL_SHEET_ROWS}+1;index={index}+1) {# Read value from the first cellExcel select row={index} column="1"# Set value of the second cellExcel set row={index} column="2" value="{_EXCEL_CELL_VALUE}"}
The Excel command populates these variables:
Who Creates and When | Variable Name | Description |
|---|---|---|
Excel open, | _EXCEL_FILE | Document file path (full/absolute). |
| _EXCEL_FILENAME | Document file name. | |
| _EXCEL_OUTFILE | Output file path (full/absolute) if it was explicitly specified. | |
| _EXCEL_OUTFILENAME | Output file name if it was explicitly specified. | |
| _EXCEL_SHEET_COUNT | Number of spreadsheets available in the document. | |
Excel open | _EXCEL_SHEET_NAME | Name of the currently selected sheet. |
| _EXCEL_SHEET_NUMBER | Number of the currently selected sheet. | |
| _EXCEL_SHEET_ROWS | Number of rows available in the currently selected sheet. | |
Excel set | _EXCEL_CELL_COLUMN | Ordinary column number of the selected/found/modified cell. |
| _EXCEL_CELL_ROW | Ordinary row number of the cell. | |
| _EXCEL_CELL_TYPE | Cell type; one of [BLANK, BOOLEAN, ERROR, FORMULA, NUMERIC or STRING] | |
| _EXCEL_CELL_VALUE | Cell value (as a string). Since 4.1.3 the value is formatted if the cell is configured so (date/number/currency format, ...) | |
| _EXCEL_CELL_VALUE_RAW | Raw cell value (unformatted). Supported since 4.1.3. | |
| _EXCEL_CELL_REF | Excel compatible cell reference, for example, "A1" or "J10". | |
| _EXCEL_CELL_FORMAT | Cell number or date format string (since 6.2.3). | |
| _EXCEL_CELL_WIDTH | Cell (column) width as a number of visible characters. The resulting pixel value is subject to the font and eventual cell margins. | |
| _EXCEL_CELL_HEIGHT | Cell (row) height in points (since 6.3.3). The resulting pixel value is subject | |
| _EXCEL_CELL_FOREGROUND _EXCEL_CELL_BACKGROUND | Cell font (foreground) and fill (background) colors in the HTML format (since 6.3.3). For example, red font on white background will show as "ff0000" and "ffffff". | |
| All Excel commands | _EXCEL_ERROR | Text of the error thrown by the last Excel command execution or compilation. This variable is being created since v2.3 and allows to track I/O errors resulting from Excel processing. |
The command in general returns 0 on success or one of the following exit codes:
Exit Code | Pseudocode | Description |
|---|---|---|
0 | SUCCESS | Successful completion. |
1 | FAILED_TO_OPEN | Failed to open the input file. Returned just by "Excel open". |
2 | FAILED_TO_SAVE | Failed to save to the file. Returned just by "Excel close". |
3 | FAILED_TO_CREATE | Failed to create a new document or sheet. Returned just by "Excel create". |
4 | SHEET_NOT_FOUND | The row and/or column parameters do not point to an existing cell. Returned by all cell-reading commands supporting "row" and "column". |
5 | CELL_NOT_FOUND | Failed to find a cell with the given coordinates or with the specified value ("Excel find"). |
Syntax and parameters of each action are described in details below.
SYNOPSIS
Excel open [file=<input_Excel _file>] [outfile=<output_Excel_file>] [id=<identifier>] [sheet=<sheet_name_or_index>] [password=<password>]
* Red colour indicates obligatory parameters
OPTIONS
file=<Excel_file>
- The Excel file to open. The relative path is resolved against the script directory (meaning the folder containing the calling script).
outfile=<output_Excel_file>
- Optional output file to save the Excel data to (regardless of whether it has been changed or not). When this parameter is specified, the input file specified by file is opened in read-only mode, its data is loaded into the memory and saved to outfile unless the file is closed in the discard mode (Excel close save=false). The input and output files must be of the same format (both must be either XLS or XLSX).
id=<identifier>
- An identifier (name) for the Excel document. This parameter doesn't have to be specified if the script opens/creates just one Excel document at a time. If multiple documents are being opened the identifier identifies the document in the subsequent Excel read/write commands.
sheet=<sheet_name_or_index>
- The spreadsheet to select. It may be specified either by its name or ordinary number starting from 1. This parameter is optional and if it is not present, the command selects (opens) the first spreadsheet by default.
password=<password>
- The password to unlock and/or lock the file (since 6.1). If the file is not protected and the password is specified it will become protected after on save.
RETURNS
The open command returns either 0 (SUCCESS) or 1 (FAILED_TO_OPEN). On success, it populates variables from the File and Sheet variable group.
EXAMPLES
Excel open file="data.xls"
- Open an MS Excel document located in the same directory as the script in read/write mode.
Excel open file="data.xls" outfile="newdata.xls"
- Open an MS Excel document located in the specified directory in the read-only mode. When the document is closed, save the content and eventually all changes into the specified output file in the script directory. If the output file exists it will be overwritten.
Excel create file=<Excel _file> [id=<identifier>] [sheet=<sheet_name>] [password=<password>]
Excel create sheet=<sheet_name> [id=<identifier>]
* Red colour indicates obligatory parameters
OPTIONS
file=<Excel_file>
- The Excel file to create. The relative path is resolved against the script directory (meaning the folder containing the calling script). If the file exists, it is overwritten.
id=<identifier>
- An identifier (name) for the created document. This parameter doesn't have to be specified if the script opens/creates just one Excel document at a time. If multiple documents are being opened the identifier identifies the document in the subsequent Excel read/write commands.
sheet=<sheet_name>
- Name of the spreadsheet to create. If the command is called with the file parameter specified to create a new file, the sheet parameter is optional. If it is not present, the command behaves the same way as MS Excel and creates a default spreadsheet called "Sheet1" in the newly created file.
password=<password>
- The password to lock the file on save (since 6.1).
RETURNS
The open command returns either 0 (SUCCESS) or 3 (FAILED_TO_CREATE) on failure, for example when a sheet of the specified name already exists. The command populates variables from the File and Sheet variable groups.
EXAMPLES
Excel create file="C:\Data\log.xls"
- Create a new Excel document in the memory and associate it with the specified file for output. The command will also create a sheet called "Sheet1" and select it.
Excel create file="C:\Data\log.xls" sheet="Data"
- Same as the previous example but the sheet will be named "Data".
Excel create sheet="Data"
- Create a new sheet named "Data" in the currently opened document.
Excel select [sheet=<sheet_name_or_index>] [id=<identifier>]
Excel select [row=<row_number>] [column=<column_number_or_id>] [sheet=<sheet_name_or_index>] [id=<identifier>]
Excel select [ref=<cell_id>] [sheet=<sheet_name_or_index>] [id=<identifier>]
* Red colour indicates obligatory parameters
OPTIONS
row=<row_number>
column=<column_number_or_id>
- Row and column ordinary numbers identifying the cell to select. Numbering starts at 1. The column may be in addition referenced by alphabetical ID used in MS Excel ("A"-"ZZ"). For example, "column=C" is equal to "column=3". The "row" and "column" parameters must be always present together. The parameters are mandatory in the first cell operation to specify the "current" cell. The reference is then cached and sequences of commands operating over a single cell do not have to repeat the "column"/"row" or "ref" coordinates.
ref=<cell_id>
- Cell ID compatible with MS Excel referencing, for example "A1" or "J10". It is provided as an alternative way of cell referencing. The parameter should not be used together with the row/column parameter pair.
sheet=<sheet_name_or_index>
- The spreadsheet to select (open). It may be specified either by its name or ordinary number starting from 1. If the command is being used just to select a sheet (the first form in the list above), this parameter is mandatory. Other command forms targeting a particular cell do not require it and if it is not present, the command will operate over the last selected sheet.
evaluate=<true|false>
- A flag controlling how FORMULA cells are handled. If it is "true" the cell value will be the calculated formula result. Otherwise, the cell value stored under the _EXCEL_CELL_VALUE will contain the formula text. If the targeted cell is not a FORMULA one, this parameter is ignored. The default value is "false".
id=<identifier_or_name>
- The document identifier to apply the operation to. This parameter doesn't have to be specified if the script opens/creates just one Excel document and no ID was specified in the open/create command.
RETURNS
The open command returns either 0 (SUCCESS), 4 (SHEET_NOT_FOUND) or 5 (CELL_NOT_FOUND). The command populates variables from the Sheet and Cell variable groups.
EXAMPLES
Excel select sheet="2"
- Select second sheet in the document and store its properties into the Sheet variables.
Excel select sheet="Data"
- Select sheet called "Data" in the document.
Excel select row="2" column="4"
- Select cell on the specified position in the current sheet and retrieve its properties into the Cell variables.
Excel select sheet="Results" ref="A5"
- Select the "Results" sheet and then select the cell on the specified position (fifth row, first column). Both the Sheet and Cell variable groups will be updated with the sheet/cell properties.
Excel find [value=<value>] [type=<type>] [sheet=<sheet_name_or_index>] [evaluate=<true|false>] [id=<identifier>]
Excel find [pattern=<regular_expression>] [type=<type>] [sheet=<sheet_name_or_index>] [evaluate=<true|false>] [id=<identifier>]
* Red colour indicates obligatory parameters
OPTIONS
value=<value>
- The string representation of the value to search for. The current sheet will be searched row by row for a cell having the specified value and the first matching one will be selected.
pattern=<regularExpression>
- Search for a cell value which matches a regular expression. The expression must comply with the Java Pattern specification.
type=<type>
- Type of cell to limit the search to. It must be one of \[BLANK, BOOLEAN, ERROR, FORMULA, NUMERIC, STRING\]. If the parameter is not specified all cell types are searched.
sheet=<sheet_name_or_index>
- The spreadsheet to select (open). It may be specified either by its name or ordinary number starting from 1. This parameter is optional and if it is not present the command will operate over the last selected sheet.
evaluate=<true|false>
- Flag controlling how FORMULA cells are handled. If it is "true" the cell value will be the calculated formula result. Otherwise the specified value will be compared to the formula text. The default value is "false".
id=<identifier_or_name>
- The document identifier to search. This parameter doesn't have to be specified if the script opens/creates just one Excel document and no ID was specified in the open/create command.
RETURNS
The open command returns either 0 (SUCCESS), 4 (SHEET_NOT_FOUND) or 5 (CELL_NOT_FOUND). If the cell is located successfully the command populates variables from the Sheet and Cell variable groups.
EXAMPLES
Excel find value="Test data"
if ({_EXIT_CODE} > 0) {
  Warning "The \"Test data\" cell was not found."
  Exit 1
}
Excel select row={_EXCEL_CELL_ROW}+1 column={_EXCEL_CELL_COLUMN}
- Search the current spreadsheet for a cell containing the text "Test data". If successful select the cell below the found one. If the search fails, record a warning and exit the script with the exit code of 1.
Excel find value="2" evaluate="true"
- Search the current sheet for any numeric cell containing the number of 2 or any text cell containing "2". As the evaluate flag is on, each cell of the FORMULA type will be calculated (evaluated) and compared to the value of 2.
Excel find sheet="Data" pattern="boo.*"
- Select sheet called "Data" in the document and search it for the first value starting with "boo".
Excel find type=FORMULA pattern="SUM\(.*\)"
- Search the current sheet for the first cell of FORMULA type containing the summary formula and retrieve its properties into the Cell variables. As the "evaluate" flag is not specified and defaults to false, the _EXCEL_CELL_VALUE will be populated with the formula text.
Excel find type=FORMULA pattern="SUM\(.*\)" evaluate="true"
- Same as the previous example. The _EXCEL_CELL_VALUE will, however, contain the result of the formula, i.e. a number equal to the sum of the cells specified in the formula text.
Excel set [row=<row_number>] [column=<column_number_or_id>] [sheet=<sheet_name_or_index>] [id=<identifier>] [type=<type>] [value=<value>] [informat=<javaFormat>] [format=<excelFormat>]
Excel set [ref=<cell_id>] [sheet=<sheet_name_or_index>] [id=<identifier>] [type=<type>] [value=<value>] [informat=<javaFormat>] [format=<excelFormat>] [width=<columnWidth>] [height=<rowHeight>] [fg=<htmlColor>] [bg=<htmlColor>]
* Red colour indicates obligatory parameters
OPTIONS
row=<row_number>
column=<column_number_or_id>
- Row and column ordinary numbers identifying the cell to select. Numbering starts at 1. The column may be in addition referenced by alphabetical ID used in MS Excel ("A"-"ZZ"). For example, "column=C" is equal to "column=3". The "row" and "column" parameters must be always present together. The parameters are mandatory in the first cell operation to specify the "current" cell. The reference is then cached and sequences of commands operating over a single cell do not have to repeat the "column"/"row" or "ref" coordinates.
ref=<cell_id>
- The cell ID compatible with MS Excel, for example, "A1" or "J10". It is provided as an alternative way of cell referencing. The parameter should not been used together with the row/column parameter pair.
sheet=<sheet_name_or_index>
- The spreadsheet to select (open). It may be specified either by its name or ordinary number starting from 1. If the command is being used just to select a sheet (the first command syntax form in the list above), this parameter is mandatory. Other command forms targeting a particular cell do not require it and if it is not present, the command will operate over the last selected sheet.
type=<type>
- Type of cell to set. It must be one of [BLANK, BOOLEAN, ERROR, FORMULA, NUMERIC, STRING]. If the parameter is not specified, the type defaults to STRING.
value=<value>
- Cell value to set. It must be aligned with the cell type. For example, when the cell type is NUMERIC, the value should be a valid number. If the "type" parameter is not specified, the command guesses whether it is a number, a Boolean value or a string and sets the cell type accordingly. To override this behaviour specify the type explicitly.
The value may contain a numeric expression but the type must be explicitly set to NUMERIC to tell the compiler that numeric evaluation is needed. To create and populate a cell of the FORMULA type use the type="FORMULA" parameter and specify the formula with or without the leading equals character as the value. For example, both "SUM(A1:A4)" and "=SUM(A1:A4)" are valid formulas.
informat=<javaFormat>
- Input Java date format to parse the value with (since 6.2.3). This parameter indicates that the value parameter contains a date and/or time and should be parsed appropriately.
MS Excel stores date values to NUMERIC cells as the number of days elapsed since 1 January 1900. To populate a date cell you may calculate the number on your own and specify it in the value parameter. An easier approach is use a combination of value and informat to populate the date from a human readable date string. For example, the parameters of value="21 Jan 1900" and informat="dd MMM yyyy" will populate the cell with the number of 21.
To make MS Excel display the cell as a formatted number or a date/time use the format parameter.
format=<excelFormat>
- The cell number format as specified by the MS Excel documentation (since 6.2.3) It allows to change the appearance of numbers, including dates and times, without changing the actual number. The format does not affect the cell value that Excel uses to perform calculations.
width=<columnWidth>
- The target column width as a number of visible characters (since 6.3.3). The resulting pixel size on the screen is then subject to the font and eventual cell margins. The default Excel applied column width is set to 8.43 characters.
height=<rowHeight>
- The target row height in points (since 6.3.3).
fg=<htmlColor>
- The cell font (foreground) color to be set (since 6.3.3). The value may be an HTML-style 6-character RGB hexadecimal format with or without the leading hash character (white is '000000' of '#000000', black is 'ffffff' of '#ffffff') or a semicolon separated list of decimal RGB components ('0;0;0' for white, '255;255;255' for black).
bg=<htmlColor>
- The cell fill (background) color to be set (since 6.3.3). The value may be an HTML-style 6-character RGB hexadecimal format with or without the leading hash character (white is '000000' of '#000000', black is 'ffffff' of '#ffffff') or a semicolon separated list of decimal RGB components ('0;0;0' for white, '255;255;255' for black). Setting of a background color also resets the cell pattern to a solid color.
id=<identifier_or_name>
- The document identifier to apply the set operation to. This parameter doesn't have to be specified if the script opens/creates just one Excel document and no ID was specified in the open/create command.
RETURNS
The open command returns either 0 (SUCCESS), 4 (SHEET_NOT_FOUND) or 5 (CELL_NOT_FOUND). If the cell is located successfully the command sets the value and/or cell type and populates variables from the Sheet and Cell variable groups.
EXAMPLES
Excel set ref=A5 value="Test data"
- Set value of the A5 cell in the current sheet to "Test data". The cell type will be STRING.
Excel set row=A5 column="A" value="2" sheet="Results"
- Select the "Results" sheet and set value of the A1 cell to 2. As the value is apparently a numeric one the cell type will be automatically set to NUMERIC.
# Declare the variable as numeric to supress compiler error
Var _EXCEL_CELL_VALUE=1
Excel set row=1 column=A value="2"
Excel set value={_EXCEL_CELL_VALUE}+1 type=NUMERIC
- Set the A2 cell value to 2 and then increment it to 3. Declaration of the _EXCEL_CELL_VALUE is needed only to suppress the compiler error when trying to evaluate the value.
Excel set row=5 column=1 type=FORMULA value="SUM(A1:A4)"
Excel select evaluate=true
- Set value of the cell at A5 to the summary formula of the A1-A4 cells and get the result.
Excel copy [rows=<row(s)>] [columns=<column(s)>] [sheet=<sheet_name_or_index>] [id=<identifier>]
* Red colour indicates obligatory parameters
OPTIONS
rows=<row(s)>
columns=<column(s)>
- The row(s) and column(s) identifying the cells to be selected for the subsequent Excel paste operation. Rows can be specified as a single number ("1"), a range ("1-5") or a comma or semicolon separated list of numbers and/or ranges ("1;3;5-6"). Columns support the same syntax where letters may be used instead of numbers ("A;C;E-F"). Numbering starts from 1.
The "rows" and "columns" parameters must be always present together. The command selects all cells at the specified rows and columns. For example, the parameters of "rows=1-2" and "columns=A-C" will select 6 cells at A1, A2, B1, B2, C1 and C2. As empty positions are ignored the specified ranges may exceed the actual sheet size.
The command does not make any internal copy of the data from the selected cells. It merely saves a reference to the selection. If the selected cells get changed between the copy and paste operations the updated data will be copied.
sheet=<sheet_name_or_index>
- The spreadsheet to select the cells from. It may be specified either by its name or ordinary number starting from 1. If it is not specified the command will fall back to the last selected (active) sheet.
id=<identifier_or_name>
- An identifier of the document to copy from. This parameter doesn't have to be specified if the script opens/creates just one Excel document and no ID was specified in the open/create command.
RETURNS
The copy command returns either 0 (SUCCESS) or throws a syntax error when the operation can not be completed for a runtime error.
EXAMPLES
Excel open file="source.xls" id="source"Excel copy rows=1-3 columns=A id="source"Excel open file="target.xls" id="target"Excel paste ref=B1 id="target"
- Copy cells A1, A2 and A3 from the source.xls file into the B1, B2 and B3 cells of the target.xls file.
Excel paste [row=<row_number>] [column=<column_number_or_id>] [sheet=<sheet_name_or_index>] [id=<identifier>]
Excel paste [ref=<cell_id>] [sheet=<sheet_name_or_index>] [id=<identifier>]
* Red colour indicates obligatory parameters
OPTIONS
row=<row_number>
column=<column_number_or_id>
- Target position to paste the cells previously selected with Excel copy to. Numbering starts from 1. For example, if cells A1 and A2 were copied and the target position is set to "row=2" and "column=3" the data will be pasted to the C2 and C3.
If a pasted cell contains a formula its references are shifted with regards to the target location. For example, if you copy a column of numbers starting at A1 and their sum ("=SUM(A1:A5)") and paste it into the B2 cell the formula gets updated to "=SUM(B2:B6)". Note that the command doesn't make any effort to recognize external references to other sheets or cells outside of the selected data which will lead to broken references. To copy such cells use the Excel set command.
ref=<cell_id>
- The target cell ID compatible with MS Excel to paste to, for example, "A1" or "J10". It is provided as an alternative way of cell referencing. The parameter should not be used together with the row/column parameter pair.
sheet=<sheet_name_or_index>
- The spreadsheet to paste to It may be specified either by its name or ordinary number starting from 1. If it is not specified the command will fall back to the last selected (active) sheet.
id=<identifier_or_name>
- An identifier of the document to copy from. This parameter doesn't have to be specified if the script opens/creates just one Excel document and no ID was specified in the open/create command.
RETURNS
The paste command returns either 0 (SUCCESS) or throws a syntax error when the operation can not be completed for a runtime problem.
EXAMPLES
See the Excel copy command for an example.
Excel close [id=<identifier>] [save=<true|false>]
* Red colour indicates obligatory parameters
OPTIONS
id=<identifier_or_name>
- The identifier of the document which is to be closed. This parameter doesn't have to be specified if the script opens/creates just one Excel document and no ID was specified in the open/create command.
save=<true|false>
- True saves the document to the file system, false discards any changes. The default value is "true" and the file will be saved automatically after the script execution finishes provided that there were any changes.
RETURNS
The open command returns either 0 (SUCCESS) or 2 (FAILED_TO_SAVE) on an I/O error. It also clears up all Excel specific variables from the context.
EXAMPLES
Excel open file=test.xls
...
Excel close
- Close the file. If the content has been modified, save the changes to the test.xls file.
Excel open file=test.xls outfile=test2.xls
...
Excel close
- Close the file. The content loaded from test.xls will be written to test2.xls regardless of whether it has been modified or not.
Excel open file=test.xls id="testfile"
...
Excel close id="testfile" save=false
- Close the file and discard any eventual changes. As the "testfile" ID was assigned to the file in "Excel open", it must be specified in the "Excel close" one as well as in any other Excel call between these two commands.
3.4.2 File
DESCRIPTION
File - Read from and/or write to text files. The command allows to open or create plain text files, read/write text, search strings/regular expressions and parse values from individual text lines using either the Comma Separated Values (CSV) format or regular expressions.
Files are by default opened and saved in UTF-8 encoding. The file content is read using the Java character streams line by line and stored into a string buffer in the memory. All subsequent I/O operations are performed on the buffer and the content is written to the file (or output file) only when the file either gets explicitly closed or when the script finishes in a standard way (meaning not through unexpected or abnormal program termination). With regard to the used technology, the command is suitable to process smaller files (up to tens of kB) and its performance significantly degrades with large data files.
Since v6.1 the File command can read MS Word (*.doc, *.docx) and PDF files (*.pdf). The content is converted to plain text and then processed as if the input file was a text one. It is not possible to modify the files and save them in the original format. The content can be only saved in form of a plain text file.
Since v6.2.3 the command improves handling of BOM characters. If an existing file with BOM is opened, modified and saved in the UTF-8 encoding the command inserts the appropriate BOM character into the file. No effort is made to insert the BOM character to newly created files.
The command defines this set of actions:
- Open - open an existing text file in read/write mode.
- Create - create a new file in memory.
- Append - append text to the end of the file.
- Insert - insert text to a position in the file.
- Find - search the file for a text value.
- Read - read text from a position in the file.
- Parse - parse values from a line using CSV format or regular expression.
- Delete - delete text and/or line.
- Close - close and save the file.
A typical workflow consists of the following logical steps:
- Open an existing file ("File open") or create a new one ("File create"). This step populates variables with the file name, path and structure. If the script works with multiple files at a time, each file must be tagged by an ID and all subsequent File commands must reference it.
- To read a value from a known position in the file using "File read". If the position is unknown, "File find" may be used to identify the position of a text value. If the file contains data in a particular format, parse them through "File parse". This command supports reading of values in the CSV format or parsing of values based on a custom regular expression.
- To write to the file using either "File append" or "File insert". The append action adds the text to the end of the file. The insert one allows inserting the text into a particular position in the file.
- To close a document and save or discard changes call the "File close" command. This step is optional and all documents are closed and eventually saved automatically when the script finishes.
Navigation through the file and retrieval of parsed text is enabled through variables:
Who Creates, Group Name | Variable Name | Description |
|---|---|---|
File open, | _FILE_FILE | File path (full/absolute). |
| _FILE_FILENAME | Filename. | |
| _FILE_OUTFILE | Output file path (full/absolute) if it was explicitly specified. | |
| _FILE_OUTFILENAME | Output file name if it was explicitly specified. | |
File open | _FILE_LENGTH | File length in characters including the new line ones. Note that it doesn't have to match the file size because some UTF-8 characters may be encoded in multiple bytes. |
| _FILE_LINE_COUNT | Number of text lines in the file. | |
| File find File read File parse File insert ("Line Group") | _FILE_LINE_NUMBER | Number of the currently processed line. Lines are numbered from 1 (one). |
| _FILE_LINE_LENGTH | Length of the current line in characters excluding the new line character. | |
| _FILE_LINE_TEXT | Text of the current line (full length without the new line character). | |
| _FILE_LINE_COLUMN | Column (character) number on the line. Column numbering starts from 1 (one) which represents the beginning of the line. This variable is populated by the "find" action to indicate the position of the searched text on the line. Other commands either mimic the "column" parameter or its default value of 1 (one). | |
| File read | _FILE_READ | Text read by the "File read"command. |
| File delete | _FILE_DELETED | Text deleted by the "File delete" command. |
| File parse ("Parse group") | _FILE_PARSE_COUNT | Number of values parsed by "File parse". |
| _FILE_PARSE_VALUE<N> | N-th value parsed from the text line where <N> is between 1 and _FILE_PARSE_COUNT. |
The command in general returns 0 on success or one of the following exit codes:
Exit Code | Pseudocode | Description |
|---|---|---|
0 | SUCCESS | Successful completion. |
1 | FAILED_TO_OPEN | Failed to open the input file. Returned just by "File open". |
2 | FAILED_TO_SAVE | Failed to save to the file. Returned just by "File close". |
3 | FAILED_TO_FIND | Failed to find a value. Returned just by "File find" to indicate failed text search. |
4 | INVALID_POSITION | The line and/or column parameters do not point to an existing position in the file. Returned by all commands supporting "line" and "column". |
Syntax and parameters of each action are described in details below.
SYNOPSIS
File open [file=<file>] [outfile=<output_file>] [id=<identifier>]
File create [file=<file>] [id=<identifier>]
* Red colour indicates obligatory parameters
OPTIONS
file=<file>
- The file to open or create. A relative path is resolved against the calling script location (meaning the folder containing the calling script). If the file being opened is a MS Word (*.doc or *.docx) or a PDF (*.pdf) one the content is converted to plain text. Be aware that PDF files often wrap images of text (screen shots, scanned documents) which can not be extracted.
outfile=<output_file>
- Optional output file. When specified the command creates a copy of the file and applies all changes to it rather than to the source file. A relative path is resolved against the calling script location (meaning the folder containing the calling script). If the parameter is omitted the file is opened in read/write mode. If the file already exists it will be overwritten.
id=<identifier>
- An identifier (name) for the file. This parameter can be omitted if the script opens/creates just one file at a time. If multiple files are being opened, the identifier is mandatory and identifies the file in the subsequent File commands.
RETURNS
The open command returns either 0 (SUCCESS) or 1 (FAILED_TO_OPEN). The create command always returns 0 because it creates the file just in memory. If the command exits with 0 it populates variables from the file_vars_file and Counter variable groups.
EXAMPLES
File open file="data.csv"
- Open a CSV file located in the same directory as the script in read/write mode.
File open file="C:\Data\data.csv" outfile="newdata.csv"
- Open a CSV file located in the specified directory in the read-only mode. When the file is closed, save the content and eventually all changes into the specified output file in the script directory. If the output file exists it will be overwritten.
File create file="C:\Data\log.txt"
- Create a new file content buffer in the memory and associate it with the specified file for output.
File append [text=<text>] [id=<identifier>]
* Red colour indicates obligatory parameters
OPTIONS
text=<text>
- Text to append to the end of the file. It may contain any UTF-8 characters. To indicate a line break use "\n". If you need to use the "\n" sequence in the normal text, double the backslash character ("
n").
id=<identifier>
- Identifier of the file to append the text to. It must be equal to the ID specified in the File open or create command. The parameter doesn't have to be specified if the script opens/creates just one file and no ID is specified in the open/create command.
RETURNS
The command always returns 0 (success). As it changes file size and eventually the number of lines, the command updates variables from the Counter group.
EXAMPLES
File append text="This is one line\nwhile this is another one"
- Append two lines of text, "This is one line" and "while this is another one" to the end of the file.
File append text="screws\\nails"
- Append one line of text, "screws\nails". The backslash character must be in this case doubled because it would be otherwise interpreted as a newline character.
File insert [text=<text>] [line=<line_number>] [column=<column_number>] [id=<identifier>]
* Red colour indicates obligatory parameters
OPTIONS
text=<text>
- Text to insert into the file. It may contain any UTF-8 characters. To indicate a line break use "\n". If you need to use the "\n" sequence in the normal text, double the backslash character ("\\n").
line=<line_number>
- The line number to insert the text to. Numbering starts at 1. If the line number is out of the range the command fails with the exit code of 4 (INVALID_POSITION).
column=<column_number>
- The column (character number) to insert the text into. Numbering starts at 1. If not specified the command inserts by default to the line beginning (column=1). If the column is greater than the number of characters on the line the command fails with the exit code of 4 (INVALID_POSITION).
id=<identifier>
- Identifier of the file to insert the text into. It must be equal to the ID specified in the File open or create command. The parameter doesn't have to be specified if the script opens/creates just one file and no ID is specified in the open/create command.
RETURNS
The command returns 0 (SUCCESS) or 4 (INVALID_POSITION) if the line and column parameters do not point to an existing position in the file. As it changes file size and eventually the number of lines, the command updates variables from the Counter group. The command also updates the Line variable group to provide information about the line pointed to by the [line, column] coordinates.
EXAMPLES
File read line=2
File insert text=" and potatoes" line=2 column={_FILE_LINE_LENGTH}+1
- Append " and potatoes" to the end of the second line. The "File read" command is called to get the line length (the _FILE_LINE_LENGTH variable).
File find text="bananas"
File insert text=" and potatoes" line={_FILE_LINE_NUMBER} column={_FILE_LINE_COLUMN}+7
- Search for "bananas" and insert the text to create "bananas and potatoes". Note that the example doesn't test whether the find command succeeds.
File find [text=<text>] [line=<line_number>] [column=<column_number>] [direction=<forward|backward>] [scope=<line|file>] [id=<identifier>]
* Red colour indicates obligatory parameters
OPTIONS
text=<text>
- The text to search for. It may contain any UTF-8 characters. To indicate a line break use "\n". If you need to use the "\n" sequence as normal text, double the backslash character ("\\n").
line=<line_number>
- The line number to start the search from. Numbering starts at 1. If the line number is out of the range the command fails with exit code of 4 (INVALID_POSITION).
column=<column_number>
- The column (character number) to start the search from (to be used together with "line"). Numbering starts at 1. If not specified the command searches by default from the line beginning (column=1). If the column is greater than the number of characters on the line the command fails with exit code of 4 (INVALID_POSITION).
direction=<forward|backward>
- The search mode. The default one is forward and searches from the position specified by \[line, column\] towards the end of file or line. The backward mode searches in the opposite direction from the given position.
scope=<file|line>
- The search scope. The default one is file and searches the whole file or its part. The line scope allows to search just the specified line or its part and the searched text should not contain the new line character.
id=<identifier>
- Identifier of the file which is to be searched. It must be equal to the ID specified in the File open or create command. The parameter doesn't have to be specified if the script opens/creates just one file and no ID is specified in the open/create command.
RETURNS
The command returns 0 (SUCCESS) if the text is found, 3 (NOT_FOUND) if the text is not found or 4 (INVALID_POSITION) if the line and column parameters do not point to a valid position in the file. If the search succeeds, the Line variable group is updated to provide the target \[line, column\] coordinates.
EXAMPLES
File find text="bananas"if ({_EXIT_CODE} == 3) { Exit 3 }File insert text=" and potatoes" line={_FILE_LINE_NUMBER} column={_FILE_LINE_COLUMN}+7
- Search the file forwards for "bananas" and insert the text to create "bananas and potatoes". If the word is not found the script will be terminated with the exit code of 3.
File read [line=<line_number>] [column=<column_number>] [length=<length_in_chars>] [id=<identifier>]
* Red colour indicates obligatory parameters
OPTIONS
line=<line_number>
- The number of the line to read from. Numbering starts at 1. If the line number is out of the range the command fails with exit code of 4 (INVALID_POSITION).
column=<column_number>
- The column (character number) to read from. Numbering starts at 1. If not specified the command reads from the line beginning (column=1). If the column is greater than the number of characters on the line the command fails with exit code of 4 (INVALID_POSITION).
length=<length_in_chars>
- Optional length specifying how many characters should be read. The range may not exceed the text line bounds. If the length parameter is not specified the command reads to the end of the specified line (excluding the new line character).
id=<identifier>
- Identifier of the file to read from. It must be equal to the ID specified in the File open or create command. The parameter doesn't have to be specified if the script opens/creates just one file and no ID is specified in the open/create command.
RETURNS
The command returns 0 (SUCCESS) if the text is located and read successfully or 4 (INVALID_POSITION) if the line and column parameters do not point to a valid position in the file. If successful the extracted text is stored into the _FILE_READ variable. The command also updates the Line variable group to provide information about the line pointed to by the [line, column] coordinates.
EXAMPLES
File find text="bananas" line=2 scope=lineFile read line=2 length={_FILE_LINE_COLUMN}Type "{_FILE_READ}"
- Find the "bananas" word on the second line, read the text before the word and type it.
File parse [line=<line_number>] [delimeter=<delimeter_char>] [separator=<separator_char>] [trim=<true|false>] [id=<identifier>]
File parse [line=<line_number>] [pattern=<regular_expression>] [trim=<true|false>] [id=<identifier>]
* Red colour indicates obligatory parameters
The command by default reads values from the specified line according to the Comma Separated Values (CSV) specification. The command is compatible with rules specified in the Comma-Separated Values article at Wikipedia and supports multi line values. The parsing mechanism may be in addition customized with optional custom text delimiter, value separator and trimming mode.
When the "pattern" parameter is specified, the command parses the line based on the provided Java-compatible regular expression. This approach takes advantage of the java.lang.String.split() method and it is fundamentally different from the CSV mechanism. For example, to parse individual words separated by a space use regular expression "\s". This mode may not be mixed with CVS parsing and "pattern" cannot be specified at the same time as "delimiter" and/or "separator".
The parsed values are made available through a set of numbered variables (_FILE_PARSE_VALUE1, _FILE_PARSE_VALUE2 ...) and a counter (_FILE_PARSE_COUNT) and may be retrieved in the script through a "for" loop with nested variable names (see the examples section). The command also modifies the line variables and sets the line number to the last processed line. This is an important feature allowing to iterate correctly over lines which may contain multiline values.
OPTIONS
line=<line_number>
- The number of the line to parse. Numbering starts from 1. If the line number is out of the range the command fails with exit code of 4 (INVALID_POSITION).
delimeter=<delimeter_char>
- The character which will serve as text delimiter. If the parameter is not specified it defaults to CSV compatible double quote ( " ).
separator=<separator_char>
- The character which will serve as value separator. If the parameter is not specified it defaults to CSV compatible comma ( , )
pattern=<regular_expression>
- A regular expression expressing the value to separate the values by. This parse mode internally relies on the java.lang.String.split() method. The expression must comply with the Java Pattern specification.
trim=<true|false>
- The value of true trims white spaces from the beginning and end of each parsed value. Be aware that this mode is not CSV compatible and doesn't meet the requirements of RFC 4180. The default value is false (do not trim).
id=<identifier>
- Identifier of the file to read & parse from. It must be equal to the ID specified in the File open or create command. The parameter doesn't have to be specified if the script opens/creates just one file and no ID is specified in the open/create command.
RETURNS
The command returns 0 (SUCCESS) if the text is located and read successfully or 4 (INVALID_POSITION) if the line and column parameters do not point to a valid position in the file. On success, the command populates the Parse variable group and also updates the Line one with information about the processed line.
EXAMPLES
Let's have a set of data listed as an example on Wikipedia:
| 1997 | Ford | E350 | ac, abs, moon | 3000.00 |
| 1999 | Chevy | Venture "Extended Edition" | 4900.00 | |
| 1999 | Chevy | Venture "Extended Edition, Very Large" | 5000.00 | |
| 1996 | Jeep | Grand Cherokee | MUST SELL! air, moon roof, loaded | 4799.00 |
The corresponding CSV file looks as follows:
1997,Ford,E350,"ac, abs, moon",3000.00
1999,Chevy,"Venture ""Extended Edition""","",4900.00
1999,Chevy,"Venture ""Extended Edition, Very Large""","",5000.00
1996,Jeep,Grand Cherokee,"MUST SELL!
air, moon roof, loaded",4799.00
The following script parses the lines one by one and prints out the individual CSV values (to see the results open a text editor on the connected remote desktop). It also calculates and prints out a sum of all prices located usually in the fifth value on the line. Note that we cannot simply iterate over the number of lines in the file because the second last line contains a multiline value.
File open file="data.csv"# We declare the fifth variable just to supress compiler error in the Eval cmd belowVar sum=0 _FILE_PARSE_VALUE5=0for (i=1; {i}<{_FILE_LINE_COUNT}; i={i}+1) { File parse line={i} Typeline "Line #{i}:" for (j=1; {j}<{_FILE_PARSE_COUNT}+1; j={j}+1) { Typeline " Value #{j}: {_FILE_PARSE_VALUE{j}}" } # Add the car price from column 5 to the sum Eval sum={sum}+{_FILE_PARSE_VALUE5} # As the parse command updates the Line var group with number of the last # processed line, this will alow us to skip lines with multiline values Var i={_FILE_LINE_NUMBER}}Typeline "Summary value: ${sum}"
When the script is executed it types the following output on the desktop:
Line #1: Value #1: 1997 Value #2: Ford Value #3: E350 Value #4: ac, abs, moon Value #5: 3000.00Line #2: Value #1: 1999 Value #2: Chevy Value #3: Venture "Extended Edition" Value #4: Value #5: 4900.00Line #3: Value #1: 1999 Value #2: Chevy Value #3: Venture "Extended Edition, Very Large" Value #4: Value #5: 5000.00Line #4: Value #1: 1996 Value #2: Jeep Value #3: Grand Cherokee Value #4: MUST SELL!air, moon roof, loaded Value #5: 4799.00
Summary value: $17699
Another example: Let's have a text file with numbers separated by one or more spaces or tabulators:
1 14 23 9 100
117 5 7
To calculate the sum of all numbers into a variable called "count" one would typically use the following script. Note that as the data file is not CSV, it is necessary to use a Java regular expression "\s".
File open file="C:\numbers.txt"
Eval count=0
Var _FILE_PARSE_COUNT=0 _FILE_PARSE_VALUE1=0

for (i=1; {i}<{_FILE_LINE_COUNT}+1; i={i}+1) {
  File parse line={i} pattern="\s"
  for (j=1; {j}<{_FILE_PARSE_COUNT}+1; j={j}+1) {
     Eval count={count}+{_FILE_PARSE_VALUE{j}}
  }
}
File delete [line=<line_number>] [column=<column_number>] [length=<length_in_chars>] [id=<identifier>]
* Red colour indicates obligatory parameters
OPTIONS
line=<line_number>
- The line number to delete. Numbering starts at 1. If the line number is out of the range the command fails with exit code of 4.
column=<column_number>
- The column (character number) to delete the text from. Numbering starts at 1. If not specified the command deletes from the beginning of the line (column=1). If the column is greater than the number of characters on the line the command fails with exit code of 4.
length=<length_in_chars>
- Optional length specifying how many characters should be deleted. The resulting delete area may exceed the text line bounds and in such a case the delete operation is applied to the terminating newline character and then to the following line or lines. If the length exceeds the file size, all the content file content after the specified position is deleted. If the length parameter is not specified the command deletes just to the end of the specified line including the new line character.
id=<identifier>
- Identifier of the file to read & parse from. It must be equal to the ID specified in the File open or create command. The parameter doesn't have to be specified if the script opens/creates just one file and no ID is specified in the open/create command.
RETURNS
The command returns 0 (SUCCESS) if the text is located and deleted successfully or 4 (INVALID_POSITION) if the line and column parameters do not point to a valid position in the file. The command saves the deleted text to the _FILE_DELETED variable. As the delete operation changes file size and eventually the number of lines, it updates variables from the Counter group as well as the Line one.
EXAMPLES
File delete line="1"
- Delete the first line (including the newline character).
File delete line="2" length={_FILE_LENGTH}
- Delete everything from the second line to the end of the file and leave just the first line.
for (i=1; {i}<{_FILE_LINE_COUNT}; i={i}+1) {
  File delete line={i} length=10
}
- Delete first 10 characters on each line.
File read line=1
File delete line="1" column={_FILE_LINE_LENGTH}+1 length=1
- Remove the newline character located at the end of the first line and join the first and second line.
File close [id=<identifier>] [save=<true|false>]
* Red colour indicates obligatory parameters.
OPTIONS
save=<true|false>
- True saves the file to the file system, false discards any changes. The default value is "true". The file is saved only if it has been modified by the script and/or if another output file was specified.
id=<identifier>
- Identifier of the file to close. It must be equal to the ID specified in the previous File open or create command. The parameter doesn't have to be specified if the script opens/creates just one file and no ID is specified in the open/create command.
RETURNS
The open command returns either 0 (SUCCESS) or 2 (FAILED_TO_SAVE) on an I/O error. It also clears up all File specific variables from the context.
EXAMPLES
File open file=test.txt
...
File close
- Close the file. If the content has been modified, save the changes to the test.txt file.
File open file=test.txt outfile=test2.txt
...
File close
- Close the file. The content loaded from test.txt will be written to test2.txt regardless of whether it has been modified or not.
File open file=test.txt id="testfile"
...
File close id="testfile" save=false
- Close the file and discard any eventual changes. As the "testfile" ID was assigned to the file in "File open", it must be specified in the "File close" one as well as in any other File call between these two commands.
3.4.3 Mail
DESCRIPTION
Mail - Get incoming mail from an IMAP or POP3 server. To send an email through an SMTP server use the Sendmail command.
The command supports three actions:
- Get - download mail from the server. The messages may be optionally filtered by their attributes.
- Set - set the SEEN flag of a message.
- Delete - Delete a message or messages.
Note that deleting of a Gmail message is subject to its options at the Settings page of the Forwarding and POP/IMAP tab. It may be archived, moved to trash or deleted immediately. Make sure to verify the options to get the expected outcome.
All actions support authentication parameters as follows:
server=<server_address>
- The the server name or IP address, for example imap.gmail.com. It may optionally contain the port number.
protocol=<IMAP|POP3>
- The server type (protocol), either "IMAP" or "POP3". If the parameter is omitted the command defaults to "IMAP". If the security parameter is set to "google" or "microsoft" the protocol falls back to IMAP regardless of this option.
user=<user_name>
- The mail server user name.
security=<password|google|microsoft>
-The security type (since 6.2.2), one of:
- "password" - plain password authentication. The password may be specified through the password parameter.
- "google" - OAuth2 authentication to the GMail IMAP server.
- "microsoft" - OAuth2 authentication to the MS Outlook IMAP server.
To enable either of the OAuth2 schemes you have to download the authentication token through the Tools→OAuth Token Manager window. Tokens are long lived but may be invalidated on the user side (password change, revocation through the Google Dev Console or MS Azure account, ...) or after they are not used for a long time (typically 6 months). Downloaded tokens are encrypted and stored in the Robot configuration file.
password=<password>
-The password. It is used only when the security is set to "password".
These parameters must be used only in the first Mail command. They are then saved internally and reused for subsequent commands called within the same script execution session.
The authentication parameters may be also specified through special variables. This approach allows to inject the authentication data from the command line or a workitem or even store the sensitive values such as the password to the Safe Box.
| Variable Name | Description |
|---|---|
| _EMAIL_SERVER | The server name or IP address |
| _EMAIL_PROTOCOL | The server type, either "POP3" or "IMAP" |
| _EMAIL_USER | The user name |
| _EMAIL_SECURITY | The security, one of "password", "google" or "microsoft" |
| _EMAIL_PASSWORD | The password |
Retrieving Mail
Since "Mail get" does not cache the messages locally and always loads the data anew it is recommended to filter the messages and/or set the maximum amount of messages searched. For example,
Mail get max=10 read=false subject="Request"
will search the 10 most recent emails for unread messages containing the word of "Request" in the subject.
The retrieved messages are sorted by the date (the newest first). Attachments are downloaded automatically to a temporary location on the hard drive and deleted at the end of the session. Message attributes are exposed to the script in form of variables:
| Variable Name | Description |
|---|---|
| _EMAIL_TOTAL_COUNT=<number> | Total number of messages in the last connected email folder |
| _EMAIL_NEW_COUNT=<number> | Number of new (unread) messages in the last connected email folder |
| _EMAIL_COUNT=<number> | Number of retrieved messages that matched the specified criteria |
| _EMAIL_FROM_<n>=<address> | Sender address of the n-th message |
| _EMAIL_TO_<n>=<address(es)> | Recipient or a semicolon separated list of recipients of the n-th message |
| _EMAIL_SUBJECT_<n>=<text> | Subject of the n-th message |
| _EMAIL_BODY_<n>=<text> | Body of the n-th message |
| _EMAIL_READ_<n>=<true|false> | The SEEN flag indicator (false=unread, true=read) of the n-th message |
| _EMAIL_FOLDER_<n>=<name> | The folder name the n-th message belongs to. |
| _EMAIL_UID_<n>=<id> | Identifier of the n-th message. It is used for the "set" and "delete" operations |
| _EMAIL_ATT_COUNT_<n>=<number> | Number of attachments of the n-th message |
| _EMAIL_ATT_NAME_<n>_<k>=<name> | File name of k-th attachment of the n-th message as it is specified in the message |
| _EMAIL_ATT_FILE_<n>_<k>=<file_path> | File path to the k-th attachment of the n-th message on the local hard drive |
SYNOPSIS
Mail get [server=<server_address>] [protocol=<IMAP|POP3>] [user=<user_name>] [password=<password>] [folder=<folder_name>] [from=<email_address>] [subject=<text>] [body=<text>] [attachment=<text>] [read=<true|false>] [max=<number>]
* Red colour indicates obligatory parameters
OPTIONS
folder=<folder_name>
- The folder on the IMAP server to connect to. If the parameter is omitted or the server type is POP3 it defaults to "INBOX".
from=<email_address>
- The sender address or it's part.
subject=<text>
- The message subject or a phrase it contains.
body=<text>
- The message body or a phrase it contains.
attachment=<text>
- An attachment name or a string it contains. For example, to retrieve messages with an attached text file use ".txt".
read=<true|false>
- Retrieve only read (true) or unread (false) messages.
max=<number>
- Maximum number of the most recent messages to process. This parameter allows to avoid long delays on accounts containing a large number of messages. The default value is 100.
uid=<message_id>
-Identifier of the message to retrieve. It may be retrieved from the _EMAIL_UID variable populated by a previous call of "Mail get". When specified all other filtering parameters are ignored and the command returns the message only.
SYNOPSIS
Mail set [server=<server_address>] [protocol=<IMAP|POP3>] [user=<user_name>] [password=<password>] [folder=<folder_name>] [uid=<message_id>] [read=<true|false>]
* Red colour indicates obligatory parameters
OPTIONS
folder=<folder_name>
- The folder on the IMAP server to connect to. If the parameter is omitted or the server type is POP3 it defaults to "INBOX".
uid=<message_id>
-Identifier of the message to be updated. It may be retrieved from the _EMAIL_UID variable populated by "Mail get". When the parameter is omitted the command will update all messages retrieved by the most recently executed "Mail get" action.
read=<true|false>
- The target state of the SEEN flag. Use "false" to set the message status to unread or "true" to read.
SYNOPSIS
Mail delete [server=<server_address>] [protocol=<IMAP|POP3>] [user=<user_name>] [password=<password>] [folder=<folder_name>] [uid=<message_id>]
* Red colour indicates obligatory parameters
OPTIONS
folder=<folder_name>
- The folder on the IMAP server to connect to. If the parameter is omitted or the server type is POP3 it defaults to "INBOX".
uid=<message_id>
- Identifier of the message to be deleted. It may be retrieved from the _EMAIL_UID variable populated by "Mail get". When the parameter is omitted the command will delete all messages retrieved by the most recently executed "Mail get" action.
RETURNS
The command returns 0 (SUCCESS) only. If the mail server connection fails it throws an error which terminates the script.
EXAMPLES
Mail get server=imap.gmail.com user=john.doe@gmail.com password=welcome max=10 read=falseMail set read=true
- Search the most recent 10 emails from the specified Google account for unread ones and mark them as "read"
Var _EMAIL_SERVER=imap.gmail.com
Var _EMAIL_USER=john.doe@gmail.com
Var _EMAIL_PASSWORD=welcome
Mail get max=20 read=false attachment=".xls"
for (i=1; {i}<={_EMAIL_COUNT}; i={i}+1) {
   Excel open file={_EMAIL_ATT_FILE_{i}_1}
   Excel select ref=A1
   Log "Value at A1 of the file {_EMAIL_ATT_NAME_{i}_1} is: {_EXCEL_CELL_VALUE}"
   Mail set uid={_EMAIL_UID_{i}} read=true
}
- Download recent unread messages with a Microsoft Excel 97 file (.xls) in the first attachment. Open the file and log the first cell value. Then mark the message as "read".
This example shows how to automate processes by emails. Users may send requests (forms) by email to the specified address where it is picked up by a running Robot instance and processed.
4. Image Comparison Capabilities
4.1 Image Comparison Overview
Image comparison methods are algorithms and/or technologies which analyze the image of the connected desktop. They are used in scripts to verify the desktop contents, retrieve artefacts such as GUI components or text and act upon the results. Most methods work with one or more image files ("template images") and/or image folders ("template image collections"). These artefacts are described closer in the Image Collections and Image Meta Data chapters.
Image comparison method plugins are closely integrated with the three following scripting language commands and their Java method counterparts. These are in the comparison method context usually called hosting commands or Java methods:
Command | Java Method(s) | Description |
|---|---|---|
Apply the selected image comparison method to the currently connected desktop once. Typically used to verify the existence of a component or to get its coordinates, to retrieve text or to verify whether the screen content is expected. | ||
Save a screenshot of the remote desktop to a file and optionally apply the selected image comparison method through an internal call of the Compareto command. | ||
Pause the execution until ('match') or while ('mismatch') the selected image comparison method produces the result of "success" (the return code of 0). Typically used to wait until the expected component or text appears on the screen or disappears from the screen. |
Each comparison method is identified by its unique name (also referred to as code), for example, "search2" or "object". Besides the standard "passrate" and "cmparea" parameters supported by the command framework, each method may declare any number of optional parameters specific for the particular algorithm. These parameters are then visible to the calling command.
As all image comparison methods are internally implemented as plugins, users are free to develop their custom algorithms and integrate them into the scripting language and the Java script API. See the ImageComparisonModule interface for details.
The following examples demonstrate the call of the most frequently used "search2" algorithm with all the framework provided parameters of "passrate" and "cmparea" and its own specific parameter of "order":
      Compareto

                       "buttonOk.png" passrate="70" method="search2" cmparea="x:258,y:114,w:417,h:298" sort="none"
Screenshot "s.jpg" template="buttonOk.png" passrate="70" method="search2" cmparea="x:258,y:114,w:417,h:298" sort="none"
Waitfor "match" template="buttonOk.png" passrate="70" method="search2" cmparea="x:258,y:114,w:417,h:298" sort="none"
The same example in the form of a Java Script:
compareTo(new File[] { new File( "buttonOk.png" ) }, 70.0f, new Rectangle(258, 114, 417, 298), "none" ); screenshot(new File( "s.jpg" ), (String) null , (Rectangle) null , new File[] { new File( "buttonOk.png" ) }, 70.0f, new Rectangle(258, 114, 417, 298), "none" , false); waitForMatch(new File[] { new File( "buttonOk.png" ) }, 70.0f, (String) null , new Rectangle(258, 114, 417, 298), (String) null , "none" , (String) null);
There are two built-in mechanisms allowing to handle failed image comparisons in a general way:
- The ComparisonFailureFallback fall back procedure (since v2.3),
- The Image Doctor wizard and the Imagedoctor command (since v3.5).
4.1.1 Image Collections
Image collections typically represent images capturing various visual appearances or possible states of a single graphical object, for example of a button on various environments and/or operating systems. Collections may be employed by the CompareTo, Screenshot and WaitFor match/mismatch scripting language commands or the corresponding Java methods to locate the component on the screen seamlessly on all environments.
T-Plan Robot Enterprise version 2.0 and higher supports image collections through semicolon-separated image file lists. For example, to search for an "OK" button represented by two template images buttonOK1.png and buttonOK2.png located in the template folder one would use:
Compareto "buttonOK1.png;buttonOK2.png" method=search
T-Plan Robot Enterprise version 2.2 introduces dynamic image collections represented by folders. This mechanism allows adding, remove and edit template images dynamically, without having to update the script code. Each folder is searched recursively for Java supported images of lossless format (PNG, BMP, WBMP, GIF) and the specified image comparison action is performed on the generated image list.
For example, images from the previous example can be moved to a folder called buttonOK and the command can be changed to:
Compareto "buttonOK" method=search
Images retrieved from the folder are by default processed in the natural order returned by the underlying operating system. Version 2.3.3 introduced a new optional mechanism allowing to change this behaviour and sort the images before comparison:
- To configure the default sort mode see the CompareTo Command panel in the Preferences window. This setting will be used application wide unless the sort mode is overruled by the script as is described in the next bullet.
- Scripts may set the sort mode through the setting of the _COMPARETO_SORT_MODE variable to the desired sort mode index. The variable acts as a switch and the sort mode are applied by all comparison commands until the variable gets reset or the end of the script is reached. Acceptable values are:
0 - Sort by image file name (ascending)
1 - Sort by image file name (descending)
2 - Sort by the image file last modification date (ascending)
3 - Sort by the image file last modification date (descending)
For example, to process the images from the previous example in the file name descending order (buttonOK2.png first) use:Var _COMPARETO_SORT_MODE=1Compareto "buttonOK" method=search
To reset the sort mode to the default one simply set the variable to an empty string:
Var _COMPARETO_SORT_MODE=
Image collections can be freely combined into file lists consisting of images and image collections. For example, to search for the "OK" button or an "Approve" button represented by the buttonApprove1.png and buttonApprove2.png images one would use:
Compareto "buttonOK;buttonApprove1.png;buttonApprove2.png" method=search
Or, having created a folder called buttonApprove for the two images one could write:
Compareto "buttonOK;buttonApprove" method=search
4.1.2 Image Meta Data
T-Plan Robot version 2.2 and higher save template images to the hard drive together with an additional text file containing image metadata such as the source coordinates and click point. Whenever the image is used for image comparison, the data is loaded and made available to the script in the form of predefined variables.
The metadata file is in the Java .properties format and its name is derived from the image file (typically <imagefile>.<formatextension>.properties). The GUI allows creating the metadata file for an already existing template created with the previous version or with a third party image editor. Since the source coordinates are however lost, the GUI, in this case, allows to edit and store only the click point.
Source coordinates store the original coordinates in the desktop image at the time of template creation. They are exposed to the script through the _COMPARETO_SOURCE_X and _COMPARETO_SOURCE_Y variables. These variables are not populated when the metadata file is not available or the data is not populated (templates created prior to v2.2 or with 3rd party tools).
Source coordinates allow scripting actions to test whether the object has moved on the screen. A typical piece of code for this action is:
Compareto "buttonOK" method=searchif ("{_COMPARETO_SOURCE_X}" != "{_SEARCH_X}" && "{_COMPARETO_SOURCE_Y}" != "{_SEARCH_Y}") { # Object has moved ...}
The Click Point represents the best location for an eventual mouse action such as a click, press, release or drag. The point defaults to the image centre but it can be customized to point to any location inside or even outside the template image rectangle. The click point coordinates are internally stored relatively to the template image top left corner.
Usage of the click point makes sense only with the image search. When it locates the object on the screen, it recalculates the click point to absolute coordinates and stores them under the _COMPARETO_CLICK_X and _COMPARETO_CLICK_Y variables. When the metadata file doesn't exist (templates created prior to v2.2), the variables are also available and default to the image centre. The following code snippet locates an object and on success clicks on its click point:
Compareto "buttonOK" method=searchif ({_EXIT_CODE} == 0) { Mouse click to="x:{_COMPARETO_CLICK_X},y:{_COMPARETO_CLICK_Y}"}
4.1.3 Image Comparison Recommendations
Reliability of most image comparison methods decreases with factors which produce image differences on the pixel level. To minimize these impacts consider the following hints:
- Change the remote desktop background to a solid colour. Choose such a colour which is not contained in the application window which you are going to test. This will ensure that the template images that contain the background will not fail in another environment. It is also likely to make your scripts faster (fewer colours usually improve the performance of image comparison methods.
- Change in the environment or display settings also affect the functionality of image comparison. If you create your templates on a 24-bit colour remote desktop and later on restart the VNC server in the 8-bit colour depth, it won't work.
- If the mouse pointer is rendered as part of the desktop image (meaning that the pointer remains visible even if you move the local mouse pointer out of the desktop view) it is a good practice to use the Mouse move command to move your mouse pointer to a constant position before comparison. Also, make sure that the mouse pointer is not on your template images!
- Do not perform image comparison against images with lossy compression such as JPEG. Though the tool will complain initially, it will finally let you do it (though the comparison will most likely fail due to too many mismatching pixels). PNG and BMP formats are preferred because they preserve 100% of the image information and guarantee reliable and stable comparison results. GIF is generally also a good one; be however aware that its palette is limited to 256 colours and many tools flatten the colours when they don't meet the limit. It is recommended to retest (compare) a GIF template against a desktop image right after it is created to make sure it works correctly.
- Some systems and applications tend to highlight buttons and menu items when the mouse pointer is above them. You may then want to create two templates, one for regular and another one for the highlighted state and use them as a template list for all applicable image searches.
4.2 Image Search Methods
Image Search Methods search the screen for an object (component) based on template image(s), image collection(s) or object parameters such as the size, colour or shape. The method typically returns a list of locations and/or rectangles on the screen where the specified object was detected. This method group is often employed to automate actions such as "find and click a button" or "make sure that a component is visible on the screen".
The Image Search Methods supported by T-Plan Robot are:
- The Image Search V2 (code "search2") method searches the screen for components by template images and collections. The algorithm features three search modes (exact, tolerant and fuzzy) and ordering of results by the lowest difference or location.
- The Image Search (code "search") method is an older version of the V2 algorithm. It is also capable of searching the screen for components by template images and collections with a limited tolerance to minor image changes.
- The Object Search (code "object") method locates objects by colour, size and an optional sample template image. The algorithm is capable of searching for rotated instances of the object and provides certain robustness against eventual object overlapping.
Note: The other methods listed above are more suitable for GUI automation, as this method rather targets analysis of graphical systems such as GIS outputs, maps, charts and similar. - The Google Cloud Vision (code "vision") is an experimental method linking to the Google AI. It is supported since Robot 8. It may be used to verify whether certain objects are on the screen.
4.2.1 Image Search V2 ("search2")
DESCRIPTION
The Image Search v2 (code "search2", since v3.0) searches the desktop screen for a component or an object represented by one or more template images and/or image collections. It is typically employed for verification of the desktop screen contents ("make sure that an object is visible") or to locate a component for a subsequent mouse or keyboard operation ("find and click or drag", "find and press/type", etc.).
The "search2" algorithm is a new generation of the older Image Search method ("search") one with the following improvements:
- Easy to use - The only parameter controlling the tolerance to minor desktop image changes is the standard "passrate" one. Its default value is set to 50% to perform an out-of-the-box reliable search for most environments including those considered as difficult to automate at the desktop image level, such as for example Flash applications.
- Fast performance - The search operates significantly faster even for low values of the passrate parameter. Also as the algorithm avoids copying of the image pixels and works directly with the desktop buffer it consumes up to 90% less memory than the other similar methods.
- Result sorting - The default sorting of the results (matching locations) by the best match ensures that even if the passrate value is too low and the method produces multiple fuzzy matches, the best matching location is always reported in the first place. This allows to work with the first match (which is the most likely the correct one) and ignore the other remotely similar ones.
- Search of scaled images - The scale parameter introduced in release 4.0 searches for scaled instances of the input component image. This allows reusing a single search across devices with various resolutions (Android, iOS ...).
- Non-rectangular template images are supported since release 8.1. Template images may contain transparent or translucent pixels which will be automatically ignored (considered a match) during image search. This allows to create template images of any shapes, without backgrounds or even with some object features removed. Transparent pixels may be introduced into template images with the new Template Image Editor v2 or with any other 3rd party image editor. An example of a circular Firefox icon template image:

Coordinates of the resulting match locations are exposed to the calling script in the form of a set of SEARCH prefixed variables. This system is compatible with the older "search" method:
Method Created Variable | Description |
|---|---|
_SEARCH_MATCH_COUNT=<number> | Number of matching locations identified by the Object Search. |
_SEARCH_X<n>=<X-coordinate> | The X,Y coordinates of the n-th match location where "n" is between 1 and the _SEARCH_MATCH_COUNT value. |
_SEARCH_X=<X-coordinate> | The X,Y coordinates of the first match location (synonyms for_SEARCH_X_1 and _SEARCH_Y_1). |
To get the width and height of the match location use the _COMPARETO_TEMPLATE_WIDTH and _COMPARETO_TEMPLATE_HEIGHT variables which are populated by the hosting command or Java method call.
This method is not capable of working with transparent/translucent template images and with the "search" specific parameters of "removebg", "bgcolor", "minalpha" and "tolerance". Should you need this functionality use the "search" method instead.
Since v4.4 the method allows setting a limit on the number of matching locations. It is intended to support scenarios such as "find first N occurrences and stop" where the full desktop search would yield too many matches or take too long. To set the limit from a script populate the _SEARCH2_MATCH_LIMIT variable using the Var command. To reset it set the variable to an empty value. For example, the value of 1 will make the search stop on the first matching location:
// Set the match limit to 1 Var _SEARCH2_MATCH_LIMIT=1 Compareto comp.png method=search2 // Reset the match limit Var _SEARCH2_MATCH_LIMIT=1
Starting with v6.1 the maximum number of matching locations was internally limited to 1,000 to prevent performance issues. The limit can be changes in the method preferences.
OPTIONS
The method requires one or more template images and/or image collections specified through the hosting command or Java method call.
In the context of the "search2" method, the parameter of "passrate" specifies the required minimum similarity between the template image and the matching location on the screen. The default value is 50% which ensures a good performance/accuracy ratio in most cases. If you experience too many matches, for example on low contrast environments, set the pass rate to a higher level. To get the maximum performance set the pass rate to 100%.
The "cmparea" parameter is optional and defaults to the full screen when omitted.
The method supports two specific parameters as follows:
sort=<best|none|top|bottom|left|right>
- Result sort mode (optional), one of:
- "best" - Sort by the best match (the best matching location with the lowest difference first). Locations having the same difference value will be sorted in the natural reading order (left to right, top to bottom). This mode is the default one when the parameter is not specified.
- "none" - Don't sort and leave the results in their natural "reading" order (left to right, top to bottom). This mode will produce the same order as the legacy "search" method.
- "top" - Sort from the top to the bottom (the topmost first).
- "bottom" - Sort locations from the bottom to the top (the bottommost first).
- "left" - Sort locations from the left to the right (the leftmost first).
- "right" - Sort locations from the right to the left (the rightmost first).
scale=<float_number(s)>
- The scale is optional parameter supported since 4.0. It allows to search for scaled instances of the input image(s). The value may be a single float number (scale factor) or a semicolon ';' separated list of numbers. When there are more numbers they are processed in the specified order until a match is generated or the list is exhausted.
To set off scaling use the value of 1. When the value is greater than zero it is being handled as a scale ratio. For example, the value of 2.0 will search for the component whose width and height are magnified twice.
There are two negative constants which can be specified to employ dynamic scaling. They will scale the input image(s) with regard to the difference between the current desktop resolution and size of the desktop the template (component) image was created from. As Robot 3.x and older did not save the desktop resolution to the template metadata, the image(s) must be created or updated with Robot 4.0 to enable this operation. To update older images connect to the original desktop, right-click the template(s) in the Project View and select the Update image properties item.
The supported scale modes are:
- -1 ("stretch mode") will scale the input image following the desktop width and height changes. The resulting image may or may not have the same width and height proportions (the width/height ratio).
- -2 ("proportional scale mode") will pick up the smaller relative change of the desktop width and height and use it for both width and height scaling. The resulting image will have the same proportions (the width/height ratio).
RETURNS
The method makes the calling command (method call) return 0 (success) if at least one matching location is found for at least one of the input template images. Otherwise, it returns the value of 1.
TROUBLESHOOTING
To deal with a failing "search2" comparison:
- If the script is designed to terminate after a failed search it is a good practice to create a screenshot in a lossless format (PNG or BMP). An example of such a code is shown in the example below. This will allow you to reproduce and debug the failed comparison after you load the screenshot either through the "Static Image Client" in the Login Dialog or using the "Load RD Image" button in the comparison command/method call property window.
- To achieve higher tolerance for the image changes simply decrease the pass rate. Don't be afraid to set it really low to the Fuzzy level, but make sure to test through the "Compare" button in the GUI that the correct component location is reported first. If you don't achieve to fix the broken search through the pass rate create an alternative template image and add it to the template list or image collection.
- For the most common factors causing comparison failures, see the Image Comparison Recommendations chapter.
- Should the search fail for no obvious reason please mail the screenshot together with the image template(s) to the T-Plan Support.
EXAMPLES
Compareto buttonOk.png method="search2" passrate="90" sort="bottom"
if ({_EXIT_CODE} > 0) {
Screenshot failure.png desc="Failed to find the OK button." Exit 1 desc="Failed to find the OK button."
} else {
Mouse click to=x:{_SEARCH_X},y:{_SEARCH_Y}}
- Search for the bottommost OK button and click it. If the button is not found take an exit screenshot and terminate the script with the exit code of 1.
// Search for the buttons and click every single one
Compareto "button.png" passrate="100" method="search2"
if ({_EXIT_CODE} == 0) {
    for (i=1; {i}<{_SEARCH_MATCH_COUNT}+1; i={i}+1) {
        Mouse click to=x:{_SEARCH_X_{i}},y:{_SEARCH_Y_{i}} wait=1s
    }
}
// Wait 15 seconds for the buttons to disappear or change their state
Waitfor "mismatch" method="search2" passrate="100" template="button.png" timeout="15s"
if ({_EXIT_CODE} > 0) {
    Exit 1 desc="Some buildings failed to turn the state!"
}
- Search the screen for multiple buttons and click every single one. Then check the screen if all the buttons disappear or change its state.
// Find the scroll button
Compareto "scrollbutton.png" method="search2"
if ({_EXIT_CODE} > 0) {
    Exit 1 desc="Failed to locate the scroll button!"
}
// Save its coordinates to the X, Y variables
Var X={_COMPARETO_CLICK_X} Y={_COMPARETO_CLICK_Y}
// Iterate 100 loops
for (i=0; {i}<100; i={i}+1) {
    // Click the scroll button
    Mouse "click" to="x:{_COMPARETO_CLICK_X},y:{_COMPARETO_CLICK_Y}"

    // Check if the component is visible on the screen. We use Waitfor
    // because the page may take time to scroll and update on the screen
    Waitfor match template="component.png" method="search2" timeout=3s
    if ({_EXIT_CODE} == 0) {
        // Found -> break the for loop
        break
    }

    // Last loop #99 -> component not found, terminate the script
    if ({i} == 99) {
        Exit 2 desc="Failed to scroll to the component!"
    }
}
- An example of how to search for a component which is displayed in a scrolled page (window). The example keeps clicking the scroll down button and checks for the existence of the component in a loop. The task of clicking onto the scroll button could be eventually replaced with the pressing of the PgDown key.
4.2.2 Image Search ("search")
DESCRIPTION
The Image Search (code "search") searches the desktop screen for a component or an object represented by one or more template images and/or image collections. It is typically employed for verification of the desktop screen contents ("make sure that an object is visible") or to locate a component for a subsequent mouse or keyboard operation ("find and click or drag", "find and press/type", etc.).
The method uses a plain pixel comparison with three independent mechanisms of tolerance:
- Pixel-based tolerance makes the algorithm search for occurrences which have a certain amount of pixels different from the template image. This is achieved through the Pass Rate "passrate" parameter which defines the percentage of pixels required to match. If your template image size is, for example, 10x10 (100 pixels) and you specify the pass rate of 99%, the algorithm will find all matching locations having up to 1 different pixel. Note that the lower pass rate you specify, the lower the performance will be and the longer the search will take.
- RGB tolerance has been introduced in v2.2. It is activated by the tolerance parameter which is an integer number between 0 and 256. It indicates how much the Red, Green and Blue components of a desktop pixel may differ at a maximum to consider the colour be equivalent to the corresponding template pixel. This value allows dealing with images whose pixels are changing slightly, for example as a result of blurring or merging of the image with the background. This behaviour has been reported for Flash applications where decorative texts and even some images are not being rendered in a constant way as the application refreshes. Be aware that the higher the tolerance value, the higher the probability of false match detections is. In most scenarios, the value should be in the [0, 100] range depending on the blurring level. If the parameter is not specified, it defaults to zero and the algorithm compares pixels using an exact colour match.
- Transparency/translucency based tolerance allows ignoring certain pixels of the template image. The image search algorithm by default counts as "passed" all transparent or translucent (partially transparent) pixels having the translucency component Alpha lower than the limit specified by the Minimum Alpha parameter (minalpha). For example, if a template with 100 pixels contains 90 transparent pixels and the minimum alpha is set to 0xFF (forcing to search for fully opaque pixels only), only the remaining 10 non-transparent pixels will be compared against the desktop image.
Transparency is a powerful method allowing to build image comparison which is robust against a background or component colour changes. When you for example search for an icon rendered on your remote desktop, marking the background colour pixels transparent in the icon template will make sure that the image comparison passes regardless of the remote desktop colour changes. The template image may be further on doctored with common image editors to remove insignificant pixels and leave just a skeleton of the searched object. This is often the only possible way to test certain types of applications with unstable object rendering, such as for example Geographic Information Systems (GIS).
T-Plan Robot Enterprise version 2.1 and higher supports automatic background transparency through the removebg and bgcolor parameters. It allows ignoring the template image background without having to edit the image with a third-party editor. The algorithm accepts an opaque template image on the input (meaning an image with no transparency) and applies an internal transparency filter to remove all pixels equal to or reasonably similar to the background. The background colour defaults to the first template image pixel but it may be also specified explicitly through the bgcolor parameter. Automatic transparency may be comfortably configured through the GUI, in particular with the Template Image Editor and the comparison GUI component described in the CompareTo window.
Transparency may be also introduced into template images using third party image editors.
For example, Windows and Linux/Unix users may take advantage of e.g. Gimp to set up transparency as follows:
- Open the template image with e.g. Gimp
- Select Layer->Transparency->Color To Alpha
- Select the transparent colour. It usually works fine if you leave it on the defaults provided by Gimp (white background colour).
- Save the template image to the file.
- Retest with the Template Image Editor. This is necessary because if the image contains just colours which are very close to the background colour, Gimp may turn all pixels transparent or translucent which will make the template unusable for image search with the default minalpha value. The Template Image Editor is able to detect such cases and suggest changes to the image search parameters.
Coordinates of the resulting match locations are exposed to the calling script in the form of a set of _SEARCH_ prefixed variables:
Method Created Variable | Description |
|---|---|
_SEARCH_MATCH_COUNT=<number> | Number of matching locations identified by the Object Search. |
_SEARCH_X_<n>=<X-coordinate> | The X,Y coordinates of the n-th match location where "n" is between 1 and the _SEARCH_MATCH_COUNT value. |
_SEARCH_X=<X-coordinate> | The X,Y coordinates of the first match location (synonyms for_SEARCH_X_1 and _SEARCH_Y_1). |
To get the width and height of the match location use the _COMPARETO_TEMPLATE_WIDTH and _COMPARETO_TEMPLATE_HEIGHT variables which are populated by the hosting command or Java method call.
Note that the number of match locations is limited by a parameter in the Compareto command preferences and the search will stop when the maximum gets reached.
OPTIONS
The method requires one or more template images and/or image collections specified through the hosting command or Java method call. The parameter of "passrate" specifies in the context of the "search" method the minimum ratio of pixels that must match exactly between the template image and the screen match location. The default value is 100% (no pixel diff tolerated). The "cmparea" parameter is optional and defaults to the full screen when omitted.
Supported specific parameters:
tolerance=<0-255>
- The tolerance parameter controls the RGB tolerance to minor colour changes. It must be an integer number between 0 and 255 where 0 stands for no tolerance (exact matching) and 255 meand maximum tolerance. It indicates how much the Red, Green and Blue components of a desktop pixel may differ at a maximum to consider the colour be equivalent to the corresponding template pixel. High tolerance values increase the probability of false match detections.
This parameter allows dealing with images whose pixels are changing slightly, for example as a result of blurring or merging of the image with the background. This behaviour has been reported for Flash applications where decorative texts and even some images are not being rendered in a constant way over time. In most scenarios, the value should be in the [0, 100] range depending on the blurring level. If the parameter is not specified, it defaults to zero and the algorithm compares pixels using the exact colour match.
removebg=<true|false>
The removebg parameter switches the automatic background transparency on ("true") or off ("false"). The value of "true" applies automatic transparency to ignore the template image background colour. If the template image (or template images) already contain transparent or translucent pixels, the background filter is not applied and this parameter, as well as the bgcolor one, are ignored. The default value is "false" (background filter is off).
bgcolor=<HTMLColor>
The bgcolor parameter is optional and it may define custom background colour for the automatic background transparency mode activated through the removebg parameter. It accepts RGB in the HTML-like notation, such as for example "ffffff" for white or "000000" for black. The value must be 6 characters long where each of the R, G, B components are specified in the form of a 2-digit hexadecimal number (00 to ff). When the bgcolor is not specified the method selects the background colour from the very first template image pixel (top left image corner).
minalpha
The minalpha parameter sets translucency tolerance. It may be applied to images filtered through the removebg filter as well as to templates with already existing transparent or translucent pixels. The default value of 255 instructs the search algorithm to compare just the fully opaque pixels and ignore all transparent or translucent (semi-transparent) ones. Values lower than 255 will make the algorithm to compare even translucent pixels with the alpha component equal to or greater than the specified limit.
The minimum alpha parameter is intended to solve situations where the background colour filter makes too many pixels or even all of them transparent or translucent. This leaves the search algorithm comparing just against a small number of opaque pixels which usually leads to unexpected match results. As lowering the alpha limit increases the number of comparable pixels, it may be used to improve the accuracy of the image search algorithm. Be however aware that comparison of translucent pixels is based on colour similarity, it has significantly slower performance than the classic image search and extremely low values of minimum alpha may produce unexpected match results.
RETURNS
The method makes the calling command (method call) return 0 (success) if at least one matching location is found for at least one of the input template images. Otherwise, it returns the value of 1.
TROUBLESHOOTING
To deal with a failing "search" comparison:
- If the script is designed to terminate after a failed search it is a good practice to create a screenshot in a lossless format (PNG or BMP). An example of such a code is shown in the example below. This will allow you to reproduce and debug the failed comparison after you load the screenshot either through the "Static Image Client" in the Login Dialog or using the "Load RD Image" button in the comparison command/method call property window.
- Decrease the pass rate or increase the RGB tolerance parameter ("tolerance") and test it through the "Compare" button until you get a match. If the parameters don't appear to be able to fix the broken search create an alternative template image and add it to the template list or image collection.
- For the most common factors causing comparison failures to see the Image Comparison Recommendations chapter.
- Should the search fail for no obvious reason please mail the screenshot together with the image template(s) to the T-Plan Support.
EXAMPLES
Compareto buttonOk.png method="search" tolerance="50"
if ({_EXIT_CODE} > 0) {
Screenshot failure.png desc="Failed to find the OK button." Exit 1 desc="Failed to find the OK button."
} else {
Mouse click to=x:{_SEARCH_X},y:{_SEARCH_Y}}
- Search for the OK button and click it. If the button is not found take an exit screenshot and terminate the script with the exit code of 1.
See the "search2" method specification for more component search examples. Or see the excerpt below:
EXAMPLES
Compareto buttonOk.png method="search2" passrate="90" sort="bottom"
if ({_EXIT_CODE} > 0) {
Screenshot failure.png desc="Failed to find the OK button." Exit 1 desc="Failed to find the OK button."
} else {
Mouse click to=x:{_SEARCH_X},y:{_SEARCH_Y}}
- Search for the bottommost OK button and click it. If the button is not found take an exit screenshot and terminate the script with the exit code of 1.
// Search for the buttons and click every single one
Compareto "button.png" passrate="100" method="search2"
if ({_EXIT_CODE} == 0) {
    for (i=1; {i}<{_SEARCH_MATCH_COUNT}+1; i={i}+1) {
        Mouse click to=x:{_SEARCH_X_{i}},y:{_SEARCH_Y_{i}} wait=1s
    }
}
// Wait 15 seconds for the buttons to disappear or change their state
Waitfor "mismatch" method="search2" passrate="100" template="button.png" timeout="15s"
if ({_EXIT_CODE} > 0) {
    Exit 1 desc="Some buildings failed to turn the state!"
}
- Search the screen for multiple buttons and click every single one. Then check the screen if all the buttons disappear or change its state.
// Find the scroll button
Compareto "scrollbutton.png" method="search2"
if ({_EXIT_CODE} > 0) {
    Exit 1 desc="Failed to locate the scroll button!"
}
// Save its coordinates to the X, Y variables
Var X={_COMPARETO_CLICK_X} Y={_COMPARETO_CLICK_Y}
// Iterate 100 loops
for (i=0; {i}<100; i={i}+1) {
    // Click the scroll button
    Mouse "click" to="x:{_COMPARETO_CLICK_X},y:{_COMPARETO_CLICK_Y}"

    // Check if the component is visible on the screen. We use Waitfor
    // because the page may take time to scroll and update on the screen
    Waitfor match template="component.png" method="search2" timeout=3s
    if ({_EXIT_CODE} == 0) {
        // Found -> break the for loop
        break
    }

    // Last loop #99 -> component not found, terminate the script
    if ({i} == 99) {
        Exit 2 desc="Failed to scroll to the component!"
    }
}
- An example of how to search for a component which is displayed in a scrolled page (window). The example keeps clicking the scroll down button and checks for the existence of the component in a loop. The task of clicking onto the scroll button could be eventually replaced with the pressing of the PgDown key.
4.2.3 Object Search ("object")
DESCRIPTION
The Object Search (code "object") locates objects of a particular colour or colours within a certain RGB range. It also allows filtering the object list by an optional template image with detection of eventual object rotation. The method was designed to handle simple image analysis tasks such as "test if the screen contains a particular colour", "find all red objects on the screen" or "find all black triangles or other shapes in any level of rotation on the screen".
As the method always locates the largest possible object and it doesn't search recursively for any other ones it may contain, this approach is not suitable for classic GUI components which are often framed, overlaid and merged together. The method, however, performs very well in the testing of schemes, maps and images with low colour scenes generated for example by Geographic Information System (GIS) applications or systems producing simple image data. The method can be also employed to check whether an object of a certain colour or colour range is present on the screen, for example, to answer a question like "is there any red message in this particular area?".
The algorithm first scans the image for the first pixel which meets the input colour criteria. Then it follows the outer shape of each such an object and stores its bounding rectangle into the context in the form of a set of variables:
Method Created Variable | Description |
|---|---|
| _OBJECT_COUNT=<number> | Number of objects identified by the Object Search. |
| _OBJECT_X_<n>=<X-coordinate> _OBJECT_Y_<n>=<Y-coordinate> _OBJECT_W_<n>=<width> _OBJECT_H_<n>=<height> | The X,Y coordinates and the Width and Height of the n-th object where "<n>" is between 1 and the _OBJECT_COUNT value. |
| _OBJECT_X_<n>=<X-coordinate> _OBJECT_Y_<n>=<Y-coordinate> | The X,Y coordinates of the n-th object centre where "<n>" is between 1 and the _OBJECT_COUNT value. Supported since 3.4. |
The original shapes (java.awt.Shape instances) that describe the objects more accurately are available just to Java scripts through the getContext().getObjectSearchShapes() method.
OPTIONS
The method optionally accepts one template image specified through the hosting command or Java method call.
The passrate parameter plays a role only when the "object" method is called with a template image. The image must contain exactly one shape of the specified colour (colour range) in any level of rotation. The list of objects identified by the input "colour" parameter will be then filtered to leave just shapes which are similar to the template image shape up to the ratio specified by the passrate parameter. If the rotations parameter is also specified and is greater than 1, the object list will be matched against the list of template shapes rotated the specified number of times. If the template image is not specified the method locates all objects matching the specified colour and size parameters regardless of the passrate value.
The standard parameter of "cmparea" is optional and defaults to the full screen when omitted.
Supported specific parameters:
color=<HTMLColor>
The color parameter defines the object color in the HTML-style 6-character RGB hexadecimal format (white is '000000', black is 'ffffff'). If the parameter is not specified it defaults to black.
tolerance=<0-255>
The tolerance parameter is an optional integer number between 0 and 255. It is similar to the RGB Tolerance one in the Image Search method. It indicates how much the Red, Green and Blue components of a pixel may differ at a maximum to consider the colour be equivalent to the object colour specified by the colour parameter. This parameter allows specifying that the object colour may be in a colour range rather than a single colour. It also helps deal with blurred images where the shapes are not formed by a solid colour but rather a range of similar colours. The higher the tolerance value, the higher the probability of false shape detections is. In most scenarios, the value should be in the [0, 100] range depending on the blurring level. If the parameter is not specified, it defaults to zero and the algorithm looks for solid colour objects only.
bridgecolors=<HTMLColor1;HTMLColor2;...HTMLColorN>
The bridgecolors parameter is optional and it may contain a semicolon-separated list of additional admissible object colours. This allows searching for continuous objects which are expected to have other objects of known colours painted over them. These colours are always compared using the exact match and they do not work with the tolerance parameter.
rotations=<1-360>
The optional rotations parameter makes only sense when a template image is provided. It defines rotation granularity. It basically says how many times to rotate the template object for object filtering purposes. For example, the value of 36 will rotate the shape in 10-degree steps. Obviously, a high number of rotations increases accuracy of recognition of rotated objects but decreases performance. Low rotation values may be compensated through lowering the passrate parameter. This approach is somewhat better in terms of performance but raises the risk of wrong detection of objects similar enough to the template one.
min=w:<width>;h:<height>
Optional minimum size (width and/or height) to filter the resulting objects by. The parameter can specify both the width and height separated by a semicolon (for example "w:100;h:100") or just one of the dimensions ("h:100").
max=w:<width>;h:<height>
Optional maximum size (width and/or height) to filter the resulting objects by. The parameter can specify both the width and height separated by a semicolon (for example "w:100;h:100") or just one of the dimensions ("h:100").
overlapmode=<true|false>
The optional overlap mode flag defines whether the objects on the screen may overlap (conflict). If the parameter value is "true" the method makes an extra effort to look for partially overlapped objects.
draw=<true|false>
The draw parameter is an optional flag which enables highlighting of the located objects on the Robot's desktop view. When the parameter is "true" the algorithm draws the object rectangles over the desktop image in the desktop viewer GUI component. This is useful for debugging and demonstration purposes. These drawings are reset (removed) when the script finishes or another Object Search with the parameter of "clear=true" is executed.
clear=<true|false>
The clear parameter allows to clear up all drawings created by the previously called Object Search methods. See the draw parameter for details.
RETURNS
The method makes the calling command (method call) return 0 (success) if at least one object meeting the specified criteria is found. Otherwise it returns the value of 1.
TROUBLESHOOTING
To deal with a failing "object" comparison:
- If the script is designed to terminate after a failed search it is a good practice to create a screenshot in a lossless format (PNG or BMP). An example of such a code is shown in the example below. This will allow you to reproduce and debug the failed comparison after you load the screenshot either through the "Static Image Client" in the Login Dialog or using the "Load RD Image" button in the comparison command/method call property window.
- Decrease the pass rate or increase the RGB tolerance parameter ("tolerance") and test it through the "Compare" button until you get a match. If the parameters don't appear to be able to fix the broken search create an alternative template image and add it to the template list or image collection.
- For the most common factors causing comparison failures, see the Image Comparison Recommendations chapter.
- Should the search fail for no obvious reason please mail the screenshot together with the image template(s) to the T-Plan Support.
4.2.4 Google Cloud Vision ("vision")
The Google Vision ("vision") method identifies objects on your screen using the Google AI (Cloud Vision). It was introduced by Robot 8. You may use a text or a regular expression to verify whether the screen contains the object of your interest. For example, use the text of "dog" to test if the AI finds at least one dog on the screen.
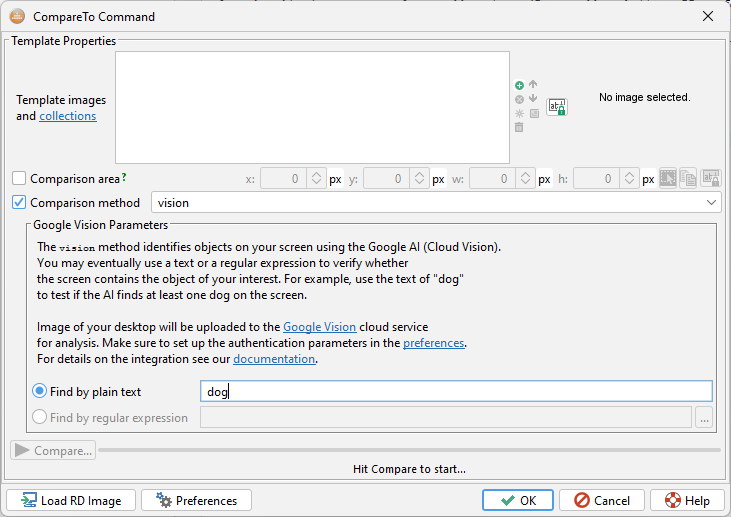
Image of your desktop will be uploaded to the Google Vision cloud service for analysis. The service returns a set of results of what was found on the screen which will be matched against the specified parameters.
The Google Cloud Vision shares the same account with the Google Vision OCR feature delivered in release 5.0. Make sure to set up the authentication parameters to the service as is described in its documentation.
OPTIONS
text=<keyword>
- The text (a keyword) to be matched against the results.
pattern=<regular_expression>
- A java.util.regex.Pattern compliant regular expression. to be matched against the results.
RETURNS
The method makes the calling command (method call) return 0 (success) if at least one object meeting the specified criteria is found. Otherwise it returns the value of 1.
4.3 Text Recognition Methods
4.3.1 Text OCR ("tocr")
DESCRIPTION
The Text OCR method (code "tocr") allows calling an external Optical Character Recognition (OCR) engine to extract text from the remote desktop image. The preferred OCR engine must be selected and configured in the preferences. Robot 5.x supports:
- Tesseract OCR is the default one. It is free and supports all major platforms (MS Windows, Linux/Unix, Mac OS X). The disadvantages are lower performance (speed) and accuracy.
- ABBYY Fine Reader is a commercial OCR engine available at an extra cost. It is faster and more accurate than Tesseract. It is supported on MS Windows only.
- Google Vision is a cloud service performing OCR. As the desktop image gets uploaded through a secure connection (HTTPS) to the Google site please consider your privacy and security before choosing this method. The OCR process is fairly fast and accurate. The biggest factor in the overall performance is your network speed.
The recognized text may be optionally tested for the presence of a phrase using the "text" (plain text search), "text" and "distance" (tolerant text search) or "pattern" (regular expression matching) parameters.
Regular expression matching matches the recognized text against the specified java.util.regex.Pattern compliant regular expression. Up to version 4.1.3 the expression must match the whole text and no searching for a matching substring is performed. Version 4.1.4 supports searching of the text for matching locations and returns their text and coordinates the same way as the text parameter.
The tolerant (fuzzy) text search is based on the Levenshtein distance. It is defined as the minimum number of edits needed to transform one string into the other, with the allowable edit operations being insertion, deletion, or substitution of a single character. This metric is enabled through the "distance" parameter which is an integer number specifying how many characters may be omitted or not recognized properly at a maximum to consider the sample text provided in the "text" parameter equivalent. Unlike the regular expressions, the tolerant matching always searches the recognized text for any occurrence of a string matching the given text and distance. There's no need to specify that the string is preceded or trailed by another text.
The method stores the OCR results into a set of TOCR prefixed variables as follows:
Variable Name | Description |
|---|---|
_TOCR_ERROR=<errorText> | Contains the error text thrown by the OCR engine. |
_TOCR_TEXT=<text> | The recognized text (all lines separated by new line characters). |
_TOCR_TEXT_X=<X-coordinate> | The bounding rectangle of the recognized text (since 3.4). |
_TOCR_LINE_COUNT=<number> | Number of recognized text lines (rows). |
_TOCR_LINE<n>=<lineText> | Text of the n-th line where <n> is between 1 and _TOCR_LINE_COUNT. |
_TOCR_LINE_X<n>=<X-coordinate> | The bounding rectangle of the n-th line (since 3.4). |
When the text or pattern parameter is specified to search the recognized text for the given string the method creates result variables as follows:
Variable Name | Description |
|---|---|
| _TOCR_MATCH_COUNT=<number> | The number of locations (strings) in the recognized text that match the pattern expression or the text and distance (if specified) parameters. |
| _TOCR_MATCH=<matchingString> | The first matching string. If text is employed and distance is set to 0 or it is not specified the variable will contain the value of the text parameter. |
| _TOCR_MATCH_<n>=<matchingString> | The n-th matching string where <n> is between 1 and _TOCR_MATCH_COUNT. If text is employed and distance is set to 0 or it is not specified the variable will contain the value of the text parameter (since 3.5). |
| _TOCR_MATCH_INDEX=<index> | Index (position) of the first match within the recognized text. Indexing starts with 0 which indicates the beginning of the recognized text. |
| _TOCR_MATCH_INDEX_<n>=<index> | Index of the n-th match where <n> is between 1 and _TOCR_MATCH_COUNT. Indexing starts with 0 which indicates beginning of the recognized text (since 3.5). |
| _TOCR_MATCH_X=<X-coordinate> _TOCR_MATCH_Y=<Y-coordinate> _TOCR_MATCH_W=<width> _TOCR_MATCH_H=<height> | The bounding rectangle of the first matching string (since 3.4). |
| _TOCR_MATCH_X_<n>=<X-coordinate> _TOCR_MATCH_Y_<n>=<Y-coordinate> _TOCR_MATCH_W_<n>=<width> _TOCR_MATCH_H_<n>=<height> | The bounding rectangle of the n-th matching string where <n> is between 1 and _TOCR_MATCH_COUNT. |
| _TOCR_MATCH_CLICK_X=<X-coordinate> _TOCR_MATCH_CLICK_Y=<Y-coordinate> | Center coordinates of the first matching string (since 3.4). They may be used for tasks such as "find a string using OCR and click it". A typical example: Compareto method="tocr" cmparea="x:33,y:2,w:200,h:22" text="Cancel"if ({_EXIT_CODE} > 0) { Mouse click to=x:{_TOCR_MATCH_CLICK_X},y:{_TOCR_MATCH_CLICK_Y}}Since version 4.1 it is recommended to use the Click command instead of the above code block: Click ocr cmparea="x:33,y:2,w:200,h:22" text="Cancel" |
| _TOCR_MATCH_CLICK_X_<n>=<X-coordinate> _TOCR_MATCH_CLICK_Y_<n>=<Y-coordinate> | Center coordinates of the n-th matching string where <n> is between 1 and _TOCR_MATCH_COUNT. |
OPTIONS
The method accepts no template images. The parameter of "passrate" is not applicable in the context of OCR and it is ignored. The parameter of "cmparea" is optional and defaults to the full screen when omitted.
Supported OCR parameters:
text=<textToSearchFor>
Optional text to search the recognized text for. The hosting command will then return either 0 when the OCR was performed correctly and the recognized text contains the given string or 1 otherwise. Indices and screen coordinates of the text locations are then stored to the _TOCR script variables and may be farther processed. This parameter can not be used together with the pattern one.
distance=<0-[textLength]>
Optional Levenshtein distance used in conjunction with the "text" parameter to perform tolerant text matching. See the method specification for details.
pattern=<regularExpression>
Optional java.util.regex.Pattern compliant regular expression to test the recognized text against. This parameter cannot be used together with the text one.
- Up to version 4.1.3 the expression must match the whole text (no searching for a matching substring is performed).
- Since version 4.1.4 the parameter will search the text for matching locations the same way as the text parameter. Indices and screen coordinates of the matching text locations are then stored to the _TOCR script variables and maybe farther processed. This enhancement allows creating actions like "find a matching text location and click it" within a single "Click ocr" command.
See the Tesseract OCR help page for details on its specific parameters.
RETURNS
The method makes the hosting command throw a runtime error on misconfiguration or an I/O error. Text of the error is made available through the _TOCR_ERROR variable.
The return code otherwise depends on the input parameters. If the method is called to perform just OCR with no result testing it always returns 0 even if no text was recognized. If the method is called with the parameters of "text" or "pattern" it returns 0 if the recognized text matches the given string/regular expression or 1 otherwise.
EXAMPLES
Var _TOCR_LINE_COUNT=0
Compareto method="tocr" cmparea="x:33,y:2,w:200,h:22"
for (i=1; {i}<{_TOCR_LINE_COUNT}+1; i={i}+1) {
   Typeline "{_TOCR_LINE{i}}"
}
- Recognize text in the specified desktop area and type it onto the desktop.
Compareto method="tocr" cmparea="x:33,y:2,w:200,h:22" pattern="[aA]pplication"
if ({_EXIT_CODE} > 0) {
  Exit 1
}
- Exit the script when the recognized text doesn't match the 'Application' or 'application' word.
Compareto method="tocr" cmparea="x:33,y:2,w:200,h:22" pattern=".*[aA]pplication.*"if ({_EXIT_CODE} > 0) {
Exit 1
}
- The previous example modified to exit the script when the recognized text doesn't contain 'Application' or 'application'.
Compareto method="tocr" cmparea="x:33,y:2,w:200,h:22" text="apple" distance="2"
- Recognize text on the screen and verifies whether it is like and/or it contains a string like 'apple':
- If the OCR recognizes text like 'There is an apple', the command will report success (the exit code of 0) because an exact match is found.
- If the OCR recognizes text like 'There is an Apple', the command will report success because word 'Apple' can be changed to 'apple' by substitution of one character (A->a) which is within the tolerated distance of 2.
- If the OCR recognizes text like 'There are Appls', the command will report success because word 'Appls' can be changed to 'apple' in two operations of (1) substitution (A->a) and (2) addition (+e) or substitution (s->e) which are still within the tolerated distance of 2.
- If the OCR recognizes text like 'There is Doppler', the command will report success because word 'Doppler' contains a sequence matching 'apple' after a single substitution (o->a).
- If the OCR recognizes text like 'There are Appis', the command will report failure (the exit code of 1) because word 'Appis' requires at least three operations (A->a, i->l, s->e) to be turned into 'apple' which is more than the tolerated distance of 2.
When the text is matched, the index of the match location in the text is stored to the TOCR_MATCH_INDEX variable. The index starts from 0 which represents the text beginning. The matching substring is further on saved under the _TOCR_MATCH variable. For example, the example above with the recognized text of _'There are Appls' will create the variables as _TOCR_MATCH=Appls and _TOCR_MATCH_INDEX=10.
4.3.2 Image-Based Text Recognition ("text")
DESCRIPTION
The Image-Based Text Recognition (code "text", since v3.0) allows recognizing text and its coordinates on the screen based on a collection of pre-saved characters. Compared to OCR:
- OCR engines typically recognize characters by shape patterns. It works out of the box for numerous fonts, text and background colours. When the OCR is applied to a font it was not calibrated for it may fail. Such a situation has either no workaround or there is a lengthy manual process required to train the engine for the particular font (such as the Tesseract Training Process).
- Robot's Image-Based Text Recognition recognizes characters by images. It works only for the particular font, text colour and background the image collection was built upon. It will get you the text coordinates or even the location of a substring identified through the input text search criteria.
Character image collections can be comfortably created and maintained in the Character Capture Wizard. See its help page for details.
Similar to the "tocr" method, the recognized text can ve verified in three ways:
- The "text" parameter alone activates plain text search for the specified string and makes the calling command return 0 (success) when found and 1 (fail) when not found.
- A combination of the "text" and "distance" parameters performs tolerant (fuzzy) text search. The "distance" parameter is the Levenshtein distance which is defined as the minimum number of edits needed to transform one string into the other, with the allowable edit operations being insertion, deletion, or substitution of a single character. This metric is enabled through the "distance" parameter which is an integer number specifying how many characters may be omitted or not recognized properly at a maximum to consider the sample text provided in the "text" parameter equivalent. Unlike the regular expressions, the tolerant matching always searches the recognized text for any occurrence of a string matching the given text and distance. There's no need to specify that the string is preceded or trailed by another text.
- The regular expression matching matches the recognized text against the specified java.util.regex.Pattern compliant regular expression. The expression must match the whole text and no searching for a matching substring is performed.
The method stores the OCR results into a set of _TEXT prefixed variables as follows:
Variable Name | Description |
|---|---|
| _TEXT_ERR=<error_text> | Error message. It gets populated only if the method fails to perform text recognition, for example when there is no desktop connection or when the specified character image collection doesn't exist or can not be read. |
| _TEXT=<text> | The recognized text (full multiline format). The variable is created always when the method gets executed successfully (meaning that it doesn't fail for a missing desktop connection or invalid character image collection). |
| _TEXT_X=<number> _TEXT_Y=<number> _TEXT_WIDTH=<number> _TEXT_HEIGHT=<number> | The X, Y coordinates and the width and height of the recognized text. |
| _TEXT_LINE_COUNT=<number> | Number of recognized text lines. |
| _TEXT_LINE<n>=<text> | The n-th text line where <n> is the line number between 1 and _TEXT_LINE_COUNT. |
| _TEXT_LINE_X_<n>=<number> _TEXT_LINE_Y_<n>=<number> _TEXT_LINE_WIDTH_<n>=<number> _TEXT_LINE_HEIGHT_<n>=<number> | The X, Y coordinates and the width and height of the n-th text line where <n> is the line number between 1 and _TEXT_LINE_COUNT. |
| _TEXT_MATCH=<text> | The part of recognized text that matches the "text" parameter (plain text search) or a combination of "text" and "distance" (tolerant text search). |
| _TEXT_MATCH_INDEX=<number> | Position (index) of the matching text referred to by _TEXT_MATCH. Indexing starts from 0 which corresponds to the beginning of the recognized text. |
| _TEXT_MATCH_X=<number> _TEXT_MATCH_Y=<number> _TEXT_MATCH_WIDTH=<number> _TEXT_MATCH_HEIGHT=<number> | The X, Y coordinates and the width and height of the matching text referred to by the _TEXT_MATCH variable. |
OPTIONS
The method requires one character image collection on the input. The "passrate" parameter in the context of the "text" method defines tolerance to minor differences in the rendering of the characters. As this tolerance is currently experimental and works only for a few larger fonts. It is recommended to keep the pass rate at 100%. The "cmparea" standard parameter can be used to limit the text recognition to a particular rectangular area of the screen. It defaults to the full screen if not specified.
Supported specific parameters:
text=<textToSearchFor>
Optional text to search the recognized text for. The hosting command will then return either 0 when the recognition was performed correctly and the recognized text contains the given string or 1 otherwise. This parameter cannot be used together with the pattern one.
distance=<0-\[textLength\]>
Optional Levenshtein distance used in conjunction with the "text" parameter to perform tolerant text matching. See the method specification for details.
pattern=<regularExpression>
Optional java.util.regex.Pattern compliant regular expression to test the recognized text against. The expression must match the whole text (no searching for a matching substring is performed). This parameter cannot be used together with the text one.
RETURNS
When none of the "text", "distance" and "pattern" parameters is used the calling command returns 0 (success) to indicate a successful execution even when no text gets actually recognized. If the text matching parameters are used the calling command will return either success (0) or fail (non-zero value) depending on whether the recognized text matches or not.
TROUBLESHOOTING
To deal with a failing "text" comparison:
- Make sure that the background colour and the font type, size and colour you are trying to recognize on the screen are the same as on the character images in the character image collection.
- As the internal algorithm derives the height of the text line and the space size from the collection images, do not mix images of characters of different font type and/or size into a single collection. Mixing of character images of different font and background colours is OK as long as the characters are of the same font type and size.
- If the text is ant aliased and/or is not rendered regularly try lowering the pass rate. This will, however, work only for larger fonts.
EXAMPLES
Var _TEXT_LINE_COUNT=0
Compareto "C:\MyAutomation\chars" method="text" cmparea="x:33,y:2,w:200,h:22"
for (i=1; {i}<{_TEXT_LINE_COUNT}+1; i={i}+1) {
Typeline "{_TEXT_LINE{i}}"
}
- Recognize text in the specified desktop area and type it onto the desktop.
Compareto "C:\MyAutomation\chars" method="text" cmparea="x:33,y:2,w:200,h:22" pattern="[aA]pplication"
if ({_EXIT_CODE} > 0) {
  Exit 1
}
- Exit the script when the recognized text doesn't match the 'Application' or 'application' word.
Compareto "C:\MyAutomation\chars" method="text" cmparea="x:33,y:2,w:200,h:22" pattern=".*[aA]pplication.*"if ({_EXIT_CODE} > 0) {
Exit 1
}
- The previous example modified to exit the script when the recognized text doesn't contain 'Application' or 'application'.
Compareto "C:\MyAutomation\chars" method="text" cmparea="x:33,y:2,w:200,h:22" text="apple" distance="2"
- Recognize text on the screen and verifies whether it is like and/or it contains a string like 'apple':
- If the method recognizes text like 'There is an apple', the command will report success (the exit code of 0) because an exact match is found.
- If the method recognizes text like 'There is an Apple', the command will report success because word 'Apple' can be changed to 'apple' by substitution of one character (A->a) which is within the tolerated distance of 2.
- If the method recognizes text like 'There are Appls', the command will report success because word 'Appls' can be changed to 'apple' in two operations of (1) substitution (A->a) and (2) addition (+e) or substitution (s->e) which are still within the tolerated distance of 2.
- If the method recognizes text like 'There is Doppler', the command will report success because word 'Doppler' contains a sequence matching 'apple' after a single substitution (o->a).
- If the method recognizes text like 'There are Appis', the command will report failure (the exit code of 1) because word 'Appis' requires at least three operations (A->a, i->l, s->e) to be turned into 'apple' which is more than the tolerated distance of 2.
When the text is successfully matched, the index of the match location in the text is stored to the _TEXT_MATCH_INDEX variable and its X, Y coordinates and width/height to _TEXT_MATCH_X, _TEXT_MATCH_Y, _TEXT_MATCH_WIDTH and _TEXT_MATCH_HEIGHT. The matching substring is further on saved under the _TOCR_TEXT variable.
For example, the example above with the recognized text of 'There are Appls' will create the variables as _TEXT_MATCH=Appls and _TEXT_MATCH_INDEX=10.
4.4 Other Methods
4.4.1 Histogram Based Comparison ("default")
DESCRIPTION
The Histogram Based Comparison Method (code "default") was historically the first method provided by T-Plan Robot in 2005. It was designed for a quick check of the desktop screen against one or more full-screen template image(s). Though it has been obsoleted by better verification means such as the "search2" and "search" methods it may be still used in special cases.
The method is based on a simple histogram comparison. An image histogram is in simple words a list of colours located in the image together with the number of pixels of each colour. The method first calculates histograms both of the remote desktop and template images and compares them. Result of the image comparison is then calculated as the number of matching pixels divided by the total number of image pixels.
The following example illustrates how the method works. Let us have two simple 120x100 images (12000 pixels each):
Image 1 | Image 2 |
| ||||||||||||||||||||||||||
The comparison result is in this case 9000px/12000px, which is 0.75, or better 75%. This corresponds to what a human would say when comparing the images visually - they are different just in one quarter.
Though this is a very primitive algorithm it is sufficient where you need to verify whether the desktop displays correct application provided that the application and desktop background colours differ. The algorithm is also quite robust in terms of window location changes which don't affect the full-screen colour histogram.
Be aware that the default method is designed to compare two images of the same size. If your template image has a different size than the remote desktop, both images will be internally cropped to the size of their intersection. As this may lead to unpredictable results it is not recommended to use the default method together with a custom comparison area (the "cmparea" parameter).
OPTIONS
The method requires one or more template images and/or image collections specified through the hosting command or Java method call. The parameter of "passrate" defines in the context of the "default" method the lowest acceptable result of the comparison of the template image and the screen histograms (see the example in the method description). It defaults to 95%. The "cmparea" is optional and defaults to the full screen when omitted.
No other method-specific parameters are supported.
RETURNS
The method makes the calling command (method call) return 0 (success) if the produced comparison result is greater than or equal to the specified pass rate. Otherwise, it returns the value of 1.
TROUBLESHOOTING
As the "default" method does not use any method-specific parameters, the only means of dealing with a failing histogram comparison is decreasing of the "passrate" parameter. To see the actual comparison result after a histogram comparison looks for the _COMPARE_RESULT variable in the variable viewer.
The general Image Comparison Recommendations consider the following reliability factors:
- Remove all icons and items from the server desktop and make it as simple as possible. Note that most desktops also display a clock/date which introduces differences with the time & date updates. If such an object participates in the area you are comparing to, use the pass rate to increase the tolerance to mismatching pixels.
- Check if the application window(s) you are testing have a stable size and open in a stable location. Variable window size and location significantly affects comparison results. It is a good idea to maximize the application window through a scripted key sequence (such as Alt+Space followed by X on Windows or Alt+F10 on Linux/Gnome) before comparison.
EXAMPLES
Compareto netscape1.png;netscape1.png method="default" passrate="90"
if ({_EXIT_CODE} > 0) {
  Exit 1
}
- Compare the desktop screen to the netscape1.png and netscape1.png images with the pass rate of 90% and terminate the script with the exit code of 1 if neither of them matches the screen.
4.4.2 Image Difference ("diff")
DESCRIPTION
The Image Difference (code "diff") compares the desktop screen against one or more full-screen template image(s) and produces a set of differences. It is typically used with the Screenshot command to insert an image with the highlighted differences into the Report (see Examples below). The algorithm is edge-based and omits colour changes.
OPTIONS
The method requires one or more full-screen size template images and/or image collections specified through the hosting command or Java method call. The parameter of "passrate" defines the lowest acceptable level of difference to produce a PASS result. It defaults to 95%.
The "cmparea" is optional and defaults to the full screen when omitted. No other method-specific parameters are supported.
RETURNS
The method makes the calling command (method call) return 0 (success) if the produced comparison result is greater than or equal to the specified pass rate. Otherwise, it returns the value of 1.
EXAMPLES
Compareto myscreen.png method="diff" passrate="98"
if ({_EXIT_CODE} > 0) {
  Exit 1
}
- Exit the script if the screen differs from the myscreen.png one more than by 2%.
Screenshot myapp.png template="expected_screen.png" passrate="95" method="diff" drawdiff="true"
- Draw differences between the desktop screen and the expected_screen.png image into a screenshot in the report file.
4.4.3 Variable Existence Test ("variable")
DESCRIPTION
The Variable Existence Test (code "variable") is not a real image comparison algorithm. It only uses the framework of the WaitFor command to wait for a session variable to appear or disappear in order to enable communication among scripts running in parallel within a workitem.
This mechanism can be used to implement the producer-consumer scenario:
- One script (the "producer") performs a task, creates a session variable through the Varg command and suspends using Waitfor mismatch until the variable disappears.
- Another script running in parallel (the "consumer") detects that the variable was created (Waitfor match), performs its task and deletes the variable using Varg to notify the first script of the job completion.
OPTIONS
The "name" parameter specifies the variable name.
The "passrate" parameter is accepted just for compatibility reasons but it is ignored if specified.
RETURNS
The method makes the calling command (method call) return 0 (success) if the variable exists. Otherwise, it returns the value of 1.
EXAMPLES
Waitfor match method="variable" name="FLAG" timeout="5m"
if ({_EXIT_CODE} > 0) {
Exit 1 desc="The other script failed to populate the FLAG variable within the timeout of 5 minutes!"}
- Wait for another script to create a session variable called FLAG. If the variable fails to appear within 5 minutes exit the script.
Contents