Setting up the Agent
1. RAP Configuration
As the first step you should populate the address and credentials to your RAP system. It is recommended to do so before the Robot installation because the RAP may supply the license server address for Robot if it has been configured so by its administrator. If you intend to use the agent without RAP you may skip this step.
Click the ![]() button to the left of the RAP status field. The RAP parameters will appear. Populate the RAP Address, User and Password fields. Contact your RAP administrator if you don't have them. To enable connection through a web proxy select the
button to the left of the RAP status field. The RAP parameters will appear. Populate the RAP Address, User and Password fields. Contact your RAP administrator if you don't have them. To enable connection through a web proxy select the ![]() Proxy... button and complete the details accordingly.
Proxy... button and complete the details accordingly.
The User and Password entered here should represent that for a user account of the "Agent" type - as setup in the RAP Admin page.

Your parameters will be saved to the <userHome>/.tplanrobot/rapagent.cfg local configuration file. The password will be encrypted.
To verify the connection first make sure that the "Observe mode (don't execute)" option is on. This is to keep RAP from giving you jobs before you complete the configuration and install Robot. Then select the ![]() Connect button. The agent should connect to RAP and start polling the job queue.
Connect button. The agent should connect to RAP and start polling the job queue.
Optional parameters:
- Agent name sets the reference name of your agent in the RAP. You must be connected to do it.
- Poll time defines how often the agent should check the RAP queue for available jobs.
- Observe mode (don't execute) instructs the agent not to accept any job. Use this mode to check the connection or for development work, for example when you wish to monitor the queue or if you plan on workitem importing or exporting.
- Minimize agent on execute hides the agent window before the execution begins and restores it after it ends.
2. T-Plan Robot Configuration
There are two types of executables (workitems) managed by the agent:
- Full executable packages contain a Robot instance and display with the
 icon in the Type column. These do not need Robot to be installed on the agent machine. For details on executable packages read the Robot documentation.
 - Lightweight executable packages and Robot workitems (*.xml) require a locally installed and configured Robot in order to execute.
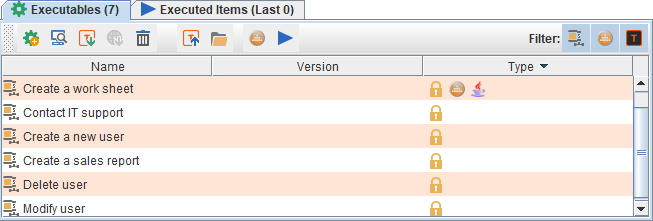
For example, there is one full executable called "Create a work sheet" and five lightweight ones in the view below:
When you start the agent window for the first time it will search your hard drive for a Robot installation. If none is found it will pop up a message asking whether you wish to install it. The agent will then guide you through installation of the latest cross-platform Robot release. You can skip the installation for later - there will be an ![]() Install button in the agent window. Make sure to start the Robot after the installation because you will have to agree to the license agreement and activate the license key.
Install button in the agent window. Make sure to start the Robot after the installation because you will have to agree to the license agreement and activate the license key.
You may also install Robot manually. This option allows you to choose from the supported Robot distribution packages (cross-platform ZIP, Windows installer or Mac OS application). Contact our support for the download options.
If you already have Robot installed and the agent fails to find it, you may configure it manually. To do so click the ![]() button to the left of the Robot status field to expand the Robot parameters and set its installation directory.
button to the left of the Robot status field to expand the Robot parameters and set its installation directory.

Optional parameters:
- CLI Arguments allow to modify the Robot behavior through its CLI arguments.
- Run Robot in the CLI mode (no GUI) makes the automation execute without displaying the Robot GUI. This option in facts applies the
-n/--nodisplayRobot CLI argument. Be aware that executable packages and workitems may force this mode on their own too.