ALM Quality Center
Contents:
Introduction
This guide provides instructions on how to set up both T-Plan Robot and OpenText ALM Quality Center (formerly Micro Focus ALM / HP ALM / Quality Center) in order to integrate your automation scripts, allowing you to execute and view the results from the context of the ALM.
OpenText ALM Quality Center is a quality management software solution offered formerly by the HP Software Division of Hewlett Packard. ALM is a component of the now OpenText and formerly Micro Focus Application Lifecycle Management (“ALM”) software solution set.
The integration is achieved by utilising the VAPI-XP test type within Quality Center to launch console-based applications i.e. T-Plan Robot.
T-Plan Robot is compatible with the CLI and even offers a “CLI Wizard” to help determine the correct required command and save as an executable file such as .bat. It is this that we will use to allow the integration to drive T-Plan Robot.
Setting up T-Plan Robot
Within T-Plan Robot there need to be two aspects in place to allow the execution and reports to run successfully from and with OpenText ALM Quality Center.
1 – ALM specific report output directory
2 – Generate a Script executable
Report Output Directory
Each T-Plan Robot script contains a “Report” command which allows to specify the output report format and location. The default location for script output is within the <projectDir>\reports\<custom> directory, however, this doesn’t lend itself to the integration due to its dynamic nature. Instead, we recommend storing your output files to a static directory of your choice which ALM will read from.
T-Plan Robot does allow for saving of multiple report files within a single “Report” command using a semi-colon separated list of filenames. We also recommend making use of the zip format output which will allow all associated output files to be uploaded to ALM post-execution.
A sample report command might, therefore, look as follows:
Report “Results.xml;..\ALMReports\Results.xml;..\ALMReports\Results.html;..\ALMReports\Results.zip”
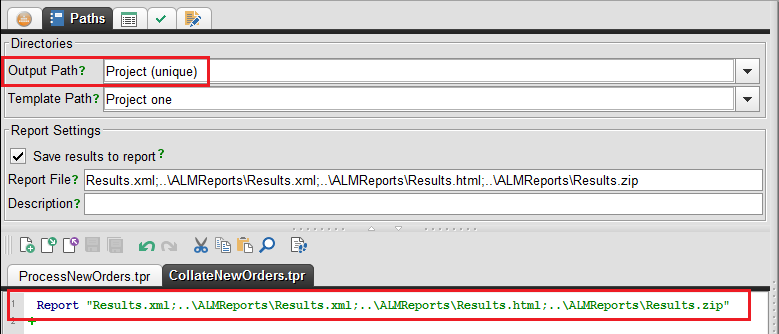
NOTE: Relative paths for the report output are resolvable against the currently set “Output Path” of the Robot Project. Absolute paths are also accepted.
Test Script Executable
Within T-Plan Robot use the CLI Wizard located under the Tools main menu option to generate the script executable (.bat) file.
Complete the form as you need in order to successfully launch and run your desired T-Plan Robot script from the resulting executable file:

NOTE: As you can see, the resulting batch file will call the T-Plan Robot application and test scripts using the relevant files, therefore these all need to be accessible form the driving machine.
With the desired settings in place select “Save To File” and save the executable batch file in an accessible (shared) location.
Quality Center
To run the T-Plan Robot executable file (created above) from the context of OpenText ALM Quality Center and correctly return the output results we need to configure ALM a particular way.
Setting up Quality Center
We have to create a “VAPI_XP” script using the following options…
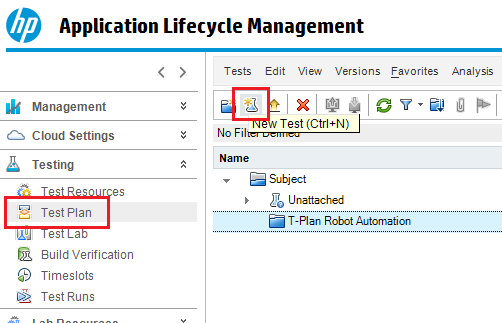
Within the ALM “Test Plan” section, create a new test:
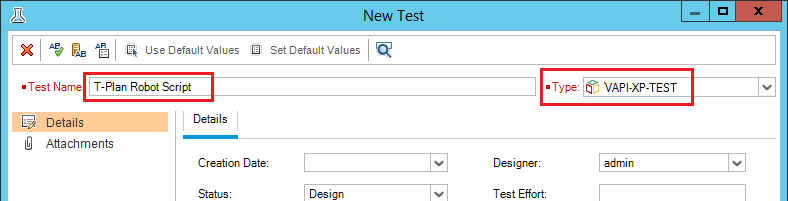
Give your new test an appropriate name and set the type to “VAPI-XP-TEST”:
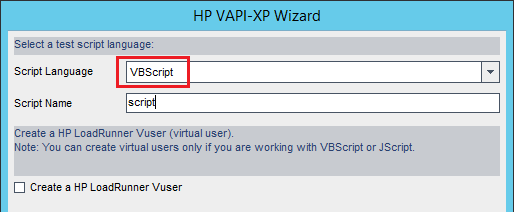
Ensure “VBScript” is selected as the Script Language and select Next:
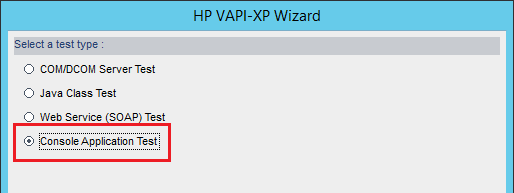
Set the test type to “Console Application Test”:
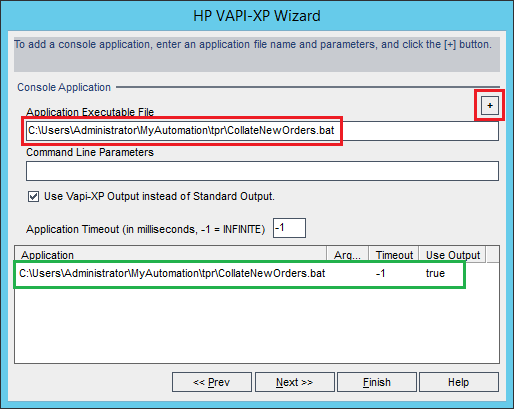
Within the “Application Executable File” field enter the full path to the Robot script batch file (created using the Robot CLI Wizard earlie) and the click the “+” button. The entry should then be added into the bottom field:
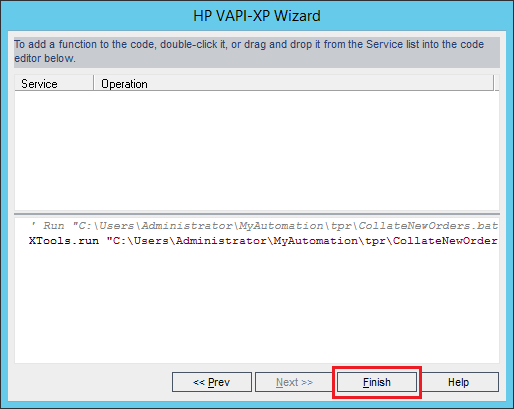
Select “Finish” to complete the New Test wizard:
The resulting test script now has the ability to call the T-Plan Robot script executable in order to run the automated script. However in order for it to also correctly pickup the Robot automation results we need to amend the generated VBScript.
Select the “Test Script” tab for your newly created test:
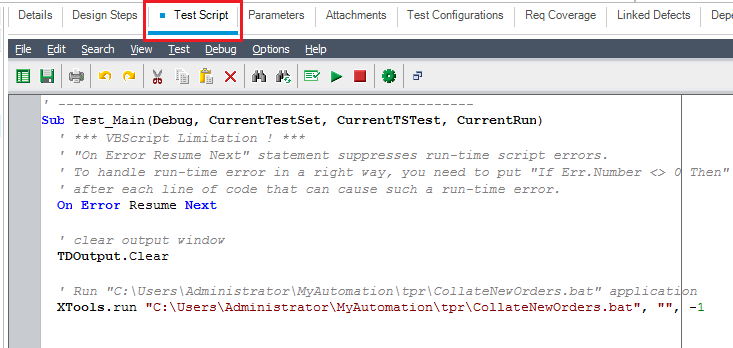
The auto-generated VBScript ‘Sub’ code should be replaced with the following:
Sub Test_Main(Debug, CurrentTestSet, CurrentTSTest, CurrentRun)
' *** VBScript Limitation ! ***

' "On Error Resume Next" statement suppresses run-time script errors.
' To handle run-time error in a right way, you need to put "If Err.Number <> 0 Then"
' after each line of code that can cause such a run-time error.
On Error Resume Next

' clear output window
TDOutput.Clear

CurrentRun.Status = "Not Completed"
CurrentTSTest.Status = "Not Completed"
CurrentTSTest.Status = "Not Completed"

Dim result
Dim ReportLogFile
Dim ReportLogZip

result=XTools.run ("C:\Users\Administrator\MyAutomation\tpr\CollateNewOrders.bat", "", -1)
OutputReportHTML=("C:\Users\Administrator\MyAutomation\reports\ALMReports\Results.html")
OutputReportLog=("C:\Users\Administrator\MyAutomation\reports\ALMReports\log.html")
OutputReportTPR=("C:\Users\Administrator\MyAutomation\reports\ALMReports\CollateNewOrders.tpr.html")
OutputReportZIP=("C:\Users\Administrator\MyAutomation\reports\ALMReports\Results.zip")

TDOutput.Print "Result: " & result
if result = 0 then
TDOutput.Print "Passed!"
CurrentRun.Status = "Passed"
CurrentTSTest.Status = "Passed"
else
TDOutput.Print "Failed!"
CurrentRun.Status = "Failed"
CurrentTSTest.Status = "Failed"
end if

' TODO: put your code here

If Not Debug Then
End If
' handle run-time errors
If Err.Number <> 0 Then
TDOutput.Print "Run-time error [" & Err.Number & "] : " & Err.Description
' update execution status in "Test" mode
If Not Debug Then
CurrentRun.Status = "Failed"
CurrentTSTest.Status = "Failed"
End If
End If

TDHelper.UploadAttachment OutputReportHTML, CurrentRun
TDHelper.UploadAttachment OutputReportLog, CurrentRun
TDHelper.UploadAttachment OutputReportTPR, CurrentRun
TDHelper.UploadAttachment OutputReportZIP, CurrentRun

End Sub
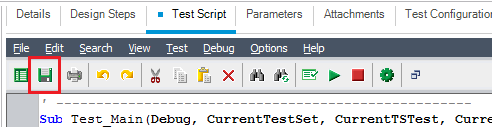
Save your code changes using the mini toolbar:NOTE: The file paths for the XTools.run and the OutputReport commands (lines 20-24) should be set according to your Robot Project location
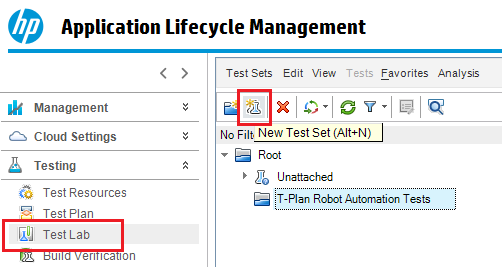
Test Set
Now that we have our new test prepared and able to run our T-Plan Robot automation script, we can now place that into a “Test Set” within the “Test Lab” section of ALM allowing us to initiate the execution.
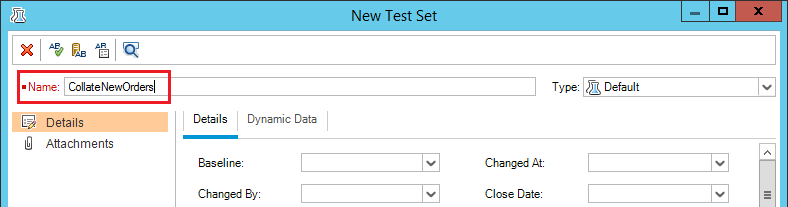
Firstly you need to select or create a Test Set for which to link the script to:
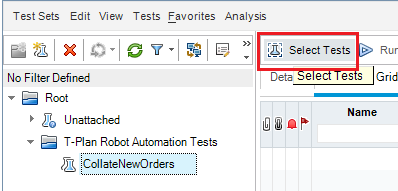
Next associate your test with the new Test Set by clicking “Select Tests” and then either double click or drag your Test from the right-hand pane:
You are now ready to execute your T-Plan Robot automation scripts from OpenText ALM Quality Center!
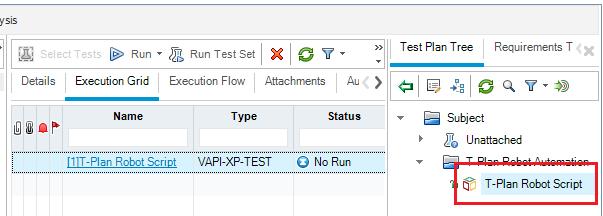
Test Execution
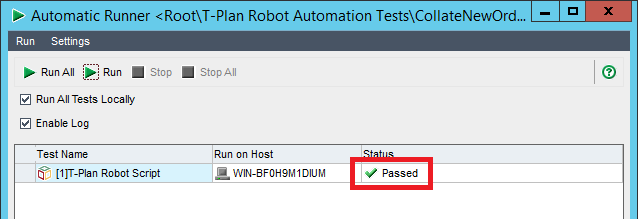
To perform an execution run from ALM, highlight the desired test and select “Run”:
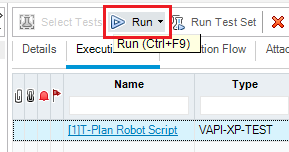
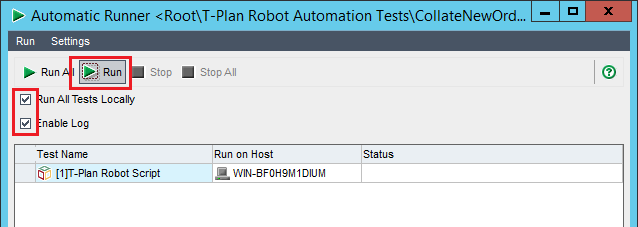
Ensure both options are checked for “Run all Test Locally” and “Enable Log” before selecting “Run”:
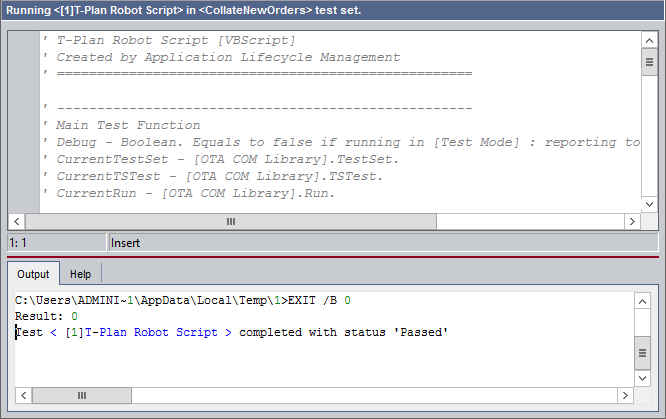
Upon completion of the execution run you should see confirmation of the status:
Viewing Test Results
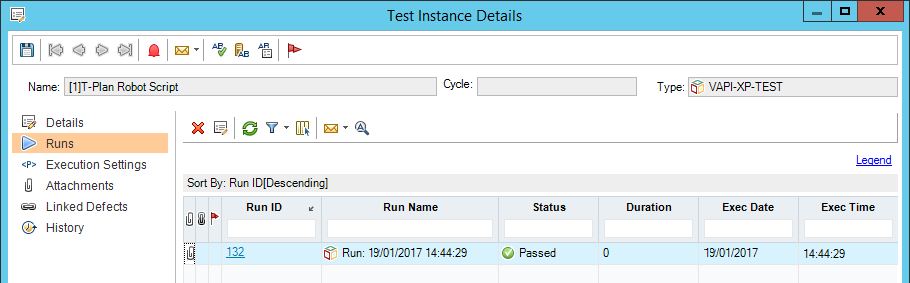
Clicking on the test in the Execution Grid opens the “Test Instance Details” screen, from here you can again see the status:
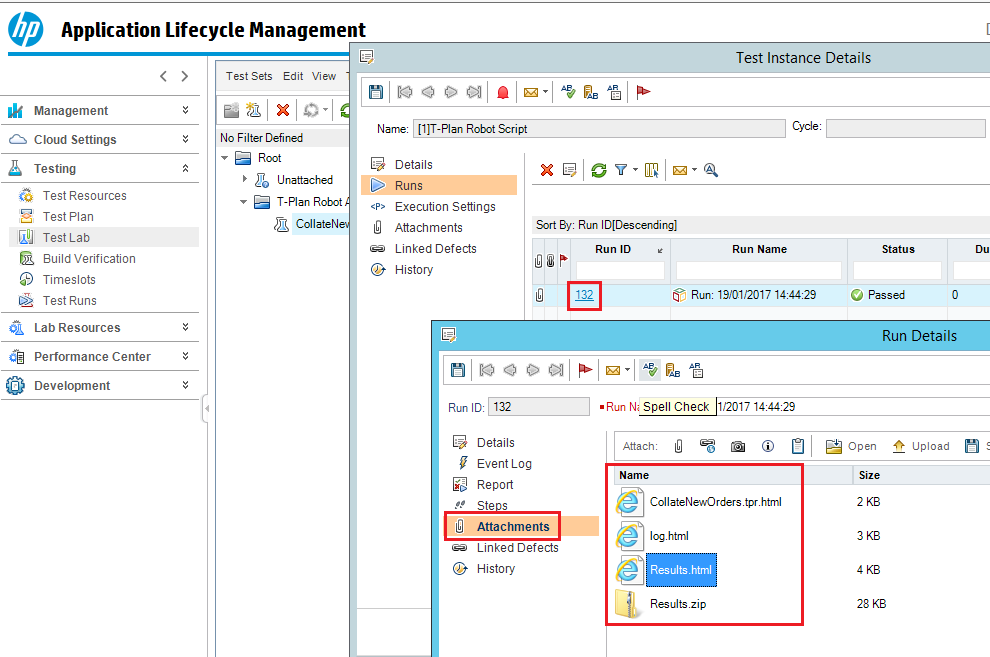
Clicking the attachment icon gives you quick access to the output report for that instance, otherwise, you can select the executions “Run ID” to open up the “Run Details” screen. Selecting the Attachments option on the left will then give you access to the T-Plan output report/files:
Summary
T-Plan Robot automated test scripts can be executed from the context of OpenText ALM Quality Center through the use of the CLI. The results of said executions are then visible also directly from withinOpenText ALM Quality Center.
The above instructions allow you to set up both T-Plan Robot and OpenText ALM Quality Center in order to achieve this functionality. The above steps are also potentially a starting point from where you can further edit and enhance the integration to suit. Perhaps you want to pass some parameters at run-time, perhaps you want to retrieve other files etc., by following the above principles this should all be possible.