Professional Integration
Contents:
1. T-Plan Integration Overview
2. Tight And Loose Integration
3. Entity Mapping
4. T-Plan Professional Set Up
4.1 T-Plan REST Service
4.2 T-Plan SOA Service
5. Integration Overview
5.1 Import
5.2 Export
6. T-Plan Professional 7.0 Integration Overview
6.1 Configuration
6.2 Creating And Attaching Scripts
6.3 Automation Scheduling And Execution
1. T-Plan Integration Overview
This document describes integration of Robot with T-Plan Professional 7.0 (TPP) and higher as well as typical use cases and processes.
T-Plan Professional is a sophisticated test management tool designed around the V-Model principle. It is modular in design and it clearly differentiates between the Analyze, Design and Manage phases of the software cycle:
- The Analyze phase defines what to test and allows to gather and review the requirements from which the testing will be derived and define a set of test conditions (features to be tested). The point is to track major software requirements usually described by the formal documentation (such as Requirements Specification) to make sure they get addressed by QA.
- The Design phase focuses on how to test and creates a test specification hierarchy to model the test plan. A structure with test scripts (also referred to as “test cases”) with detailed instructions represented by test steps are created in this phase.
- The Manage phase allows to plan when to test and deals with scheduling and test execution (both manual and automated).
Robot integrates with the Design and Management phases. While the Design phase clearly corresponds to the process of writing Robot automated test scripts, the Manage one deals with execution of automated testing and tracking of test results.
2. Tight And Loose Integration
The products support two approaches, a tight or loose integration.
A tight integration means that automation is fully managed through the T-Plan Professional GUI which is able to:
- Associate a script entity in Design with an automated test script and also to break such relation. It is in plain words possible to create a mapping like “this script entity is automated (or no longer automated) by this T-Plan Robot script”.
- Create an automated script template from the data in the T-Plan database and export it to Robot.
- Display a read-only view of the automated script and eventually start Robot to edit the script.
- Execute automation in Manage for an automated script entity (or entities). Robot is started in GUI mode to execute each single script (sequential approach – no support of parallel executions in this version) and test results are automatically imported to the T-Plan database at the end of each execution.
There are three basic requirements on Robot automated test scripts to be eligible for tight integration:
- One Robot test script (a single file) must automate exactly one T-Plan Professional script. This is necessary because T-Plan Professional allows to associate script entities with automated scripts in 1:1 relation only.
- The automated script must have one of the registered extensions (.tpr or .java). As T-Plan Professional integrates also with other automated testing products, this requirement enables to identify the tool to handle the automated script.
- The automated script must be self connecting to the system under test (through the Connect command). As T-Plan Professional doesn’t maintain any information about available test environments, it is up to the script itself to get connected.
As T-Plan Professional is a strictly Windows application and integrates with locally installed Robot, tight integration is in fact available just on Windows. As Robot operates in a client-server mode, the system under test (SUT) may be still any of the supported server systems.
Loose integration on the other way allows to stand away from the T-Plan Professional GUI and work with the T-Plan test management products on the database level (through a SOA web service). T-Plan Professional in this mode doesn’t know about existence of automated test scripts; it is however able to accept and display test results from automation as long as they correspond to existing Design entities. Robot GUI supports approximately the same functionality as the T-Plan Professional GUI features discussed above:
- Automated script templates may be created in Robot through the Import T-Plan Script window. It allows to connect to the T-Plan database, select a script entity from Design and create a template with the corresponding structure.
- Test results may be exported to T-Plan database either automatically through the integration CLI options or manually through the Export Results To T-Plan window. Test result source may be in case of manual import either data from recently executed scripts stored in the memory or an XML report saved through the Report command.
It is important to realize that tight and loose integration approaches may be freely and flexibly combined. Association of a Design script entity with an automated script gives you just the option to manage automation through the T-Plan Professional GUI. The same automated script may be also executed manually or through a scheduling system and the test results may be imported through the Robot loose integration features. There are no limitations applied to how you execute the automated testing.
Both approaches have advantages and disadvantages:
- Tight integration provides a comfortable and seamless all-in-one solution. It was designed to support users who have followed the T-Plan process and they decide to start with automation. It is also suitable for beginners and on environments with a low number of systems under test.
- Loose integration allows to take full advantage of Robot capabilities such as platform independence, extensive CLI and ability to test on multiple desktop servers in parallel. It is suitable for more advanced users and provides solution for automation across various operating systems and complex test environments. Ability to save results to XML allows to review the test results before importing them and it also supports scenarios with no connection to the T-Plan database (for example executing automation in an isolated environment or at the customer site). Loose integration is also convenient for those who already have automation in place and decide to take advantage of T-Plan management products to bring structure to their QA efforts.
3. Entity Mapping
The corner stone of mapping among the T-Plan Professional entities and Robot automated test results are the Script and Step commands. They must be called in Robot automated scripts to produce recognizable test results and associate them with script entities in the T-Plan database.
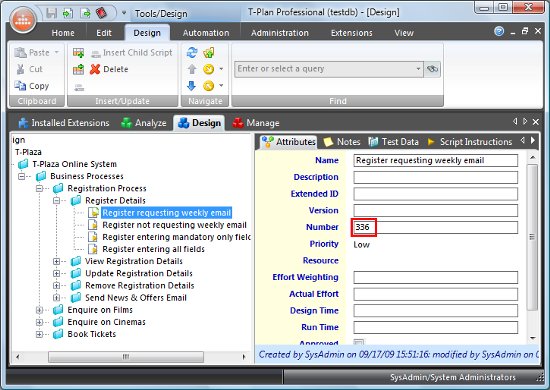
The Script command labels the start or end of a particular script entity in a Robot automated script. It’s argument, the script number is a unique number assigned to each T-Plan entity at the creation time. To find out the number open the Design module of T-Plan Professional, select the script of interest and look for the Number field under the Attributes tab as is shown on the following picture.
The Step command creates result of a single test step. Step instances should be always placed into a script body (meaning between the Script start and Script end pair of commands). The command supports the same attributes as T-Plan Professional step entities such as Name, Instructions, Expected Result, Actual Result and Notes. It also defines step status (meaning result) which is one of:
- Not Tested (“nt”) which is default,
- Tested & Passed (code “pass”),
- Tested & Failed (“fail”),
- Not Available (“na”)
The overall script result in T-Plan Professional is derived from the step results. If there’s at least one failed step, the script result is Tested & Failed. See the T-Plan Professional documentation for more information.
Steps in Robot automated scripts are in fact not associated with step entities in the T-Plan database. An automated test script may but doesn’t have to contain the same steps as the corresponding script entity in T-Plan Professional. The point is that automated testing may follow different steps to perform testing of a test case, compared to the manual one. That’s why parity between Step commands and step entities in T-Plan database is not enforced and T-Plan Professional is ready to import any results based just on a valid script entity number.
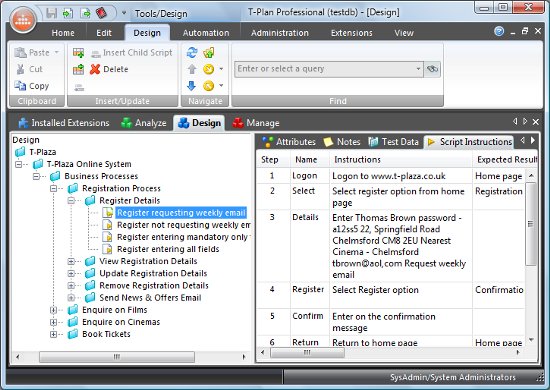
The following picture shows an example of steps under the Script Instructions tab of a script in T-Plan Professional Design.
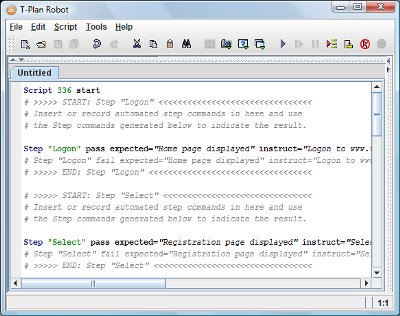
Both T-Plan Professional and Robot provide GUI tools to export the script entity data into an automated testing script template. See the following chapters. A short example of such a template for the script entity number 336 displayed on the picture above follows:
Script 336 start

# >>>>> START: Step "Logon" <<<<<<<<<<<<<<<<<<<<<<<<<<<<<<<<
# Insert or record automated step commands in here and use
# the Step commands generated below to indicate the result.

Step "Logon" pass expected="Home page displayed" instruct="Logon to www.t-plaza.co.uk"
# Step "Logon" fail expected="Home page displayed" instruct="Logon to www.t-plaza.co.uk"
# >>>>> END: Step "Logon" <<<<<<<<<<<<<<<<<<<<<<<<<<<<<<<<<<

# >>>>> START: Step "Select" <<<<<<<<<<<<<<<<<<<<<<<<<<<<<<<
# Insert or record automated step commands in here and use
# the Step commands generated below to indicate the result.

Step "Select" pass expected="Registration page displayed" instruct="Select register option from home page"
# Step "Select" fail expected="Registration page displayed" instruct="Select register option from home page"
# >>>>> END: Step "Select" <<<<<<<<<<<<<<<<<<<<<<<<<<<<<<<<<

# .... other steps omitted for brevity
Script 336 end
The template may in such a case serve as a source of structure code for update of an the existing one.The template may be used as base of a new automated script. It is up to the user to add code snippets automating individual steps into the indicated empty lines, for example using the Script Recorder.
If the script entity structure gets updated on the T-Plan Professional side, for example some steps are added, updated or removed, the changes have to be applied manually to the corresponding automated script.
Here is a fully functional example of a Robot script which automates the first step of the script entity number 336 displayed on the previous screenshots. If such a script is executed, it produces a result of the Logon step which may be recorded to the T-Plan database:
# Connect to the test environment
Connect rfb://mytestserver:5900 password=welcome

# Define script mapping
Script 336 start

# Windows+R opens the Run window on Windows
Press Windows+R wait=3s

# Type the HTTP link and press Enter to open the T-Plaza site in the default web browser
Typeline http://www.t-plaza.co.uk

# Wait no longer than 30 seconds until the screen contains the T-Plaza logo image
Waitfor match template=tplaza_logo.png method=search timeout=30s

# If the Waitfor exit code is 0, the logo was found and the step passed
if ({_EXIT_CODE} == 0) {
  Step "Logon" pass expected="Home page displayed" instruct="Logon to www.t-plaza.co.uk"

} else {
  # The logo was not found -> record the failed step and terminate the script
  Step "Logon" fail expected="Home page displayed" instruct="Logon to www.t-plaza.co.uk" actual="Web site failed to open"
  Exit 1
}

# TODO: automate other steps here

# Define script end
Script 336 end
4. T-Plan Professional Setup
All communication between Robot and T-Plan Professional (respectively the T-Plan database) is realized through a web service built on top of the Service Oriented Architecture (SOA) technology as follows:
- T-Plan Professional 8.1 and higher uses the T-Plan REST Service to communicate with Robot.
- T-Plan Professional 7 relies on the T-Plan SOA Service component.
The service must be installed and running and both products must know its location (URL) to execute correctly any of the integration features.
4.1 T-Plan REST Service
For the latest instruction on the T-Plan REST service installation and operation please contact T-Plan support.
4.2 T-Plan SOA Service
The T-Plan SOA service is a gateway to the T-Plan database used for all data exchange between Robot and T-Plan Professional 7. It typically runs on the same server as the T-Plan database. As it is a web service operating on the HTTP/SOAP protocol, it may be accessed over the network.
The server is delivered as a separate piece of software. Its installer is typically located under the Robot/SOAfolder in the T-Plan installation bundle. There is no particular setting at the install time and the only prerequisite is to have the .NET Framework 3.5 SP1 installed. The server requires post-installation configuration as follows:
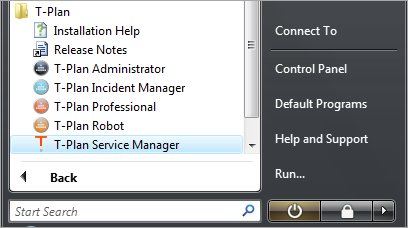
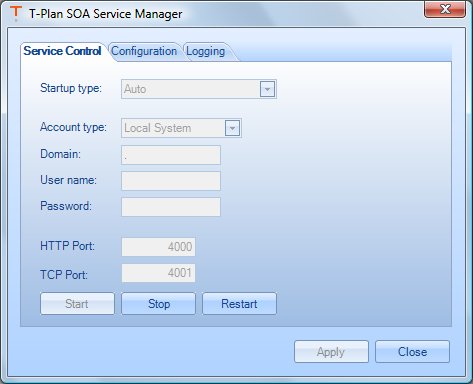
- Start the T-Plan SOA Service Manager application from the T-Plan menu group.
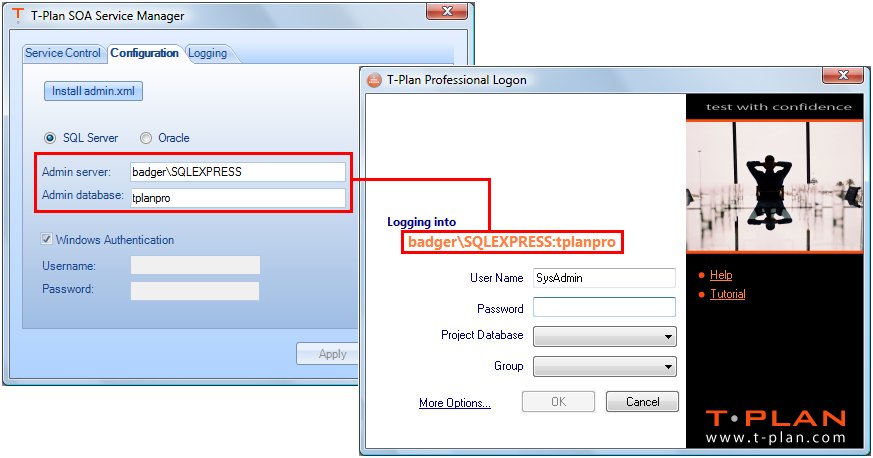
- Select the Configuration tab in the manager window and take advantage of the Install admin.xml button to configure the service with the T-Plan configuration file created during set up of T-Plan Administrator. If you don’t know its location, you may alternatively populate the Admin Server, Admin Database and authentication details manually in the fields provided. The server and DB names should be the same as the one displayed in the T-Plan Professional logon window. Select Apply after you finish.
- Switch back to the Service Control tab and restart the service through Restart. The service by default runs on address http://localhost:4000 (when connecting to a local DB) or http://<yourservername>:4000 (when connecting to a remote DB over the network) . If the default HTTP port of 4000 is already used by another application, you may optionally change it to a custom one. The TCP port is not used by Robot and is reserved for other applications.
You can leave the service account as Local System but it must be added as a SQL Server 2008 user with appropriate access to databases. Otherwise change the service account to a one that has ‘Log on as Service’ rights as follows:- Start Menu->Run->’secpol.msc’
- Double click ‘Local Policies’ -> ‘User Rights Assignment’ -> ‘Log on as a service’
- Add your account to the list.
- Close the manager window through Close but make sure the service is up and running and the Windows icon tray displays the T-Plan icon. You may double click it to reopen the manager any time.
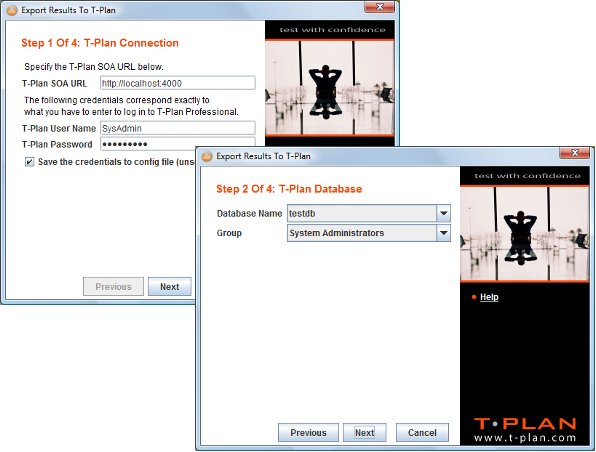
- To test whether your configuration works correctly start T-Plan Robot Enterprise, open the Import or Export window and provide the SOA service address and credentials in the first screen. If you are able to proceed to the “Step 2: T-Plan Database” screen with the Next button, your service works properly and Robot is able to exchange data with the SOA service.
5. Robot Integration Overview
Robot integration features support two basic tasks:
- Import of structure of a T-Plan Professional script entity into a Robot automated script.
- Export of test results from automation to a T-Plan Professional test suite entity.
Both tasks can be performed either manually through the GUI or automatically through the integration CLI.
5.1 Import
For automated import from CLI refer to the T-Plan Integration CLI Options chapter of the CLI Reference.
To import structure of an existing T-Plan Professional script entity from the Robot GUI follow these steps:
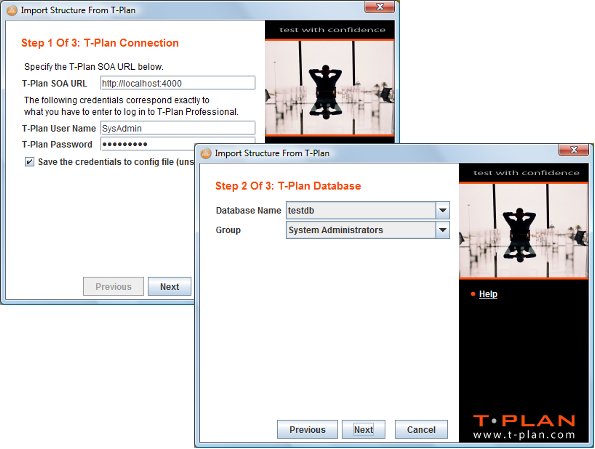
- Select Tools->Import T-Plan Script in the main GUI menu. Alternatively open the File->New Test Script window and select Choose under the “Populate the test script with a structure imported from T-Plan Professional” option.
- The first wizard screen asks you to provide the SOA or REST URL and credentials to the T-Plan database (see the T-Plan SOA Service chapter). The second wizard screen allows to select the database name and group. The credentials and database details are equal to the ones you provide when logging on to T-Plan Professional. Be aware that Robot saves values provided in this screen to the configuration file so that you don’t have to enter them every time. As configuration is saved to a plain text file in your home folder, it is insecure to save the database user name and password this way. Deselect the “Save the credentials…” check box to avoid storing of user name and password if necessary.
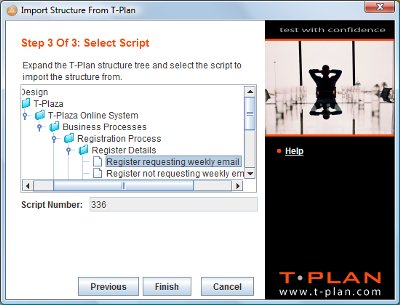
- The third wizard screen displays the T-Plan Professional Design tree with available specification and script entities. Select a script to import from and hit Finish.
- The wizard opens the New Test Script window to define the script name, type (TPR/Java), location and path and report settings. Then it creates the test script and populates it with the template:
Be aware that there’s no functionality allowing to check structure of an existing automated script against its counterpart in T-Plan Professional Design. If the script entity structure gets updated on the T-Plan Professional side, for example some steps are added, updated or removed, the changes have to be applied to the corresponding automated script manually. The template may in such a case serve as a source of structure code (Step commands) for update of the the existing automated script.
Similarly there is no way to create a new script entity in Design from an automated script which must always refer to a valid script entity number. If you already have automation in place and you decide to create a corresponding structure in the T-Plan database, create it using T-Plan Professional first and then map the entities to automated scripts.
Future versions of both products may deliver improvements in these areas.
5.2 Export
For automated import from CLI refer to the T-Plan Integration CLI Options chapter of the CLI Reference. Be aware that the CLI doesn’t allow to export results from XML reports. This feature is currently available only in GUI.
To export test results from automation into T-Plan database:
- Select Tools->Export Results To T-Plan in the main GUI menu.
- The first two screens are identical with the Import T-Plan Script wizard. The first one asks you to provide the SOA URL and credentials to the T-Plan database (see the T-Plan SOA Service chapter). The second wizard screen allows to select the database name and group. The credentials and database details are equal to the ones you provide when logging on to T-Plan Professional. Be aware that Robot saves values provided in this screen to the configuration file so that you don’t have to enter them every time. As configuration is saved to a plain text file in your home folder, it is insecure to save the database user name and password this way. Deselect the “Save the credentials…” check box to avoid caching of user name and password if necessary.
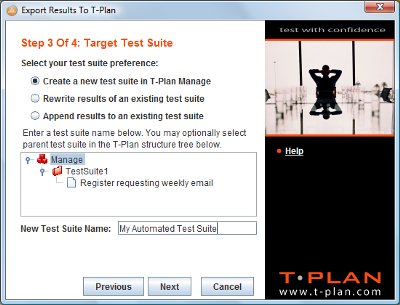
- The third wizard screen displays the T-Plan Professional Manage tree with available test suite and script entities. There are three options:
- Create a new test suite in T-Plan Manage option will create a new test suite entity in the Manage tree to save the test results to. This option requires the New Test Suite Name field to be populated with a valid name. If you select a test suite in the tree, it will serve as parent node for the new test suite. Default parent is the root Manage node.
- Rewrite results of an existing test suite option will rewrite test results of an existing test suite entity. Any data contained in the test suite are purged first. This mode requires that a valid test suite node is selected in the tree.
- Append results to an existing test suite option will append test results to an existing test suite entity. This mode is intended to merge disjunctive sets of test results. If the selected entity already contains data for the same scripts and steps, this operation will lead to result duplication. This mode requires that a valid test suite node is selected in the tree.
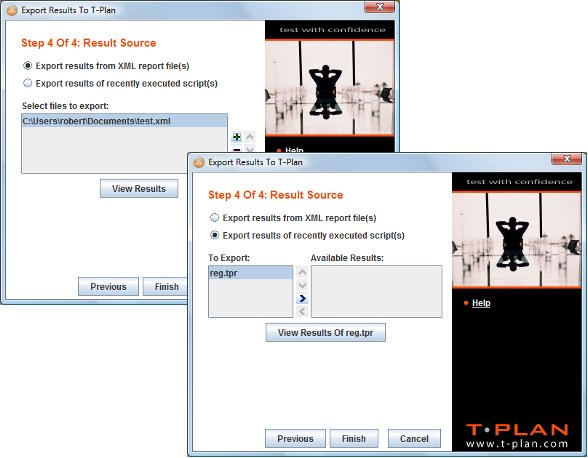
- The last wizard screen allows to select source of test result data. There are two options:
- Export results from XML file(s). This option allows to define a list of XML files which were created by the Report command of previously executed automated scripts. Results will be exported in the selected order.
- Export results of previously executed script(s) offers a list of results generated by automated test scripts executed by this Robot instance from the application start. This list is maintained just in the memory and all such results are discarded when the application exits (this doesn’t impact data saved to XML).
Both lists provide a View Results button which displays the test result XML in a web browser. For test results stored in memory the tool creates a temporary XML file which gets deleted after viewing. - Once you select at least one valid result source, select the Finish button to complete the export. If the operation is successful, the dialog is disposed without any confirmation message.
Be aware that the current implementations can export just Step command results and it is not possible to upload other automation output objects, such as screenshots, warnings and reports. It is therefore recommended to use XML reports alongside with T-Plan management software to preserve these output for eventual review. Future versions of both products may deliver improvements in this area.
6. T-Plan Professional 7.0 Integration Overview
This chapter describes GUI features of T-Plan Professional 7.0 supporting integration with Robot. The functionality is demonstrated on simple use cases. We presume that you already have created some data in T-Plan Professional Design module, in particular a test specification with at least one script and several steps. For more details refer to the T-Plan Professional 7.0 documentation.
6.1 Configuration
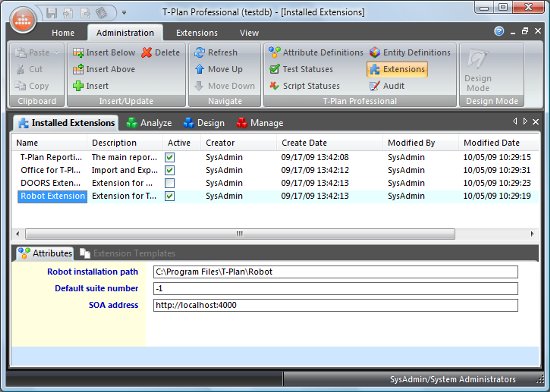
Before you proceed to the examples, make sure that Robot is properly configured in the Extensions section. To do so navigate to the Administration->Extensions menu in the T-Plan Professional GUI as follows:
If you don’t see the Robot Extension in the panel, right click the extensions list and choose the Robot Extension from the “Append to end of list” menu. If this item is not present in the there, create folder RobotExtn under C:\Program Files\T-Plan\Extensions\T-Plan (or your custom install directory) and retry.
T-Plan Professional populates default values except the SOA address from registry entries created by the T-Plan Robot Windows installer (HKEY_LOCAL_MACHINE\SOFTWARE\T-Plan\Robot). If you intend to integrate the tool with a standalone Robot ZIP distribution, you will have to fill in the extension data on your own.
- The Robot installation path points to the installation directory. The default value is
C:\Program Files\T-Plan\Robot. For the standalone ZIP distribution the path should point to where you unzipped the product. - Default suite number specifies the default Test Script node number in Manage to import test results from automation to. The value of -1 indicates that test suites should be created right under the Manage node.
- The SOA address is an URL pointing to the SOA web service. The SOA must be executing in order to make the integration features work correctly in both products. See the T-Plan SOA Service chapter for details. If you are connecting to a remote test database, ask your T-Plan database administrator to get you access to the SOA.
Should you need to customize the way T-Plan Professional calls Robot (such as which Java environment should be used or how much heap memory is the application allowed to allocate), refer to the Integration With T-Plan Professional chapter of the Release Notes document for instructions.
6.2 Creating And Attaching Scripts
Now, let’s show the integration on an example. A typical view of the T-Plan Professional Design module with data looks as follows:
Right mouse click on a script entity opens up a context menu. There are two items of interest:
- Create new Robot script creates a template of automated script from the selected entity and opens it in Robot. You will be prompted for the automated script file name. It is highly recommended to store the test script into a T-Plan Robot project to make it populated with the default path and report options. An association between the script entity and the automated script is also created and saved to the T-Plan database.
- Browse Robot script allows to browse an already existing automated script from the file system and create the association. Robot is not started in such a case.
When the context menu gets opened for an entity which already has an association, the menu items are different:
- Load this script in Robot starts Robot and opens the associated automated script for editing.
- Browse Robot script allows to break the current association and create a new one with another existing automated script from the file system.
- Detach Robot script removes the association from the T-Plan database. The automated script itself is not affected by this step and can be reattached any time through the previous menu item.
6.3 Automation Scheduling And Execution
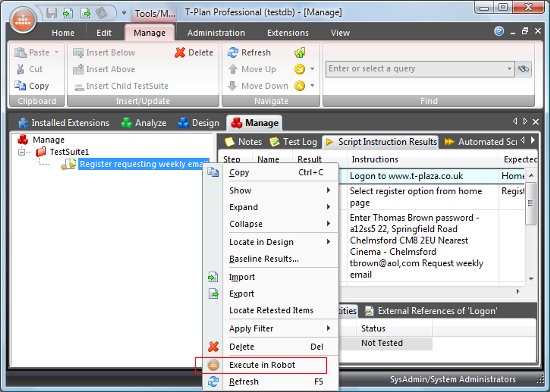
To schedule execution of the script from the previous example select Copy in the context menu in Design and paste the entity into a test suite in the Manage module. An example of the result follows:
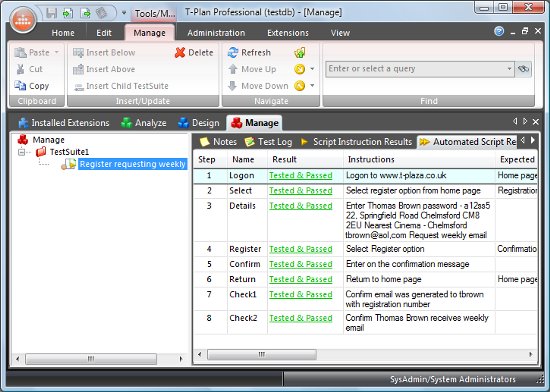
To execute the associated automated script just select Execute in Robot in the node context menu. This action may be also started from any higher level node where it executes all scripts in the selected subtree which are associated with an automated script. T-Plan Professional in this case starts the Robot GUI, executes the automated testing and imports the test results into the Automated Script Results tab.
It is useful to realize that while script associations are managed by T-Plan Professional, other integration functionality such as export of script entity structure or import of automated testing results are provided by Robot and T-Plan Professional just takes advantage of the Integration CLI to have Robot execute these tasks. The practical impact is that any task available in the T-Plan Professional menus may be also performed outside of T-Plan Professional.

