iosplugin
iOS Plugin
Contents:
1. Overview
2. Static Library Linking
3. Dynamic Library Linking
1. Overview
The T-Plan iOS Plugin enables testing of iOS applications on iOS version 12 and higher, using the iOS Mirror connection. It is an library which has to be added to the iOS application you wish to automate.
The library plugin is delivered both in the static and dynamic form:
- The static library (.a format) must be added to the Xcode project and the application source code must be updated with two lines of code. This approach is suitable for QA organizations which have access to the application source code and are allowed to build the AUT on their own. This way is also recommended for applications relying on the key chain APIs. For details see the the Static Library Linking chapter.
- The dynamic library (.dylib format) may be injected to an existing Ad-Hoc or Enterprise application in the .ipa format. This approach is suitable where the QA organizations which don't have access to the application source code and/or the build process. For details see the the Dynamic Library Linking chapter.
2. Static Library Linking
The static library is easy to use:
- Download the latest static library
- Unzip it to your Mac OS X machine with Xcode and your application project.
- Right click the Frameworks folder in the Xcode project view, select "Add Files To ..." and add the libTPlanTestLib.a file.
- Locate your application delegate class. If you are not familiar with the code right click the topmost project node, select "Find in Selected Groups" and search for a class containing "didFinishLaunchingWithOptions" or "AppDelegate". Once you have it:
- Right click its parent folder in the project view, select "Add Files To ..." and add the TPlanTestLib.h file.
- Open the app delegate class in the editor and insert the import clause to the header:
#import "TPlanTestLib.h" - Locate the didFinishLaunchingWithOptions method and add a call of the setup_tplan() function to the very beginning of its body:
- (BOOL)application:(UIApplication *)application didFinishLaunchingWithOptions:(NSDictionary *)launchOptions
{
setup_tplan();
<...other code>
}
- Build the application and start it on the device in the standard way. See the Application Automation chapter for further instructions.
3. Dynamic Library Linking
The dynamic library package consists of the library binary (.dylib) and the injector script. It adds the library to your iOS ad-hoc application (*.ipa) without having to modify the source code or rebuild it in Xcode. It works as follows:
- The application archive is unzipped and the library is copied in there.
- The script adds the library to the Mach-O header of your application executable. This ensures that the library gets loaded on the application start up. As this operation doesn't touch the part of the executable that contains your application code, it is generally considered safe and low invasive.
- As any modification of the application package invalidates its signature, the application gets re-signed with your distribution certificate and packed back to the .ipa format.
1. To enable dynamic linking get a Mac OS X machine and configure it as follows:
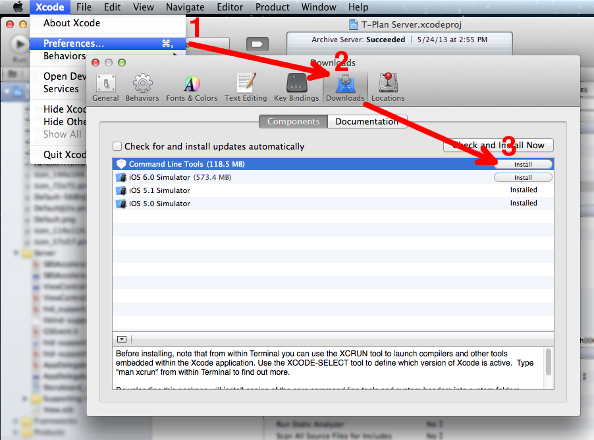
Make sure to have the latest Xcode and Command Line Tools. To verify:
- Select Xcode->Preferences and click the Downloads button. If you see "Command Line Tools" available in the Components section then install it.
Requirements:
- Mac OS X 10.7 (Mountain Lion) or later.
- An Apple Developer Account.
- Xcode installed (v5.x or higher required) with the Command Line Tools package. To install the tools:
- Start Xcode and select Xcode->Preferences in the menu.
- Switch to the Downloads tab.
- Select Install next to the Command Line Tools package.
2. Get the dynamic library and check your environment
- Download the latest dynamic library package
- Unzip it to your hard drive to a path with no spaces in its name.
- Open a terminal and change to the package directory.
- To verify whether your Python is configured properly execute:
./test_python.sh
- If Python fails with an error like: "ImportError: No module named pkg_resources" then install setuptools:
Sudo curl https://bitbucket.org/pypa/setuptools/raw/bootstrap/ez_setup.py | python
- If Python fails with an error like: "pkg_resources.DistributionNotFound: altgraph>=0.10" or "pkg_resources.VersionConflict: altgraph 0.9" then upgrade the altgraph library:
/Library/Frameworks/Python.framework/Versions/2.7/bin/easy_install --upgrade altgraph
- Should you wish to call another Python instance edit test_python.sh and set the PYTHON variable to the target python command.
3. Get the provisioning profile and import the distribution certificate into your local keychain as is described in Step 1 and 2 below.
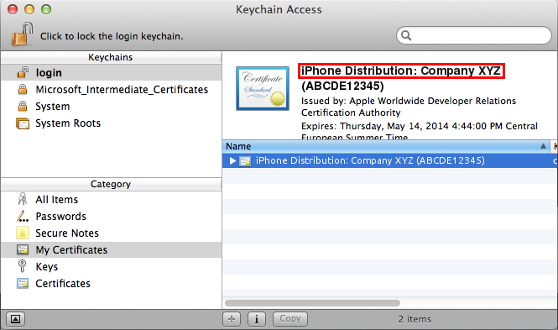
Note: Remember the distribution certificate name because you will need it later. You may also get it through the Applications->Utilities->Keychain Access tool of the Mac OS.
Step 1: Create the provisioning profile
- Switch to the Provisioning Profiles section.
- Click the "+" button to create a new profile:
- Select the "Ad Hoc" profile type.
- Select the Xcode iOS Wildcard App ID.
- Select the appropriate distribution certificate.
- Select the devices you wish to allow to run the server on. You must add at least one device.
- Provide the profile name, for example "T-Plan Server" and select Generate.
- Select Download to download the "T-Plan Server.mobileprovision" file to your local file system.
Step 2: Get the certificate
- Go to Member Center->Certificates, Identifiers & Profiles and select the Certificates link in the iOS Apps group.
- Download the iOS (iPhone) distribution certificate.
- Open the certificate from Downloads or Finder. This will import it into your key chain. Then look at the certificate under the My Certificates screen of the Keychain Access window and jot down the name. It should look like "iPhone Distribution: <name>".
Once your environment is set up you may modify your application through:
./add_dylib_and_resign.sh <application>.ipa <profile>.mobileprovision "<distribution_certificate_name>"
If the script executes correctly it will create a new package called <application>-modified.ipa. See the Application Automation chapter for further instructions.
IMPORTANT: This process will only work for applications that have been built for Ad-Hoc or Enterprise distribution. Applications downloaded from the Apple Store can not be modified because they are signed by Apple and protected through DRM. The script will reject them.