xcode
Automating iOS Over Xcode
Contents:
1. Introduction
2. Java Requirements
3. Setting Up
4. Connecting From Robot
5. Troubleshooting
6. Automation
1. Introduction
NOTE: For the older document describing automation of iOS 9 devices over Xcode 7 go here. |
T-Plan Robot Enterprise version 4.3.1 and higher supports automation of iOS 10+ devices over Xcode 8 and higher on Mac OS X. Main features:
- Full iOS control enabled without jailbreak.
- No modification of the tested application is required.
- Device must be connected either to the same WiFi network as the Mac OS X or via the Lightning USB cable.
- Support of automation in the Portrait and Landscape Left (with the device button on the right) screen orientations.
- An extra set of features is provided through the Mobile command. It allows to manage the device applications, keyboard and screen orientation.
- Parallel connections (i.e. automation of multiple devices in parallel from one Mac machine) are supported as long as USB tunneling is not used.
As the connection is slower than the iOS Mirror one it is not suitable for testing of applications that require real time control, such as games etc. Use the iOS Mirror connection instead. Alternatively switch the connections on the fly as needed using the Connect command.
2. Java Requirements
Certain versions of Java do not support Lightning USB screen mirroring due to issues related to the new security restrictions introduced in Mac OS X Catalina. The Robot UI will notify you if the Java you have is not compatible.
We strongly recommend to use Robot 6.3.2 or newer which enabled the most recent Java versions such as 11.0.9+, 15, 16 and 17. Older Robot releases will work only with old Java versions which are difficult to get (Oracle release archives require subscription).
| Java Product Line | Supported Versions (Robot 6.3.2+) | Supported Versions (Robot 6.3.1 and older) |
|---|---|---|
| Java 8 | Any Java 8 except for updates 251 and 262 | Java 8 update 242 (1.8.0_242) or lower |
| Java 9, 10 and 12 | All supported | All supported |
| Java 11 | Any Java 11 except for 11.0.7 and 11.0.8 | Java 11.0.6 or lower |
| Java 13 | All supported | - |
| Java 14 | - | - |
| Java 15 and higher | All supported | - |
We support & test:
Oracle Java (access to older releases requires subscription)
3. Setting Up
Requirements:
- Xcode installed, up to date and configured with a valid Apple Developer account (matching provisioning profile, valid certificate chain).
- Command Line Tools must be configured to point to the correct active Xcode directory:
sudo xcode-select -s /Applications/Xcode.app/Contents/Developer - The iOS device is connected over the Lightning USB cable to the Mac machine and is accepted by Xcode (listed in Window -> Devices).
Give the Robot process necessary access rights.
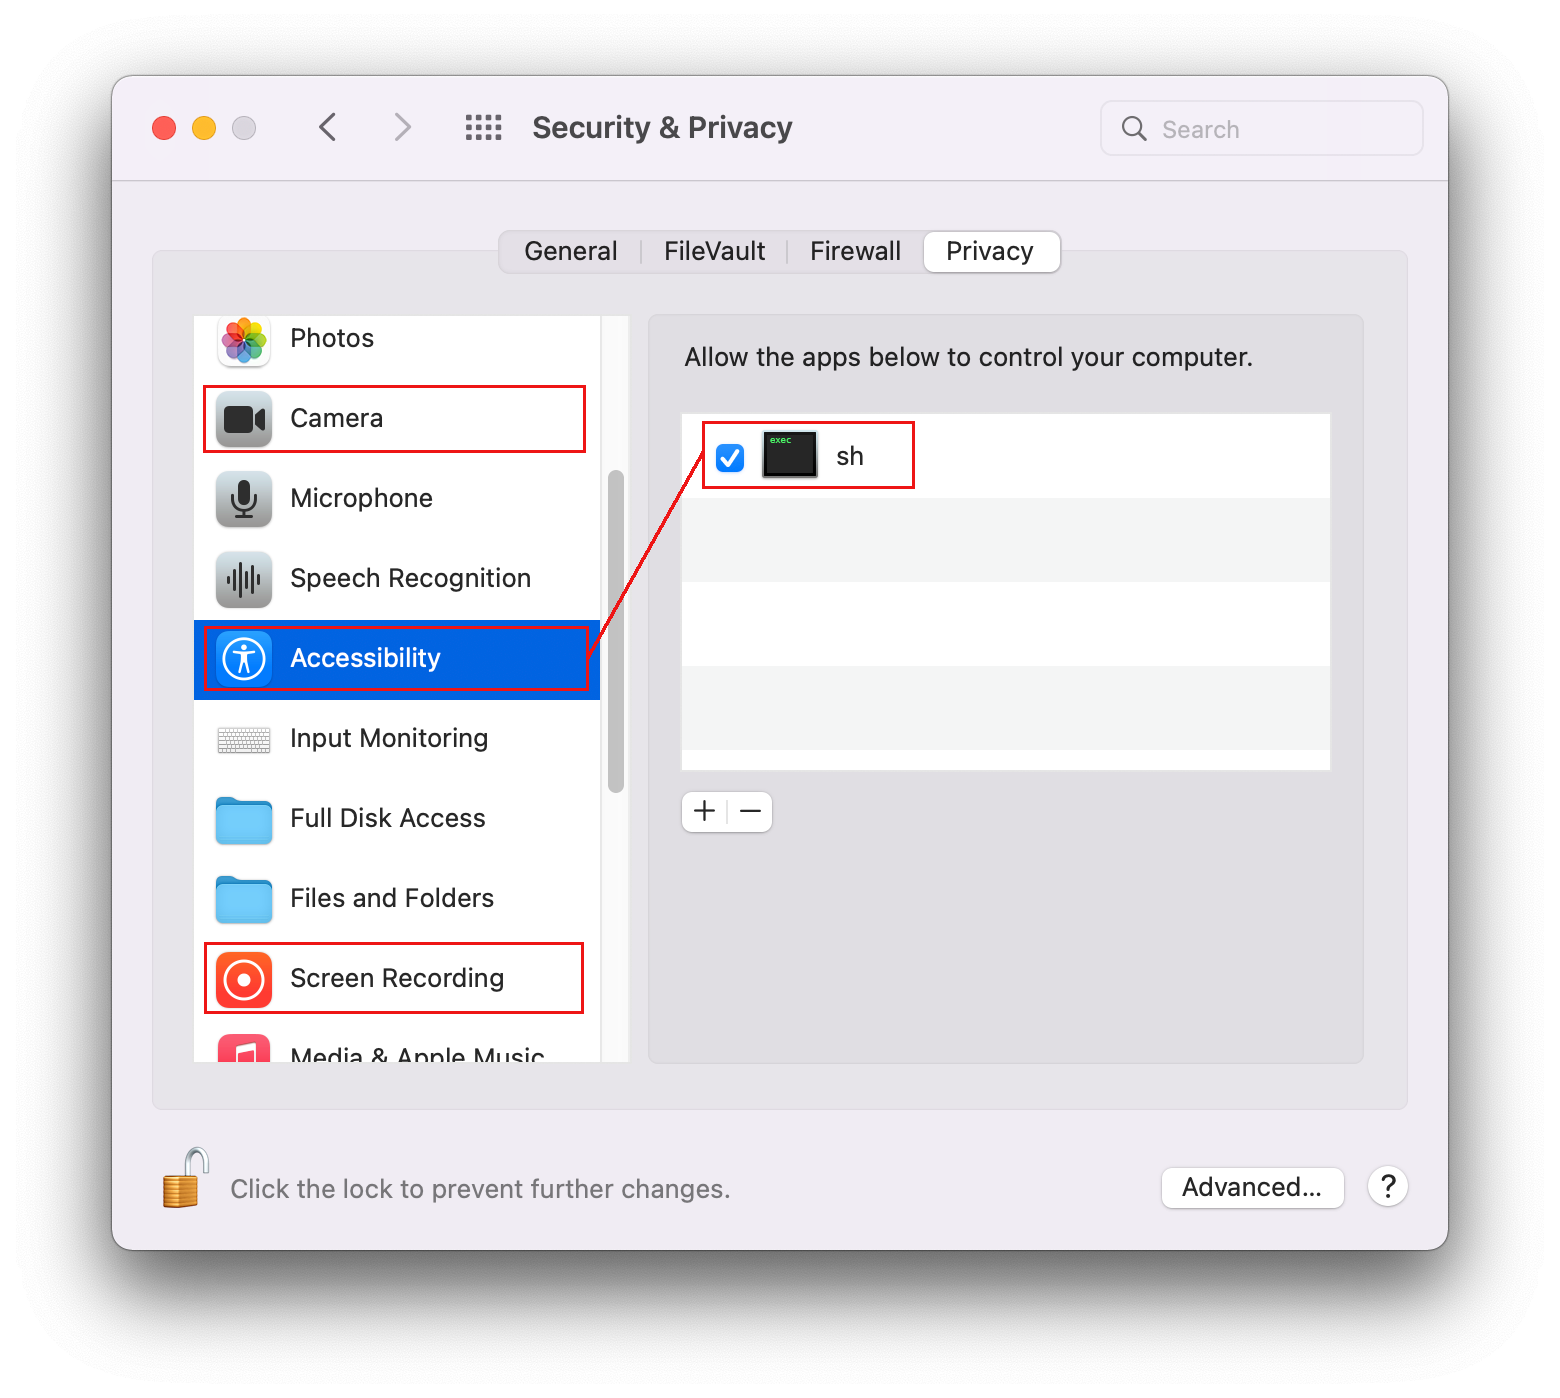
- Start Robot, select the "iOS Over Xcode" connection in the Login window, populate its options and click Connect. The connection will fail complaining that Accessibility is not enabled.
- Open Apple→Settings and select Security & Privacy
- Click Accessibility in the left column and enable the access in the right part of the window. If you are using the standalone release the process may appear as "java" or "sh" depending on how it was started.
- Click Connect in the Robot's Login window again. A pop up asking for Camera permission should appear. Approve it. Alternatively select the Camera item in the Security & Privacy and grant the permissions there.
- Similarly you may have to enable the access for Screen Recording and Automation too (these may be missing in older Mac OS X releases).
- You may have to repeat this step after each Robot or Java upgrade.
1. Download Instructions:
If you are using Robot 8 for Mac then skip this step. There's a WDA instance bundled with it.
For other Robot versions you must download the most recent version WebDriverAgent (WDA) project:
- If your iOS is version 17.7 or higher you MUST use Robot 7.2.10+ and the most recent WDA version (v13+).
- Robot 7.2.9 or older supports only iOS versions older than 17.7 and is only compatible with WDA up to version 11.
- There's no upgrade from any of the previous versions. Simply abandon the old WDA and set up a new Xcode project.
NOTE: Don't use the official WebDriverAgent project. We have added bug fixes and enhancements to enable the landscape mode and full iOS control. There's a switch in the connection preferences allowing Robot to accept a custom project version but we don't guarantee its functionality.
2. Project Setup Instructions:
First time set up:
- Install dependencies: npm, Carthage and GIT. Recommended steps:
- Install Homebrew
- Use Homebrew to install NPM, GIT and Carthage:
$ brew install node
$ brew install git
$ brew install carthage
3. Xcode Setup Instructions:
If you are using Robot 8 for Mac then perform this step only if the connection fails to start out of the box. Use the Manage WebDriverAgent button in the Login window to open the bundled WDA instance in Xcode.
Xcode set up must be repeated:
- After you update or re-download the WebDriverAgent project.
- After the Xcode gets updated.
- After the iOS on the target device gets updated.
- If you need to set up a new device.
The steps:
- Start Xcode. Open the
WebDriverAgent.xcodeprojproject file from the WDA project folder. - In the Xcode project:
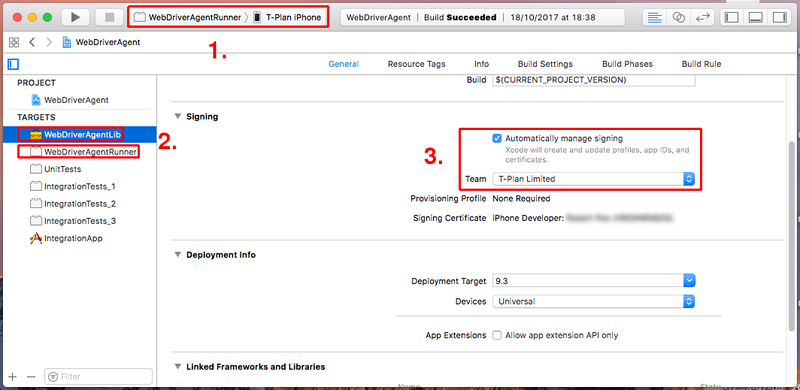
- Select the WebDriverAgentRunner scheme and the target device at the top bar. If the device displays with the suffix of "(Developer Mode disabled)" follow these steps to enable it.
- Select the WebDriverAgentLib target. Make sure that the "Automatically manage signing" option is on and a valid team is set.
- If you have a paid Apple development account then prefer using the company team to the personal one.
- If you do not have a paid Apple account then use a personal team. Xcode is likely to refuse it saying "Failed to register bundle identifier". To fix this replace the default com.facebook.WebDriverAgentLib bundle identifier with a fabricated one. It may take several attempts to achieve this, try to create a very unique one such as "my.nonsense.app" or similar. Once your bundle ID gets accepted Xcode will stop displaying error messages.
- Select the WebDriverAgentRunner target. Make sure that the "Automatically manage signing" option is on and a valid team is set in a similar fashion.
- Make sure that the top left drop down (#1 in the image above) is set on WebDriverAgentRunner→[your phone]. Select Product->Test in the Xcode menu. Open the debug console through View->Debug Area->Activate Console. If everything works OK the application will start in the test mode on the device and the console output will contain a line at the bottom:
2017-10-19 15:51:28.502141+0100 WebDriverAgentRunner-Runner\[785:276949\] ServerURLHere->http://192.168.1.3:8100<-ServerURLHere
- To verify that the WDA server works copy the URL, append /health to it and open it in Safari. It must read "I-AM-ALIVE"
http://192.168.1.3:8100/health
- If you are using a private team the WDA fails to start for the first time because the device won't trust the private team certificate. To fix this open Settings on the iOS device, select the General→VPN & Device Management screen and make the certificate in there trusted
Robot doesn't need Xcode to run at the time of the connection. The WebDriverAgent application doesn't even have to be installed on the target iOS device. Robot will start it and eventually build it and install it on the device using the Xcode CLI tools. The manual process above is required only to ensure that the WDA project is configured properly to be built and executed using the Xcode CLI tools. It will also compile the code which shortens the connection init time.
4. Connecting From Robot
You must provide:
- Name of the device you wish to connect to. Since v5.0.6 you may retrieve the list of available devices through a call of the _IOS_DEVICES dynamic variable.
- Path of the properly configured WDA project
NOTE: Keyboard mapping may be very slow, especially on iPads where it may take up to 10 minutes. Use the stored keymap option to avoid the delay for repeated connections.
5. Troubleshooting
- Make sure to use the original Lightning USB cable shipped with your iOS device. Apple is known for making the iOS refuse cables from other producers.
- Connect the cable directly to the Mac's USB port. Do not use a USB switch or hub.
6. Automation
Connection
Touch Screen Support
Keyboard Support
Keyboard Mapping
System Alert Handling
Connection
To connect to an iOS device from a test script use the Connect command (TPR scripts) or the connect() method (Java test scripts). The argument URL must be in form of "xcode://localhost" and it must specify the device name ("device") and path to the WebDriverAgent project folder ("project"). The "app" parameter is optional. It allows to install a locally stored iOS application (.ipa) on the device. The application must be signed with the same settings (certificate) used for WDA deployment.
Example:
TPR test scripts: Connect xcode://localhost device="My iPhone" project="/Users/Joe/WebDriverAgent"
Java test scripts: connect("My iPhone", new File("/Users/Joe/WebDriverAgent"), (File) null, false);
Another alternative is to encode the parameters to the connect URL query. This form is also suitable for the c/--connect CLI connection. You may copy the URL of any of your recent connections from the Tools->CLI Wizard window. Another alternative is to give your connection a name in the Desktop->Connection Manager window and then use it instead of the URL.
TPR test scripts: Connect "xcode://localhost?device=My%20iPhone&project=/Users/Joe/WebDriverAgent"
Touch Screen Support
Only Portrait and Landscape Left screen orientations are supported. Other ones won't break the connection but the touch events (taps, ...) are likely to be misplaced. This is due to a bug in the underlying framework by Apple. To change the screen orientation press the F4 key or make your test script press it (Press F4). This is supported since v4.4.3.
The mouse gestures are interpreted as follows:
- Mouse clicks are mapped onto the touch screen taps. Double clicks (taps) and long clicks (long taps, "touch and hold") are supported since v4.4.2.
- Mouse drags are mapped onto swipes.
- Mouse wheel events are not supported and they are ignored.
- Other touch screen gestures may be supported through Mobile command.
Keyboard Support
The connection achieves typing in two ways:
- Direct interaction with the editable element returned by the backend WDA component. It is supported since Robot 7.0.2. Typing of larger strings from a script is very fast because the text is rather pasted than typed. Multibyte (non-English) characters are fully supported. Note that this method may fail for custom input elements which WDA fails to identify as text ones.
- Simulation of taps on the soft keyboard. A map of the soft keyboard is created on startup and the connection types by touching the keys. It is the only way for Robot 7.0.1 and older. Version 7.0.2 and newer use it only to support extra keys (Dictation, ...) and as a fallback mechanism when WDA fails to return the editable element. Typing through the soft keyboard is slow. Only characters available on the keyboard are supported. For details see the Soft Keyboard chapter below.
Hardware key mappings:
iOS Hardware Key | Robot Script Key (Action) | Description |
|---|---|---|
HOME | Home, Right mouse click | Home key. Long press and double Home press is not supported. |
| <screen rotation> | F4 | Rotate the screen from Portrait to Landscape Left or vice versa (since 4.4.3) |
| POWER | F10 | Press the Power button. It works well for a single press (lock & dim the screen) and triple press too (start/stop voice over). Supported since 7.2.4. It does NOT work for double press required for an app installation. This seems to be an Apple intentional security measure to prevent apps from installation of other apps |
| SNAPSHOT (POWER+HOME) | F11 | Take a snapshot of the screen (hold Power+Home). Supported since 7.2.4. |
Soft Keyboard
Other keys are simulated through the soft keyboard. The connection acts as an end user, i.e it switches through the keyboard pages and taps individual keys (characters). Rules:
- The keyboard must be visible to type anything. Typing while the keyboard is off will be ignored.
- Only one keyboard locale (language) is supported at a time. Do not switch among keyboards manually during automation as it will result in wrong keys being typed.
- The connection supports only keys that are on the current keyboard.
- Some keys may not be available when the device is in the portrait mode. For example, you can't press the "Hide keyboard" key on iPhone in the portrait mode because the keyboard contains it only in the landscape one.
- Extra keys from the list displayed on a long key press are not supported.
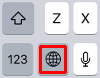
- The Emoji keyboard is not supported. The workaround is to automate using mouse clicks.
- The connection defaults to the Safari keyboard map. Some applications however customize the keyboard layout which may result in typing failures. Use the LoadKeyboard and RemapKeyboard scripts from the iOS Over Xcode Extension plugin to fix it from a test script.
Most keys on the soft keyboard are equivalent to the PC keyboard (a-z, A-Z, 0-9 etc.). The outstanding soft keyboard mappings are summarized at the table below. Availability of the keys marked with a red asterisk may be subject to the device type and screen orientation.
iOS Keyboard Key | Robot Script Key (Action) | Description |
|---|---|---|
ENTER, GO | Enter (new line) | The Enter key. |
DELETE | Backspace, Delete | Backspace key. Deletes characters before the insertion point. |
| Up (Arrow Up) | The shift key switches the keyboard to shifted characters.It's label and/or appearance changes depending on the keyboard page.You don't have to press this key manually to type a shifted characterbecause the connection will switch it on its own. |
| Right (Arrow Right) | The shift key switches the keyboard to the next keyboard page.It's label and/or appearance changes depending on the keyboard page.You don't have to press this key manually to type a character from another pagebecause the connection will switch it on its own. |
| F5 | The key switches to the next keyboard locale. As the connection supports(maps) just one locale you may interact with the next keyboard only through taps.To restore the typing support you must switch back to the base keyboard locale. |
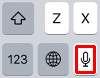
| F6 | Starts dictation. |
Keyboard Mapping
The connection performs soft keyboard mapping on the start up. It is a process where it displays all pages (called "layouts") of the current keyboard and records location of its keys. As this is a slow operation it is recommended to enable storing of the map to a file. The mapping will be performed just once and the subsequent connections will reuse it. Be aware that any keyboard change will invalidate the map, namely switching to another locale (language). Update of the iOS may also introduce changes which invalidate it.
The initial keyboard mapping is performed against the keyboard displayed for the URL field of the Safari browser. As other apps may use a different set of keyboard keys or customize the keyboard the Safari map may not work properly. To fix it use the the iOS Over Xcode Extension plugin features:
- The LoadKeyboard script allows to load a keymap file.
- The RemapKeyboard performs an immediate remapping of the keyboard displayed on the device screen. It is much slower than LoadKeyboard but it saves you from having to create the keymap files.
To view and edit the keyboard map files use the Desktop -> iOS Over Xcode Keymap Editor window:
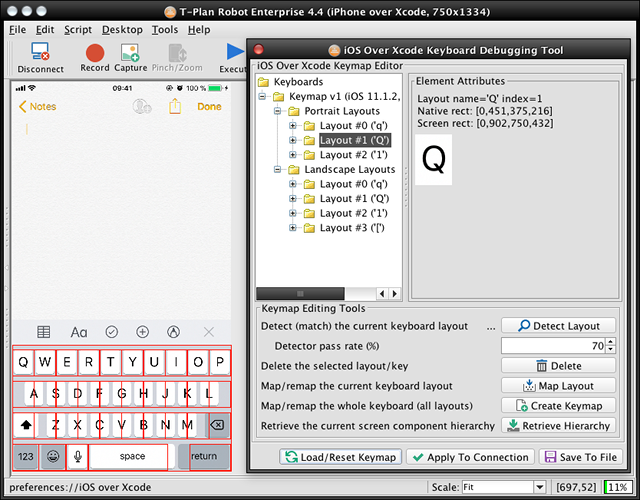
- To identify the currently displayed layout select Detect Layout.
- The Create Keymap button will repeat the whole mapping process to create a new keyboard map.
- To recreate or fix an individual layout displayed on the device screen select Map Layout. For example the 'Q' layout in the above screen shot is not applicable to the Notes application because Safari adds a few extra keys to it. To make the characters type properly it must be remapped.
To add a missing layout use Map Layout. For example the map above contains just three portrait layouts. To add the '[' one make it displayed on the screen and map it.
- Use Delete to delete keys you want the scripts to ignore. Though you may also delete layouts it's not recommended unless you are about to recreate them.
- To apply the changes to the current connection session click Apply To Connection.
- To save the changes to the default keymap file in the Robot configuration folder click Save To File. The map will be loaded by the subsequent connections if the stored keymap flag is enabled.
- To save the changes to another file click Save As. This allows you to create files to be used with the LoadKeyboard script.
To delete the default map file and eventually re-create the default Safari one:
- Open the Login Dialog, select the "iOS Over Xcode" connection and click the "..." button next to the "Device name" field
- The window will show the list of devices connected over USB and indicate whether a device keyboard map has been created. Use the "Delete Keyboard" button to delete the invalid keyboard(s).
- Connect again with the stored keymap option enabled to create a new Safari map.
WARNING: The connection forces the screen orientation change during the keyboard mapping process. As this step sets off the built-in gyroscope you won't be able to change the screen orientation by manual device rotation. To re-enable this functionality re-plug the device to the USB and avoid programmatic orientation change through reconnection using the stored keyboard. Yet another option is to disable screen rotation completely.
System Alert Handling
To handle system alerts (pop ups) use the Mobile alert command.