SQLDb
SQL Database Plugin For T-Plan Robot Enterprise
Contents:
1. Overview
2. Plugin installation
3. Usage
1. Overview
The SQL Database Plugin allows T-Plan Robot Enterprise test scripts to interact with SQL databases over the JDBC connection.
The plugin addresses primarily test scripts written in the TPR language. Though the functionality can be also called from Java test scripts, it may be easier to use the JDBC API directly. To call the plugin scripts from Java either use the DefaultJavaTestScript.run() method or use the script instance approach described in the Java Test Script Basics document.
The plugin is provided "as is" with the full source code. It can be freely modified and reused. To make the code compile in an IDE such as NetBeans or Eclipse put the robot.jar file from the T-Plan Robot Enterprise installation folder onto the project class path.
Should you have any questions or suggestions contact the T-Plan support. For the list of other plugins provided by T-Plan go here.
2. Plugin installation
The plugin requires T-Plan Robot 3.2 or higher. To install it:
- Download the plugin from https://downloads.t-plan.com/releases/robot/plugins/tprdb_v1.zip
OPTION 1:
- Unzip the file and copy the tprdb.jar file to the plugins/ directory under the Robot installation directory. This will make Robot load the classes on the start up.
- Start or restart Robot.
OPTION 2:
- Unzip the file to a location on your hard drive.
- If you plan on using the plugin in the TPR scripts put the following command to the beginning of each test script:
Include "<location>/tprdb.jar" - If you plan on using the plugin in Java test scripts put the tprdb.jar file onto the Java class path.
To uninstall the plugin simply delete the file.
3. Usage
The plugin contains five Java test scripts:
Script Name | Description | Return Value |
|---|---|---|
com.tplan.db.Connect | Create a connection to the specified database. | 0 on success1 when the JDBC driver is not available2 when the connection fails |
com.tplan.db.Execute | Execute a SQL statement. | 0 on success1 when no connection has been created2 when the statement fails to execute |
com.tplan.db.Commit | Commit the transaction. | 0 on success 1 when no connection has been created2 when the commit operation fails |
com.tplan.db.Rollback | Roll back the transaction. | 0 on success1 when no connection has been created2 when the rollback operation fails |
com.tplan.db.Disconnect | Disconnect from the database. | Always returns 0 |
The plugin scripts are to be called from TPR test scripts using the Run command. The command instances may be easily created using the Command Wizard tool. To edit an existing Run command right click it and select Properties in the context menu.
To establish a database connection you will need to download the JDBC driver and find out the driver class name and the database URL:
- Java DB and MySQL - see the JDBC Tutorial
- See Example 1
- Microsoft JDBC Driver 4.0 for MS SQL Server
- When installed please read the instructions for which .jar file to use in: "C:\Program Files\Microsoft JDBC Driver 4.0 for SQL Server\sqljdbc_4.0\enu\help\default.htm"
- The above note obviously presumes that you have installed JDBC Driver 4.0 installed. Please alter path if another version has been installed
- See Example 2
- When installed please read the instructions for which .jar file to use in: "C:\Program Files\Microsoft JDBC Driver 4.0 for SQL Server\sqljdbc_4.0\enu\help\default.htm"
- Oracle DB JDBC drivers
- Pick up the ojdbc6.jar file for your DB version
- See Example 3
- For other databases contact the DB vendor (producer).
The driver is typically distributed in form of a JAR file. To make it visible to Robot use one of the following alternatives:
- Load it using a call of Include (the example case).
- Copy it to the plugins/ folder under the Robot installation directory (requires Robot restart).
- Put the JAR file path on the class path of the Robot's start command.
The plugin by default pools the database connections. It means that any created connection will exist until it gets closed explicitly through a call of com.tplan.db.Disconnect or until Robot terminates. When another script calls the Connect to the same database it receives the pooled connection instead of a new one. This has two distinct advantages:
- It saves time in the test script development phase where one needs to execute the script or its parts often.
- It allows fast switching among connections where the test script needs to work with more than one database at a time.
The pooling mechanism is not synchronized. It means that if two test scripts executing in parallel connect to the same database they may end up using the same connection. That's why the pooling mode is not intended to be used in environments executing multiple automated testing processes in parallel inside one JVM. To set off pooling pass the pool=false parameter to the com.tplan.db.Connect call. The connection will not be pooled and it will be closed automatically after the script finishes unless it gets closed explicitly earlier.
The JDBC framework by default creates every new connection with the activated auto-commit mode. This means that each individual SQL statement is treated as a transaction and is automatically committed right after it is executed. To suppress this behavior pass the autocommit=false parameter to the com.tplan.db.Connect call and then manage the transactions from the script using the com.tplan.db.Commit and com.tplan.db.Rollback calls.
All plugin scripts except for the Disconnect one handle any experienced DB errors as follows:
- The error is logged to the execution log.
- The _DB_ERROR variable is populated with the error description.
- The script returns a non-zero exit code.
- The calling script is terminated through a call of the Exit command. To suppress this behavior start the connection with the "makefail=false" parameter. When using this mode it is recommended to test the return value of each DB call and take any appropriate action when a failure is detected.
To query data using the SQL SELECT statement use the com.tplan.db.Execute script. The resulting data is exposed to the calling test script in form of variables:
Variable Name | Description |
|---|---|
_DB_COLUMN_COUNT | Number of columns resulting from the SQL SELECT statement. |
_DB_ROW_COUNT | Number of rows resulting from the SQL SELECT statement. |
_DB_VALUE<row>_<column> | The value at the specified row an column. For example, the _DB_VALUE_2_3 variable will contain the third value of the second row of data. |
Example 1: Java DB instance (Derby)
The following example shows a test script which connects to the embedded Java DB instance (Derby), creates a table called "dummy", populates two rows, queries the table content and prints out the retrieved values from the _DB_VALUE variables. You may execute the example right away provided that you have JDK installed and that you set the Include path to derby.jar correctly.
# Load the JAR file with the JDBC driver class for Java DBInclude "C:\Program Files\jdk1.6.0_31\db\lib\derby.jar"# Connect to the databaseRun "com.tplan.db.Connect" driver="org.apache.derby.jdbc.EmbeddedDriver" url="jdbc:derby:testdb;create=true"# Create the "dummy" table and populate it with dataRun "com.tplan.db.Execute" statement="create table dummy (pid int, Name varchar(20))"Run "com.tplan.db.Execute" statement="insert into dummy values (1, 'Value')"Run "com.tplan.db.Execute" statement="insert into dummy values (2, 'Another value')"# Query the table contentRun "com.tplan.db.Execute" statement="select * from dummy"
# Iterate over the data and write the values into the execution logfor (row=1; {row} < {_DB_ROW_COUNT}+1; row={row}+1) { for (column=1; {column} < {_DB_COLUMN_COUNT}+1; column={column}+1) { Log "Value at [row, column] = [{row}, {column}]: \"{_DB_VALUE_{row}_{column}}\"" }}# Close the database connection.Run "com.tplan.db.Disconnect"
Example 2: SQLExpress DB instance
The following example connects to a MS SQL Server database:
# Load the JAR file with the JDBC driver class for SQL Server DBInclude "C:\Program Files\Microsoft JDBC Driver 4.0 for SQL Server\sqljdbc_4.0\enu\sqljdbc4.jar"# Connect to the databaseRun "com.tplan.db.Connect" driver="com.microsoft.sqlserver.jdbc.SQLServerDriver" url="jdbc:sqlserver://localhost\SQLEXPRESS;DatabaseName=<dbName>;UserName=<SQLusername>;Password=<SQLpassword>
Example 3: Oracle DB
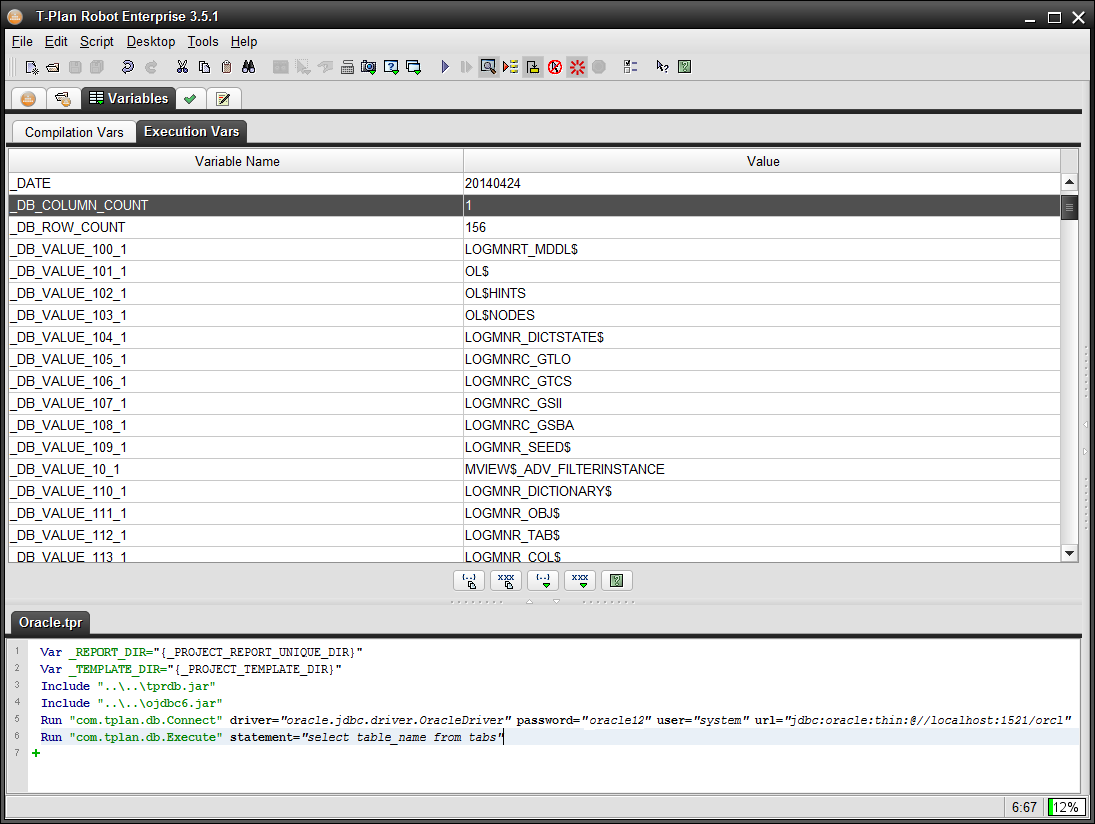
The following example connects to the default Oracle database (orcl) running on the local machine and queries names of all tables:
// The Include commands presume that the JAR files are in the
// same folder as this script
Include "tprdb.jar"
Include "ojdbc6.jar"
// Connect to locally running Oracle as system
Run "com.tplan.db.Connect" driver="oracle.jdbc.driver.OracleDriver" password="oracle12" user="system" url="jdbc:oracle:thin:@//localhost:1521/orcl"
// List all table names
Run "com.tplan.db.Execute" statement="select table_name from tabs"
After the scrips gets executed successfully the variables can be viewed in the Execution Vars table: