Automatic Initiation
In the previous topic we discussed manual execution in the T-Plan Robot Enterprise GUI. It however doesn't make much sense to run scripts this way all the time. In an ideal automation scenario we want to develop a script and then integrate Robot with the system scheduler or a Test Management tool to execute it automatically against new AUT builds and/or at scheduled intervals.
T-Plan Robot Enterprise offers two integration interfaces, the command line interface (CLI) and the programming Java API. For the purpose of this topic we will define automatic execution as an unattended script execution started from the command line interface (CLI) .In simple words, you pass the necessary parameters through the CLI options and T-Plan Robot will execute the script and report the result. The most important CLI options (switches) are:
-r/--run specifies the script file to be executed and it is the only mandatory switch for automatic execution. It accepts both plain scripts (typically .tpr extension) as well as Java source code ( .java ). The file may be either absolute (with full file path given) or relative to the installation folder.
-c/--connect defines the target environment (remote desktop) to connect to. As scripts may also connect on their own through the Connect command, this parameter is optional. The argument must be a valid URL in form of [protocol]://[server]:[port] . The protocol is mandatory and defines the desktop technology. For example, to connect through VNC use "RFB" or "rfb". The server name is also mandatory and it must be either a resolvable server name, a numeric IP address or the loop back name ("localhost"). The port is optional and if omitted the tool falls back to the default port number for the given technology (5900 for VNC). If the server requires a user name or password, they must be specified through the -u/--user or -p/--password options.
- -n/--nodisplay suppresses the GUI and runs in CLI only (so called "CLI mode"). Advantages of this mode are lower memory requirements and ability to run on terminals without graphic environment. Disadvantages are limited control over the execution and missing visual contact with the desktop.
- Behaviour of the script and/or the tool itself may be customized through the -v/--variable (already mentioned in one of the previous topics), -o/--option , fromlabel , tolabel and --nooutput switches.
Leveraging the power of automatic execution of Robot scripts/Schedules really opens the boundaries as to the possible uses of the tool. It also allows it to segue nicely into many existing frameworks, often without any disruption.
Let's demonstrate the CLI functionality on the calculator.tpr script . In the examples so far we have executed the script on a local VNC server running on port 5901 on Ubuntu Linux and on a VNC server running on a Windows XP virtual machine with IP 192.168.100.3. To execute the script one would run:
- Linux:
java -jar robot.jar -r calculator.tpr -c rfb://localhost:5901 -p welcome -v OS=Linux - Windows:
java -jar robot.jar -r calculator.tpr -c rfb://192.168.100.3 -p welcome -v OS=Windows
These examples presume that the calculator.tpr script is located in the T-Plan Robot Enterprise installation folder and that the VNC server password is "welcome". As the -n/--nodisplay switch is not specified, the GUI opens up and shows a simple window with the start time out (15 seconds by default). Then the script gets executed. In this phase you are free to interact with the GUI and interfere with the script in any way; be however aware that any such action will turn the execution into a manual one and the tool will not exit automatically. Unless this happens and the script finishes on its own, the tool counts down the shut down timeout, dismisses the GUI and terminates the application. It returns to the underlying OS either the default value of 0 (zero) or the custom value specified by the script through the Exit command.
When the example commands are run with the -n/--nodisplay switch, the sequence is similar save that the progress is reported into the console (command prompt). The tool counts down the start timeout first. Unlike in GUI this step can not be skipped. While the script is being executed, it may only be stopped through Ctrl+C or resumed when the script pauses the execution through the Pause command. When the script finishes, the shut down sequence is counted down and the application exits.
The start and shut down time outs are intended to provide an opportunity to interrupt the automatic process before the script is started or to prevent the application from exiting. The time out values are configurable through the Scripting->Execution panel of the Preferences window. To switch off a time out set its value to zero. To set a custom time out value temporarily for a particular script execution use the -o/--option switch. For example, to set up the start time out to 3 seconds include "-o scripting.delayBeforeAutomaticExecutionSeconds=3" in your command.
CLI Wizard
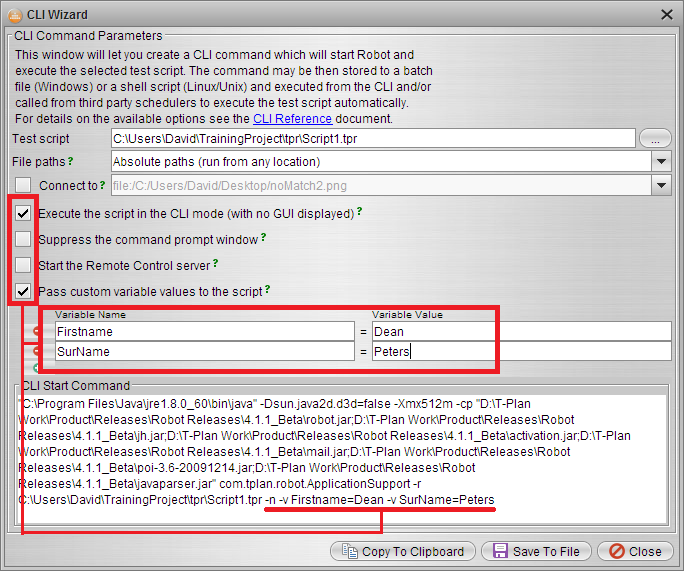
The required CLI call can obviously be created manually and saved in the desired calling container (.bat, third party tool etc) or you can utilize Robots CLI Wizard for both script and Schedules.
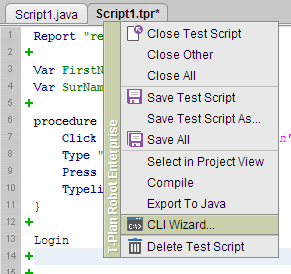
The Script CLI Wizard can be found either under the Tools main menu option or via the Rich Click Menu on the script tab:
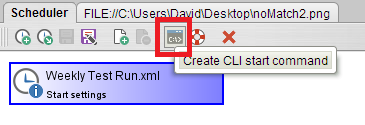
The Schedule CLI Wizard is accessed through the Schedules mini toolbar:
Once the wizard has been initiated you can make the desired changes using the selection fields available. You can also use this wizard to define any custom variable values that you wish this particular script execution to utilize.
Any modifications and values entered are simply used to construct the full CLI call in the lower window. The entire call can then either be copy/pasted to the desired location or saved to a runnable file i.e. .bat.