capture
Component Capture
Contents:
1. Overview
2. Version 4
3. Version 3
1. Overview
Component Capture helps the script developer generate an automated scripted action in a simple way. The feature was updated in the 4.0 release but the legacy 3.x functionality is still available.
- Component Capture v4 uses a wizard which creates the target action in three or four simple steps.
- Component capture v3 uses a single screen dialog. This process is faster but is less user friendly, it exposes less action parameters and it is not intuitive for "search by color" and OCR actions.
Both the v4 wizard and the v3 dialog provide a button allowing to switch to the other version. This preference is remembered and the chosen capture version is then used for all action unless the user switches the versions again.
Component Capture gets activated through the ![]() Capture tool bar button or the corresponding item of the Script menu.
Capture tool bar button or the corresponding item of the Script menu.
2. Version 4
Selection of the ![]() Capture tool bar button opens the Component Capture Wizard. The first Action Type screen allows to choose the action type and subtype.
Capture tool bar button opens the Component Capture Wizard. The first Action Type screen allows to choose the action type and subtype.
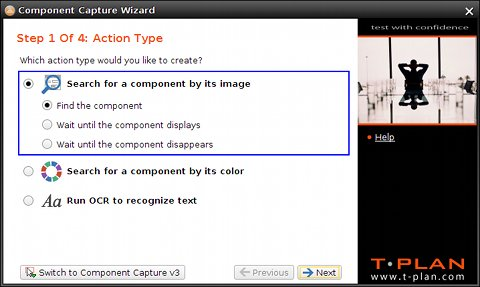
Supported types:
- Search for a component by its image creates an action based on the "search2" image comparison method. It looks for the component on the screen by its template image.
- Search for a component by its color searches for the component by the specified color, minimum and maximum sizes. It relies on the "object" image comparison method.
- Run OCR to recognize text will employ the OCR engine to identify the component by its text. It uses the "tocr" image comparison method.
The action subtype defines which image comparison command will be used to identify the component:
- The first "Find <subj>" subtype will generate a call of the Compareto command to perform one time comparison.
- The second "Wait until the <subj> displays" subtype will utilize the Waitfor match command to perform the comparison repeatedly until the component gets identified or the specified time out is reached.
- The second "Wait until the <subj> disappears" subtype will employ the Waitfor mismatch command to perform the comparison repeatedly until the component disappears from the screen or the specified time out is reached.
When the selected action requires a template image (such as the Search for a component by its image one) the wizard continues with the Component Image(s) screen. This screen may not be available when the image or images are already known, for example when the wizard gets opened for an existing image or image collection displayed in the Component Images branch of the Project View.
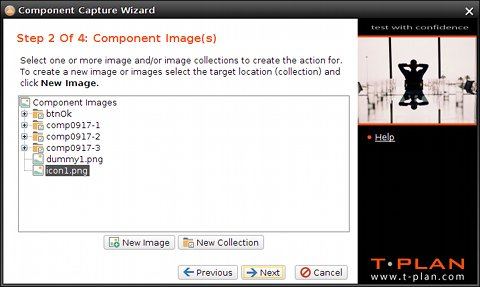
It supports a set of actions allowing to define the template image(s) and/or image collection(s) (folders) to be involved in the search. It's functionality is similar to the Component Images branch of the Project View:
- To create a new collection (image folder) click New Collection
- To create (crop) a new component image from the current desktop screen click New Image
- To continue select one or more images or image collections in the tree and choose Next
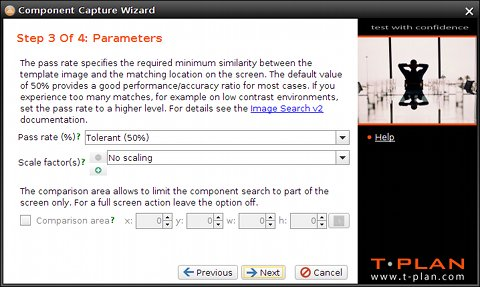
The next Parameters screen is dynamic and shows parameters of the selected action type and subtype (the selected comparison method and command):
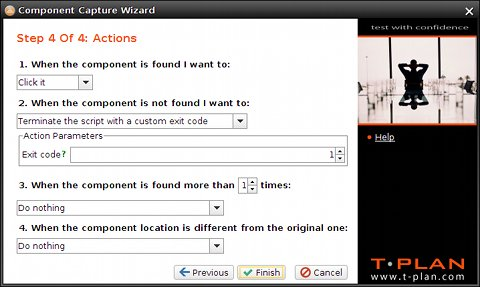
The final screen defines what to do with the identified component. There are multiple options allowing to click, right click or double click the component or make the action just verify the component existence. The screen also allows to define error handling such as what to do when the component is not found, there are multiple instances (match locations) on the screen or when the component location is different from the original one.
3. Version 3
Component Capture v3 is typically used to cut image of a component (button, field, text, ...) from the current desktop image, save it to the project template folder and generate a piece of code working with the image into the active script editor. Though it can also be used for the "search by color" and OCR actions it requires the user to pass the initial cut area selection screen which is then used to limit the action to (so called "comparison area").
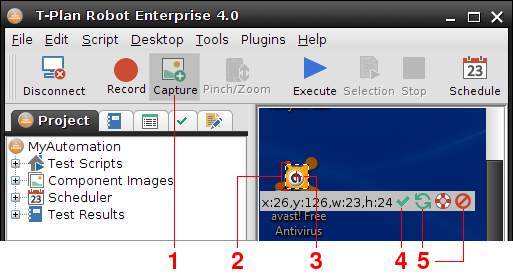
- To activate the Component Capture mode select the Component Capture
 button on the tool bar or the Tools->Component Capture menu item. The desktop image freezes and turns gray save for the default capture area. To cancel the capture mode simply click (deselect) the button or menu item again.
 - To adjust the capture area drag its corners or dashed side lines. To move the area perform a mouse drag with either Ctrl, Alt or Shift pressed. It is recommended to create the component images as small as possible to improve performance and increase accuracy.
- The red cross located in the center of the capture area is called click point. It can be also dragged and it defines where to click when the component is found on the screen. The click point may be even dragged out of the capture area to automate tasks such as "click XY points in this and this direction from the component".
- Once you are satisfied with the capture area and the click point location, select the OK button to proceed to the Component Capture window.
- While selecting you may cancel the current capture area through clicking on the red cross Cancel button. To recreate the area somewhere else simply drag your mouse in the image (move mouse while holding the left mouse button). To cancel the whole action click the rightmost Exit button.
The Component Capture window defines the target template image file and the task(s) to be carried out by the script:
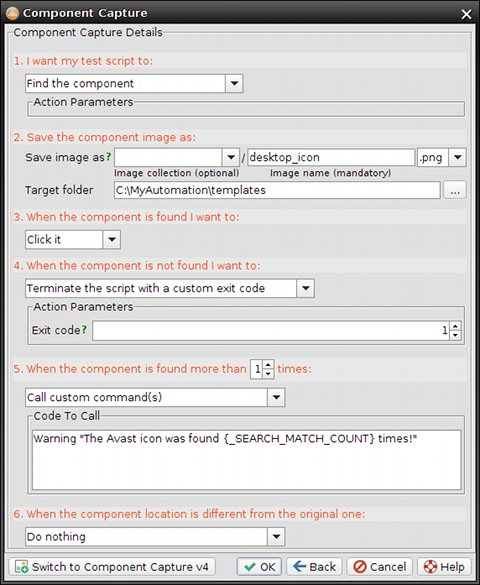
- The first group defines the task to be carried out with the selected area. It may be saved to a template image for the Image Search purposes or used as an area of interest for the OCR or Object Search. Some actions may have additional parameters which display dynamically below the drop down. For example, the "Wait until the component displays and click it" action has a configurable timeout.
- The second group of controls specifies collection, name and target folder for the component image file. It is not visible if the selected task is an OCR or object search one. The Image Collection field is optional and allows to create a new subfolder (collection) for the component images. The drop down is pre-populated with folders available in the target one. When the collection is defined, the image comparison will process all images in the specified directory (or its subdirectories). To read more about collections read the Image Collections chapter of the scripting language specification. The Image Name is mandatory and defines the image file name without extension. The format and extension is derived from the Extensions drop down next to the field. The Target Folder is by default set to the template directory defined by the TEMPLATE_DIR variable in the script. Images and collections residing under this directory will be called through a relative path. For example, the parameters displayed in the picture instruct the window to create a new component image desktop_icon.png under the _C:\MyAutomation\templates template path.
- The third group defines what is to be done when the task is successfullycompleted, that is when the component was found (image search tasks), when the OCR succeeded to recognize text in the target area and optionally match it against a pattern, or when at least one object of the specified color was found in the area. The most common actions are mouse clicks.
- The fourth group specifies what is to be done when the component is not found on the screen. Similar to the previous control group there's a drop down with a predefined set of actions. The action selected in the picture will make the script finish with an exit code of 1.
- The fifth group defines what to do when multiple instances of the component are found on the screen. The list of supported actions is similar to those available in the previous group. The action selected in the picture will call a custom Warning command which will create a warning note in the script report.
- The last group deals with the component location change. As the original coordinates of the component are saved in the image file meta data, the script allows to test whether the component has moved and associate it with an action. The one selected in the picture will ignore any location changes.
- To close the window, save the component (template) image and insert the corresponding script code into the active editor select the OK button. To go back to the previous desktop view with the capture area click Back. To cancel the window, discard any changes and switch off the Component Capture mode select Cancel. To open this help topic select Help.
For example, when closed with OK the window above inserts into the active editor:
WaitFor match template="desktop_icon.png" method=search2 timeout=20s
if ({_EXIT_CODE} > 0) {
Exit 1
} else if ("{_SEARCH_MATCH_COUNT}" > 1) {
Warning "The Avast icon was found {_SEARCH_MATCH_COUNT} times!"
} else {
Mouse click to=x:{_COMPARETO_CLICK_X},y:{_COMPARETO_CLICK_Y}
}