codetemplates
Code Templates
Contents:
1. Overview
The Code Template framework allows to speed up script writing through inserting of reusable pieces of code (so called "code templates"). The code template support consists of three parts:
- Code template data files,
- Code Template Wizard,
- Code Template Editor.
2. Code Template Data Files
The code templates are stored in a plain text file which complies with the Java Properties format. T-Plan Robot Enterprise is distributed with a set of default code templates which are packed inside the binaries and loaded automatically. Any custom modifications to the code templates through the Code Template Editor window are stored to an external file called RobotCodeTemplates.properties and saved to the user home folder. The file can be then copied to another environment and imported using the Import button in the Code Template Editor window. This system is intended to support situations where one person creates code templates for the whole team or company to enforce a certain process and/or format.
3. Code Template Wizard
The Code Template Wizard allows to select a code template and insert it into the current position of the script editor. The wizard can display in two modes, the List Mode and the Menu Mode.
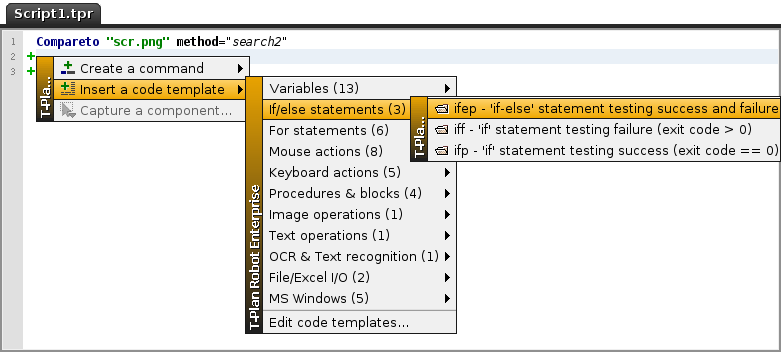
Menu Mode This mode is suitable for inserting of full line templates into empty editor lines. To open the Code Template Wizard menu do one of the following:
- Click the icon to the left from an empty editor line and select the Insert a Code Template menu item.
- Right click an empty editor line and select the Insert a Code Template menu item.
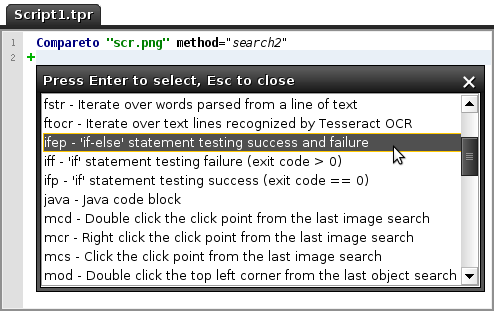
The template menu is sorted by categories where one code template may be present in one or more categories. Each template is identified by a unique short cut key which allows fast template selection in the List Mode. The template short cut key typically starts with a letter which identifies the category, for example all If/else Statements templates start with the letter of 'i'. List Mode To open the Code Template Wizard in form of a list of all available templates press Ctrl+I in the script editor. The list can be operated as follows:
- Use the arrow keys or the mouse wheel to navigate through the list. You may also type the shortcut key or its part (such as the "ifep" one on the picture) to jump to a particular template or a category.
- To insert the selected code template into the editor press Enter or click it with the mouse
- To cancel the wizard press Escape (Esc) or move the mouse pointer outside of the template window.
4. Code Template Editor
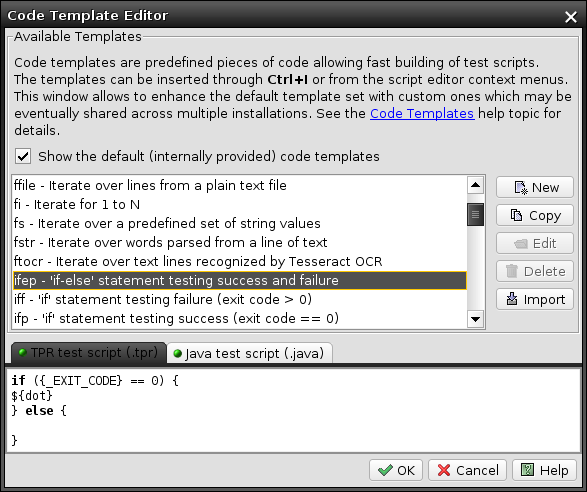
The Code Template Editor allows to create custom code templates. To open the editor window do one of the following:
- Select the Edit -> Code Templates... item in the main application menu.
- Click the icon to the left from an empty editor line or right click the line, select Insert a Code Template menu item and click the Edit code templates... menu item.
The editor by default shows the complete list of all available code templates including the internal ones created by T-Plan. this behaviour can be changed though the Show the default code templates check box. The internal templates can not be changed but they can be re-saved through the Copy button to a different short cut key and then changed. The Import button allows to import code templates from a data file as is described in the Code Template Data Files chapter. To save the changes it is necessary to close the window with the OK button.
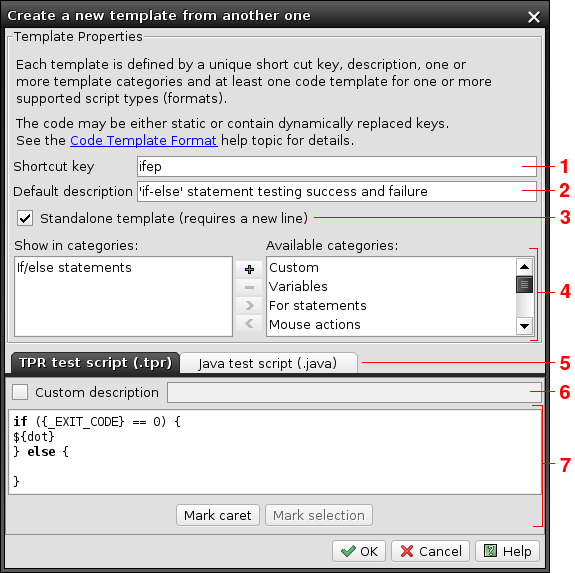
To create a new template select the New button. Alternatively select the Copy button to create a copy of the selected template. Both buttons open the template editor as follows:
- The Shortcut key is a unique template identifier. To keep the templates well organized it is recommended to set the first letter to the one typical for the selected template category. This system allows easy identification of the template in the List Mode of the Code Template Wizard.
- The Default description will be displayed by the wizard. Keep it short.
- The Standalone template check box controls how the template gets inserted into the editor. When the check box is on the template will be always created on a new line. When the check box is off the template will be just inserted into the current caret position. This mode is suitable for small "word" templates which are typically inserted into an already existing command and/or method call, for example a paramater value or a call of a frequently used variable.
- The template category list allows to associate the template with a particular functional category. Each template must have at least one category. To create a new category use the button. To delete an existing custom category select the button. The default categories can not be changed or removed.
- Inline templates (the Standalone template check box is off) may declare one or more value types they represent. For example, a code template intended to be used where a number is expected may be declared as the INT and/or FLOAT type. Templates that declare at least one value type will be shown in the custom input mode of the command/method call property window for parameters of the same type. The list of supported value types:
Value Type | Description |
|---|---|
BOOLEAN | The boolean value type ('true' or 'false'). It is shown in the GUI as a check box or a radio button. |
COLOR | A color. It is shown in the GUI as a drop down with the default set of colors and a button allowing to add custom ones. |
COLOR_FROM_IMAGE | A color. It is shown in the GUI as a drop down with the default set of colors and a button allowing to add a custom color and/or select a color from the desktop screen. |
COLOR_LIST | A list of colors. |
DIRECTORY | A directory. The GUI shows this value type as an editable text field with a button allowing to select a directory from the local file system. |
FILE | A file. The GUI shows this value type as an editable text field with a button allowing to select a file from the local file system. |
FILELIST | A list of files. |
FLOAT | A floating point number. It is shown in the GUI as a number field. |
INT | An integer number. It is shown in the GUI as a number field. |
INT_DISPLAYED_AS_BOOLEAN | An integer number which is interpreted as a boolean value of "false" (the value of 0) or "true" (any other value). |
KEYSTROKE | A key stroke, for example "Ctrl+C". It is shown in the GUI as an editable text field with the record and Keyboard Tool buttons. |
PASSWORD | A password. It is shown in the GUI as a password field. |
POINT | A point (location) defined by the x and y coordinates. It is shown in the GUI as a pair of number fields together with a button allowing to select a point from the desktop screen. |
RECTANGLE | A rectangle defined by the x, y, height and width coordinates. It is shown in the GUI as a set of four number fields together with a button allowing to select a rectangle from the desktop screen. |
REGEXP | A java.util.regex.Pattern compliant regular expression. It is shown in the GUI as an editable text field with a button allowing to construct the expression from elements. |
STRING | A string. It is shown in the GUI as an editable text field or as a drop down. |
STRINGLIST | A list of strings. |
STRING_WITH_ACTION | A string. It is shown in the GUI as an editable text field together with a button allowing to implement a custom value selector. |
TEXT | A text. It is shown in the GUI as an editable text area (a field with multiple lines). |
TIME_INTERVAL | A time interval, such as "10s" (ten seconds). |
- There is a code editor for each of the supported script formats, TPR (.tpr) and Java (.java). A valid template must provide code for at least one of the formats or for both.
- The optional Custom description field allows to override the default description (2) with a format specific one. When populated the description will be shown by the Code Template Wizard opened for the associated script format.
The template code should be provided without any indent (leading spaces) which will be created automatically. The code may be either static (plain text) or dynamic with parameters. The list of supported marks (parameters) follows:
Parameter
Description
1 ${dot}
Marks the position where to put the dot (caret) in the script editor after the template code is inserted. When used together with ${mark} it defines the end of text selection. To insert this mark you may optionally use the Mark caret button below the editor.
2 ${mark}
Marks beginning of the text to select (highlight) in the script editor after the template code is inserted. It must be used in combination with ${dot}. To insert this mark you may optionally use the Mark selection button below the editor. Text selection may be optionally used to select a value or an expression which is expected to be rewritten right after the template insertion into the script.
3 ${var<N>:name1;..;nameM}
${var<N>}Marks a place where to create a unique variable name. The <N> expression must be the variable ordinary number starting from 1, for example var1, var2, etc. The first mark of the N-th variable must contain the colon (:) followed by the semicolon separated list of one or more preferred variable names.
This mark allows the template to specify that it needs to create one or more unique variables in a way that doesn't conflict with the existing script code. When the template is being inserted into a script the framework retrieves the list of variables it uses and populates the template with a unique variable name which is not yet used. The preferred variable names serve as a prefix and they are suffixed with an ordinary number if needed. For example consider a simple template which creates a for() statement looping from 1 to 10:
for (${var1:i}=0; {${var1}}<10; ${var1}={${var1}}+1) {}If such a template is inserted into a script which already uses the 'i' variable for another purpose the framework creates a unique variable name as 'i2' and inserts the template as follows:for (i2=0; {i2}<10; i2={i2}+1) {}


