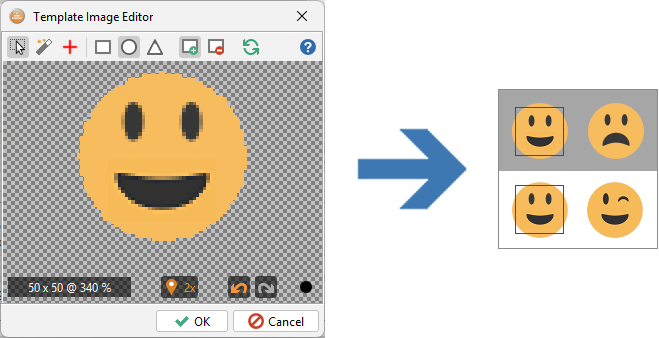
tempeditor2
Template Image Editor v2
Contents:
1. Overview
2. Editor Workflow
3. Transparency Guidelines
1. Overview
This document describes the new image editor delivered in release 8.1. It addresses improvements of the "search2" image comparison algorithm, in particular support of non-rectangular images. The editor allows to remove irrelevant pixels from the image by making them transparent. The "search2" algorithm then ignores all transparent or translucent areas when looking for a match on the screen. This approach allows to create template images without the background, or ignore certain parts of the object on the image. See the Transparency Guidelines chapter for an example.
Using transparency to mark irrelevant pixels has quite a few advantages. All the information is stored directly in the image file. If you have the original transparent/translucent source icons used for the application under test then you may use them as template images right away. Last but not least as transparency is a standard image feature you can eventually prepare template images in any third party image editor too. Whether you use Gimp or Windows Paint the transparency will work the same way.
Here are the key features of the new image editor:

- The editor supports three edit modes:
- The
 Zoom and Crop mode allows to zoom to the target component and crop its image.
 - The
 Erase mode removes irrelevant image areas with mouse clicks and drags.
 - The
 Click Point mode allows to define the best spot to click, so called "click point". It defaults to the image centre.
- The
- The button group to the right is subject to the selected editor mode. The one displayed in the picture is for the Zoom and Crop one. You may choose among three crop shapes: rectangular, round (oval) or triangle. There are also two buttons to choose between inner and outer crop (remove inner or outer pixels). Removal of inner pixels may be used for bulk erasing of pixels inside the image.
- The
 Reset to full screen image button is visible only if image of the source screen is available. Select it to reset the editor to the full screen image and start anew.
 - The
 Hint button displays a pop up with the current editor mode description.
 - The bottom left field displays the current image size and the zoom factor.
- The
 Match field offers an on-the-fly search of the current template image. It is visible only if the editor is opened from a comparison command property window (CompareTo, Click image, ...) and image of the source screen is available. It shows how many times the current template image can be found on the current screen with the parameters specified in the parent property window. It gets refreshed after every image edit. You may click the field to pop up the Image Search Details window showing the component locations.
 - The Undo/Redo buttons revert or reapply the last image edit. A right click into the image also performs Undo.
- The Zoom slider allows to adjust the zoom level. You can also zoom using the mouse wheel. The Zoom and Crop mode also zooms and centers the screen on a left mouse click.
2. Editor Workflow
Here's the recommended workflow for creation of a new template:
- The editor initially displays in the Zoom and Crop mode with a full desktop screen zoomed to fit.
- Click the approximate location of the component you wish to crop. The editor zooms in and centers to your click location.
- Repeat clicking until the component is zoomed in properly for comfortable cropping. Use right click to undo the zoom step at any time.
- For minor position adjustments drag the mouse while pressing Control to move the image. You may also use the mouse wheel to zoom in or out.
- Choose the most appropriate crop shape and drag the mouse in the image to crop it. Use right click to undo at any time.
- Erase the irrelevant pixels if applicable:
- To remove larger shaped areas use the Zoom and Crop mode with the
 Outer crop option on. Choose the target crop shape (rectangular, triangular or oval) and drag the mouse to define the erase area.
 - To erase individual pixels and/or irregular areas select the Erase mode. Choose the eraser size and then use clicks and mouse drags to erase pixels.
- To remove larger shaped areas use the
- Keep an eye on the Match field while editing the image. Make sure that it displays expected number of objects found on the screen. Undo the edits if there are false matches.
- Each template image has a click point. It tells the calling command which location to click when the component is found on the screen. It defaults to the image center. Should you need to customize it switch to the Click Point mode and click the image to set it. Do this always as the very last step because the click point gets reset by any crop operation.
- Save the template image once satisfied with the result.
3. Transparency Guidelines
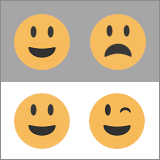
Let's explain how transparency works on a simple screen like:
If you wish to reproduce the examples below:
- Right click the above image and select "Save image as" in your browser pop up menu to download it.
- Start Robot. In the Login dialog select the "Static Image" connection type and enter the image file path. Then click Connect.
- Make sure a script editor is open. Drag a Compareto or a Click image command from the command bar at the right into the script.
- A command property window appears. Choose to create a new template image.
- The image editor with the test screen pops up. Follow the instructions below to reproduce the examples. To see the matching locations click the Match field.
GOAL #1: Find the happy smiley on the gray background
This is the simplest case consistent with older Robot versions. Simply drag the mouse around the first smiley to crop it. The ![]() Match field will show that the "search2" algorithm found that template just once.
Match field will show that the "search2" algorithm found that template just once.

GOAL #2: Find both instances of the happy smiley
To make the template match both smileys we have to remove the gray background. Before we crop the image again let's make a detour and explain translucency. It is quite important to understand it because it affects how reliable your templates will be.
Component images and especially icons today often contain translucent pixels around the object edges. These blend with the background color to produce smooth object curves. Look at the following picture closely. The left image shows a detail of the original smiley icon. We highlighted the translucent pixels in red. The two images on the right are the corresponding crops from our screen showing how these pixels blend with the gray and white background:
![]()
An important take is that translucent pixels in your template image are likely to cause comparison failures on high contrast backgrounds. Robot can handle slightly blended pixels with the pass rate but it's tolerance is fairly low. To achieve predictable results always remove pixels that seem to be blended with the background. Crop the image smaller and try to resort to fully opaque or even single color areas where possible.
Now we can proceed to our example. First select the ![]() button on the toolbar to set on oval cropping. Then drag the mouse to crop the smiley to what is displayed below. Use the right mouse click to undo until you are satisfied with the result and the
button on the toolbar to set on oval cropping. Then drag the mouse to crop the smiley to what is displayed below. Use the right mouse click to undo until you are satisfied with the result and the ![]() Match field shows 2 matches.
Match field shows 2 matches.
GOAL #3: Find all smileys with straight eyes
To find all smileys with matching eyes remove the image part that makes them different - the mouth. Click the ![]() button to switch back to rectangle cropping. Then select the
button to switch back to rectangle cropping. Then select the ![]() Outer crop button to make the crop operation remove the inner pixels. Now drag the mouse around the mouth to crop the mouth as is shown below. Use the right mouse click to undo until you are satisfied with the result and the
Outer crop button to make the crop operation remove the inner pixels. Now drag the mouse around the mouth to crop the mouth as is shown below. Use the right mouse click to undo until you are satisfied with the result and the ![]() Match field shows 3 matches.
Match field shows 3 matches.
To remove the mouth you could eventually use the ![]() Erase mode too. It is however more suitable for free style fine erasing of individual pixels. Rectangular crop is more efficient in this case.
Erase mode too. It is however more suitable for free style fine erasing of individual pixels. Rectangular crop is more efficient in this case.

GOAL #4: Find all smileys on the screen
Similar to what we have done in the previous example remove the eyes to make the template match all the smileys on the screen. Be careful however if comparing this template to a real desktop given that it now consists of only one colour and could therefore potentially match any larger areas of that same, or similar, colour.
