updates
Update & Upgrade
Contents:
1. Update & Upgrade Window
The Update & Upgrade window shows T-Plan products which are available for download and installation. To open the window select Tools -> Update & Upgrade in the main GUI menu.
Plugins are supported since v7.0. Should you be interested in how to create your own ones please read the Plugin Framework document.
The product data is downloaded from the T-Plan release server. If there's no internet connection the window displays a warning message and exits. The products are displayed in form of a tree where releases are grouped by the version (such as for example 2.3, 2.3.1 etc). The list is by default filtered to display just those releases that are compatible with your current operating system. To make the window display products for other platforms use the Preferences (8) or the check boxes (9).
Robot updates and plugins can be installed as follows:
- Cross platform Robot releases (plain ZIP) can install plugins without any limitations.
- Robot for MS Windows (the .msi installer) installs by default to
C:/Program Fileswhich has restricted file permissions. To install any update or plugin you must run it as administrator temporarily:- Locate the T-Plan Robot item in the Windows Start menu, right click it and select "Open file location"
- Right click the Robot shortcut in the Windows Explorer and select "Run as administrator"
- Robot for Mac OS (.app format) must be version 7.0.2 or newer to install plugins. As the application is signed and any file change would invalidate it the plugins are installed to the user home folder instead.
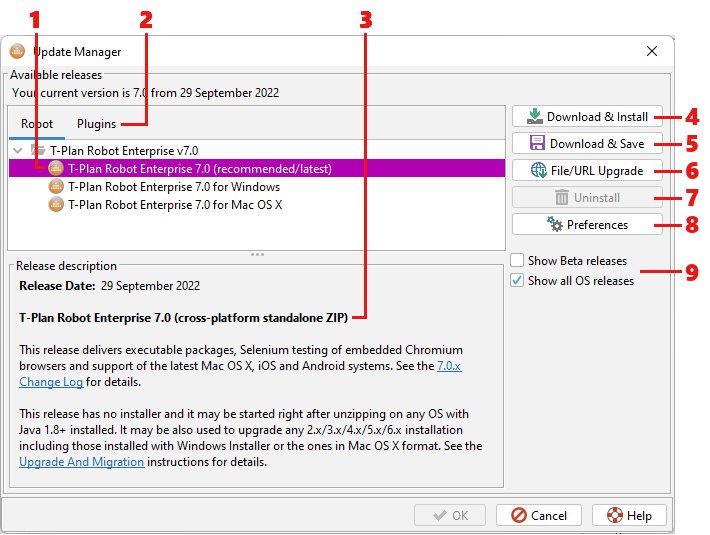
- The release tree shows available releases. The currently installed release is displayed in green and marked as "current". Recommended releases are shown in magenta and highlighted it as "recommended".
- The Plugins tab switches the view to available plugins (since Robot 7).
- The panel below the release tree shows description of the currently selected release.
- The Download & Install button downloads the selected release and either installs it or prepares if for installation depending on whether the product requires a restart or not. Plugins often install right away. Robot updates typically require a restart. No changes are made to the software at this point and the update is applied only after the window is closed with OK and the application gets restarted. The update process is described in details later on in this help topic. The button is enabled only if the selected release is identified as a patch one (typically a standalone release in ZIP format), it is compatible with the local OS and the application has sufficient write permissions to the current installation path. If the button is disabled for a particular release it can be still downloaded through the Download & Save button and installed manually.
- The Download & Save button downloads the selected release and saves it to the local file system. This is designed to support users who intend to create an additional installation from a standalone ZIP release or who prefer to apply the update manually (for example those who create customized company builds or pick up just the Java libraries). This feature also enables to download releases which can not be used for direct update, such as for example releases with Windows Installer (.exe) or releases in Mac OS X application format (.dmg). For instructions on manual installation or update see the Release Notes document.
- The File/URL Update button can be used for manual installation of previously downloaded products or plugins. It also accepts web URLs pointing to a product binary or to a release descriptor. You may be given a custom URL by the T-Plan support.
- The Uninstall button removes an already installed plugin.
- The Preferences button opens the Update & Upgrade preferences in the Preferences window. There are several parameters which control behavior of this window and the Auto Updater feature.
- The check boxes act as short cuts to product filtering preferences.
An update process initiated through the Download & Install button goes through three stages:
- The product binary is downloaded from the release server to the local file system. Each download is checked for integrity through a CRC32 check sum. If the file is corrupted the window displays an error and skips the update.
Downloads are by default stored to an OS-specific temporary location. On Linux/Unix they get deleted after system restart. To save all binaries to a permanent location set up the Download Directory parameter in the Preferences (8). - If the product doesn't require a restart it installs right away. Otherwise an update task is created and configured. It is a standalone thread (routine) which registers with the Java Virtual Machine (JVM) to get called as part of the Java shut down sequence. A successful set up of the update task gets reflected in the GUI. The release tree of the Update & Upgrade window displays the corresponding release in red and marks it as "ready to install". The OK button gets enabled and the Download & Install button changes into Cancel Installation:
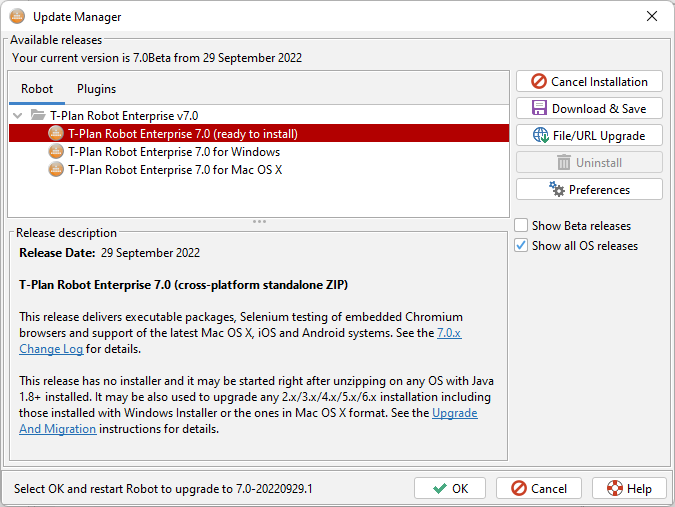
To save the planned update leave the window with OK. - As the update task is called on Java exit the actual update of installed files is not carried out until the application is properly finished through the Exit menu item or through the OS provided Close button in the window header. The update can be cancelled or changed until then through the Update & Upgrade window. Do not kill the Robot application through the system means such as the Task Manager on Windows or xkill on Unix/Linux because it will cancel the update task.
The update is performed in several steps:- A back up directory is created in the OS specified temporary path.
- The update task processes contents of the package and updates the specified Robot installation. A back up copy of each file is created before it gets updated. If the update process crashes with an error it restores the original installation from the back up location.
- A log with the update result and details is displayed in web browser.
TROUBLESHOOTING
If the update fails check the log for errors which are typically in form of a Java exception stack trace. Most update problems are caused by insufficient file permissions. If the update stops on a particular file then check if it is not open in another process and make sure that the update process has the permission to read from and write to the file. If you experience any other errors please contact the support for help.
If the update log does not open in a web browser check the Robot's web browser settings. The log file is named like tpr_install_logXXXXXXXXXXXX.html and it is located in the OS temporary folder (usually C:\Windows\Temp on Windows or /tmp on Unix/Linux). To get the temporary path eventually start Robot's GUI, open Help->About, select the System Information tab and look for value of the java.io.tmpdir property.
If you need to restore any of the original application files, for example if you have customised the start scripts, you may retrieve them from the back up directory which is listed at the beginning of the update log. Be aware that the back up location is likely to get deleted after OS restart.
2. Auto Updater
Auto Updater checks the online release list for updates at configured time intervals. This process runs only when the Robot is started in GUI mode with no automation being executed. If there's a new update release available it displays a pop up message. Since release 7.0.1 this works also for plugins.
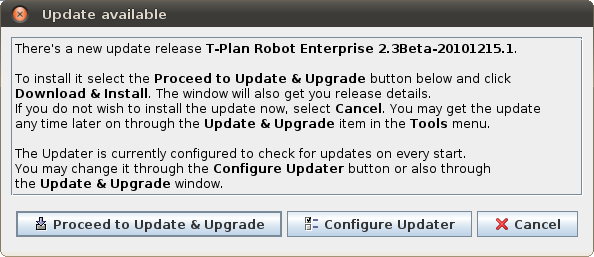
The default time interval is set to 2 weeks. It can be configured in the Update & Upgrade panel in the Preferences window. To disable it set the time period to "Never".