winservice
As Windows Service
1. Overview
2. Service Deployment
3. Environment Connection
4. Service Maintenance
1. Overview
T-Plan Robot Enterprise release 4.3 introduced support of Robot as Windows service. The key principles:
- Running as a system service ensures that Robot gets started after the Windows system boot and gets restarted in case of a crash.
- The service is executing without the GUI which keeps the RAM and CPU requirements low.
- The service gets started with one or both of the following remote control mechanisms:
- The Robot Automation Portal (RAP) server allows the service to be controlled from the RAP portal.
- The Remote Control (RC) server enables remote control with telnet or the RC client application.
- The service receives and carries out requests to execute local scripts and workitems on the specified system.
IMPORTANT: Both RC and RAP use unencrypted communication over TCP/IP. Use these options only in secure environments (intranet).
2. Service Deployment
As Java apps can not be started as a service Robot relies on the NSSM wrapper (nssm.exe). It is packaged inside the Robot installation. Should you need to customize the service feel free to interact with the wrapper directly. To get an idea of how the wrapper is employed by Robot see the command prompt output in the Advanced section of the window below. The easiest way to set up the service is the "Robot as Windows Service" window available from the Robot's Tools menu:
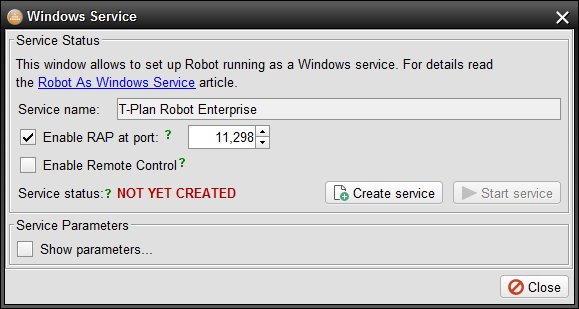
To install the service click "Create service":
- The window will use the packaged NSSM and the currently used Java and Robot installation to set up the service. You may eventually customize the NSSM or Java through the Show Parameters options.
IMPORTANT: Do NOT move or remove any of these three components (NSSM, Java, Robot) after the service gets created or you will break it.
- The service name is fixed to T-Plan Robot Enterprise so that it can be identified.
3. Environment Connection
The service may execute scripts sequentially or in parallel (the max number of parallel processes is subject to the license key or server terms). The scripts may be executed against any supported connection except for the Local Desktop one. This one is not supported because the Java process running in the service mode doesn't have sufficient access rights to the desktop resources. To execute scripts on the service machine desktop use the VNC Server connection as follows:
- Install any of the supported VNC servers on the service machine (UltraVNC, TightVNC, RealVNC). All three products allow to run the server as a service too.
- RECOMMENDED: Configure the VNC server restrict the access to local connections only. This will keep your machine safe from the outside world. To do so open the server admin properties through the system tray and look for the "Allow loopback connections" and "Allow only loopback connections" controls. Alternatively create the loopback IP filter.
- Connect to the local VNC server using the rfb://localhost address.
There are two ways to connect the service to the environment:
- From the script using the Connect command or the connect() Java method call.
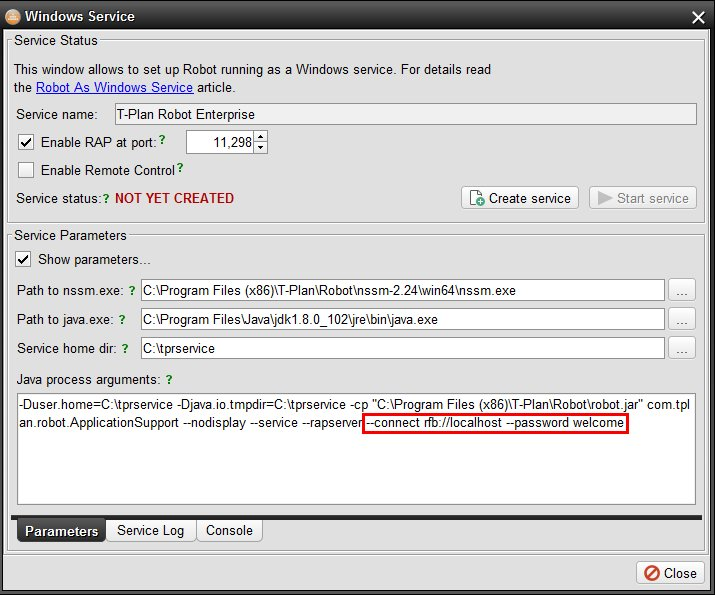
- Through the c/-connect service CLI option (define the default connection). See the example on the screen shot below.
4. Service Maintenance
To perform service maintenance such as the T-Plan Robot Enterprise upgrade, configuration change or license key/server update perform the following steps:
Stop the service to make it release product files.
Construct the Robot starts command using the data from the Windows Service window as follows:
- First copy & paste the path to java.exe. It is recommended to use the same Java that is used for the service.
- Add a space and paste the Java process arguments ending with the com.tplan.robot.ApplicationSupport one. Omit the trailing Robot options. The -Duser.home=<serviceHome> and -Djava.io.tmpdir=<serviceHome> options will make Robot work with the configuration files from the service home folder. For example, with the data from the above screen shot the command will look like:
"C:\Program Files\Java\jdk1.8.0_102\jre\bin\java.exe" -Duser.home=C:\tprservice -Djava.io.tmpdir=C:\tprservice-cp "C:\Program Files (x86)\T-Plan\Robot\robot.jar" com.tplan.robot.ApplicationSupport" - Start the command from the Windows command prompt. Use the Robot GUI to edit the configuration or upgrade as needed.
- Once done close the GUI and restart the service to pick up the changes.