local
Local Desktop Automation
Contents:
1. Introduction
2. Setting Up
3. Connection
6. Starting Local Applications
1. Introduction
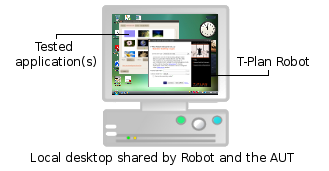
T-Plan Robot Enterprise version 3.2 introduced support of automation of applications displayed on the local desktop. This means that Robot and one or more Applications Under Test (AUT) run on the same local desktop. The automation is of course not limited to the AUT and it may perform any desktop action that a regular user can do.
Advantages:
- Single machine scenario with no need of another computer and/or OS.
- It relies just on the local Java SE installation and it requires no other software to be installed. This allows to use Robot in non-intrusive scenarios where the target system may not be modified. In an extremely isolated scenario, the file based distributions of Robot and Java can be copied to an external media(CD, DVD, USB drive) and executed from there to keep the SUT free of any installation.
- Support of multi-display environments (since v4.1).
- Fast & easy operation.
Limitations:
- Script recording is supported on MS Windows 2000 or newer (since version 3.5). Version 4.1 delivered support of Mac OS X and Linux.
- Test script relying on the Local Desktop connection can not be started remotely through a terminal such as telnet or rsh. Use the VNC Server connection for such scenarios instead.
2. Setting Up
Local desktop automation is supported over two connection types:
- The Local Desktop connection relies on the local Java SE installation. There are no other dependencies. To connect simply select the connection in the Login Dialog and hit Connect.
- The local desktop can be also automated over a locally running VNC Server:
- Install a supported VNC Server or enable the system built-in VNC access (Ubuntu, Mac OS X)
- Select the VNC Server connection type in the Login Dialog and connect to localhost. If the server is configured to use a different port than the standard 5900 one use localhost:<port>, for example localhost:5901.
The Local Desktop connection relying on Java is the preferred one. It is in general more reliable than the VNC server and it can type non-English characters (see the keyboard support). The Local Desktop connection is also typically faster in terms of screen polling. The VNC server may provide better screen performance if it is attached directly to the video driver, such as for example UltraVNC with the Mirror Driver or TightVNC with the DFMirage driver.
Compatibility between the Local Desktop and VNC Server connections is not explicitly guaranteed. A test script designed against a local or remote VNC connection may or may not run correctly with the Local Desktop. The following factors apply:
- The environments must match in terms of the OS and the desktop parameters (screen resolution, color depth). If the desktop parameters are different the template images may fail to compare and you will have to recreate them or add new alternatives using the Image Collections.
- The Local Desktop connection supports a different set of keyboard keys. It can simulate a press of only those keys that are available in the current system keyboard layout. For example, if the computer uses the United Kingdom (GB) keyboard layout, the dollar key ('$') is not there. When Robot is instructed to press the key using the Press command it can't press it directly because the physical key associated with this character is not available. Robot in such a case uses the system clipboard to paste the character instead of pressing it on the keyboard. This will work well where the character is being typed as part of a text. It will however not work correctly where the AUT requires something like "Press the $ key to continue" and listens to the particular key press event.
- Another difference is that while the VNC connection in general supports just characters from the ASCII 7-bit character set, the Local Desktop connection can transfer any national (UTF-8) characters supported by the system clipboard. It may for example type a Russian or Greek text. This allows to employ Robot for localization (l10n) or internationalization (i18n) testing.
Local Desktop on MS Windows
Automation of scaled MS Windows desktops is supported since v7.2.11. As Robot acts as a descaled application the fonts may be very small to read. The More... menu in the Login Dialog and the top left ![]() Home screen menu allows to set a custom display font size.
Home screen menu allows to set a custom display font size.
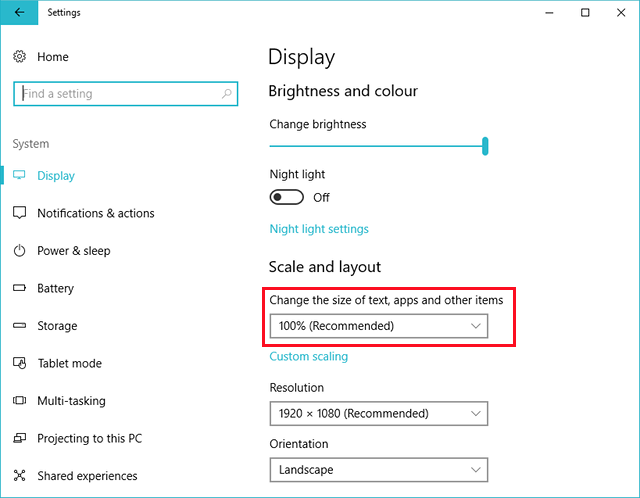
Older Robot releases will refuse to establish the Local Desktop connection when the display scaling is on. Should you need to use an older Robot version then set off display scaling:
- Open the Windows' Settings window and select the System→Display screen
- Set the "Change the size of text, apps and other items" value to 100%. If your environment uses multiple displays make sure to set the value for each display separately.
- If you do need to make the font and apps larger decrease the Resolution value instead.
Enable Local Desktop Script Recording (Mac OS X)
To enable script recording on Mac OS X you must grant accessibility and screen recording permissions to the Robot process:

- Open System Preferences and navigate to Security & Privacy
- Select Accessibility in the left column and inspect the tick box next to the "TPlanRobot" app. If you are using the cross-platform release the app may be titled as "Java".
- Select Screen Recording in the left column and grant the access too.
- Click onto the Lock icon to unlock the right column and select the tick box. Click the Lock again to apply the changes.
- Restart Robot to apply the changes.
TROUBLESHOOTING:
- If you don't see TPlanRobot or Java apps in the window start it first to make the Mac OS notice that Robot will need access.
- It may happen that Robot keeps asking for Accessibility while you see it enabled already. This may happen after Robot update where the access was granted for another app version. It usually helps to remove the access (untick the box) and grant it again. If this helps try resetting the Accessibility and Screen Recording permissions from a terminal:
tccutil reset Accessibility com.tplan.robottccutil reset ScreenCapture com.tplan.robot
Local Desktop on Linux
Local Desktop supports X11 desktops only. Newer Wayland based desktops are not yet supported because Java lacks support for it. There are efforts on the Oracle side to enable this in one of the future Java releases.
- Robot up to version 7.0.1 doesn't check for Wayland. It will allow you to create the connection but any screen shots or component images created with it will be black.
- Robot version 7.0.2 and newer will refuse to connect to Wayland desktops. We will enable it it once Oracle delivers the support.
Since Wayland is the default on most recent Linux releases you will have to switch to X11 to enable the local desktop connection:
3. Connection
To connect to the local desktop from a test script use the Connect command (TPR scripts) or the connect() method (Java test scripts). The argument URL must be in form of either "java://localhost" (Local Desktop connection type) or "rfb://localhost" (VNC Server).
For example, the following command/method call will connect you to the local desktop using the Local Desktop connection:
TPR test scripts: Connect java://localhost
Java test scripts: connect("java://localhost");
To connect to the local desktop using a VNC server running on the standard port of 5900:
TPR test scripts: Connect rfb://localhost
Java test scripts: connect("rfb://localhost");
The URL may be also used together with the c/-connect CLI option to establish the connection on the Robot start up. On a successful connection Robot starts up with the Workflow chart displayed instead of the desktop viewer and the application title will indicate the connection (java://localhost or rfb://localhost:5900).
IMPORTANT: Do not change the OS keyboard layout while using the Local Desktop connection. It maps the layout when the connection is established and any later change may cause the test script press invalid keys. To remap the keyboard disconnect and reconnect. This may be performed even from a test script by a sequence of Disconnect and Connect commands (TPR format) or the disconnect() and connect() methods (Java format).
4. Display Handling
On single display environments the local desktop automation process differs from the remote one. When Robot needs to work with the local screen it must hide the GUI first. In the test script development phase it also applies to situations when the user chooses to perform image comparison, to take a screen shot, to define a screen location or a rectangle, to create a new template image or to perform Component Capture. Similarly when a script starts to execute the GUI gets hidden and it is not restored until the scripts finishes. To pause the script execution and restore the GUI move the mouse. The behavior can be changed through the Local Machine panel of the Preferences dialog. The options allow to set the mouse sensitivity for the script pausing purposes and the UI hiding behavior.
Robot v4.1.1 introduced full support of multi display environments. It is possible to automate a particular screen or all of them. When there are two or more displays the Login window displays a screen selector and a drop down with the options:
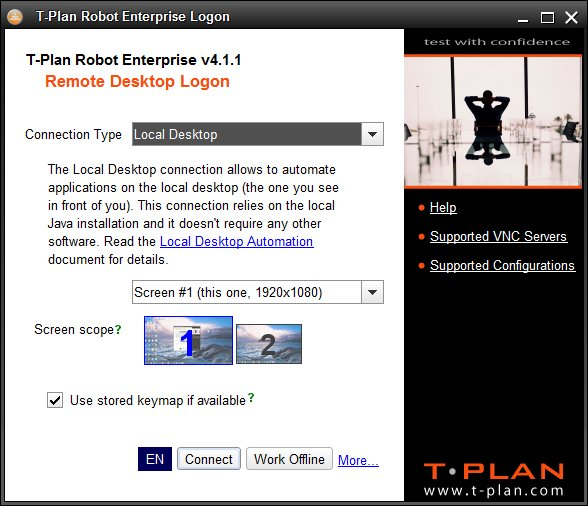
Screens are numbered starting from 1 where the first one is typically the primary one. The most efficient set up is to automate one display and put the Robot GUI on the other one. This eliminates the need to hide the GUI on script executions and graphical operations.
To connect to a particular screen from a test script or from the CLI add the screen number to the connection URL as follows. When the number is omitted or is 0 the connection will automate all screens. This form is also suitable for the c/-connect CLI connection. You may copy the URL of any of your recent connections from the Tools->CLI Wizard window. Another alternative is to give your connection a name in the Desktop->Connection Manager window and then use it instead of the URL.
TPR test scripts: Connect java://localhost?screen=1
Java test scripts: connect("java://localhost?screen=1");
IMPORTANT: For performance reasons the screen configuration is loaded just once on the Robot startup. To ensure correct operation do not change the screen layout or add/remove displays while Robot is running.
Since Robot 4.3.1 properties of the connected displays are exposed to test scripts through variables as follows:
- The number of screens (displays) is available as _DISPLAY_COUNT
- The [x, y, width, height] coordinates of each display is stored within the four variables of _DISPLAY_X_<n>, _DISPLAY_Y_<n>, _DISPLAY_W_<n> and _DISPLAY_H_<n> where <n> is the screen number. Numbering starts with one and the order is determined by the local system. If the connection is limited to a single display using the screenparameter its number is always 1 regardless of the ordinary number assigned to it by the system and displayed in the Login Dialog screen layout preview.
Image comparison commands such as CompareTo, Waitfor match/mismatch, Click and Drag populate a set of new variables to indicate the screen number the component or text was located on. These are COMPARETO_DISPLAY_NO (display number of the topmost match with the number 1) and _COMPARETO_DISPLAY_NO<i> where <i> is the ordinary number of the matching location. This allows to switch the behavior depending on the display involved. For example:
// Search for a component on all screens
Compareto "mount.png" method= "search2"
// Exit if not found
if ({_EXIT_CODE} > 0) {
Exit "1"
}
// Test the display the component is showing on
if ({_DISPLAY_NO} == 1) {
// Component on the first display -> do something
} else {
// Component on another screen -> do something else
}
For a more generic description also see the table of implicit variables in the Var command specification.
Local Desktop automation of Linux guest systems running on Virtual Box may not see the screen properly. The typical symptom is that Robot produces incorrect or even black screen shot and template images. Disable 3D acceleration in the Display settings of the guest system in Virtual Box to fix it.
5. Keyboard Handling
When the connection is being established it pops up a window showing the keyboard mapping progress. To ensure correct operation do not work with the desktop while it is displayed.
Version 4.1 introduced the stored keyboard maps (not applicable to the local VNC connection). Once the keyboard is mapped it gets saved to a file. The subsequent connections will reuse it as long as there is no change in the keyboard layout. This approach is faster and it avoids app focus issues on test suites executing a sequence of shorter test scripts.
The keyboard maps are by default stored to the user home folder. Should you need to manage the map(s) manually look for files with the tprlkm_ prefix and the .keymap extension. There's one file per each input language and keyboard layout. For example, the German keyboard layout will be stored as <home>/tprlkm_de_DE.keymap.Robot will also accept any keyboard map file placed in its installation directory (the folder containing the robot.jar file). These maps must follow the above file name convention. They are preferred to the ones placed in the user home folder. This feature allows to create custom Robot based solutions.
Usage of stored maps is controlled through the localDesktop.useStoredKeymaps preference in the user configuration file. You may set it either in the Login window or in the Local Desktop panel of the Preferences window. Should you need to modify the option programmatically please read the Setting Preferences documentation.
6. Starting Local Applications
Version 3.5.2 extended the Exec command with the nowait and kill parameters to simplify automation of local applications over the Local Desktop connection. The basic pattern is that the script starts a local application, tests it and closes it at the script end. Example:
// Start myapp.exe and don't wait until it finishesExec "myapp.exe"nowait="true"......// Test the application// Kill the application ('1' isprocess started with "Exec nowait=true"ordinary number of theExec)kill="1"