Extent Reports
Contents:
1. Overview
2. Plugin installation
3. Usage
3.1 Report Script
3.2 Set Script
3.3 Flush Script
4. Klov Integration
5. ExtentX Integration
5.1 ExtentX Setup
5.2 ExtentX Customization
6. Change Log
1. Overview
The Extent Reports plugin provides integration with the Extent library to deliver comprehensive HTML reports from T-Plan Robot automation.
The plugin also supports ExtentX/Klov report servers as follows:
- Plugin version 0.4 is packaged with Extent v3.1.5 and supports Klov report server v0.1.1.
- Plugin version 0.3 is based on Extent v2.41.0 and supports the now obsoleted ExtentX 0.2 server.
- The obsoleted ExtentX v1 is not supported at all.
The Extent libraries are published under the BSD license which is packaged inside the plugin release. The plugin is published with the source code and serves as a reference example of integration with 3rd party reporting frameworks. Customers of T-Plan Ltd. are free to reuse it for their own solutions. The source code is packaged inside the plugin archive.
Should you have any questions or suggestions contact the T-Plan support. For the list of other plugins provided by T-Plan go here.
2. Plugin installation
The plugin requires T-Plan Robot 4.0 or higher. To install the plugin download it from the following location:
- Version 0.4: https://downloads.t-plan.com/releases/robot/plugins/extent-plugin_v0.4.zip
- Support of Extent 3.1.5 and the Klov 0.1.1 report server
- Version 0.3: https://downloads.t-plan.com/releases/robot/plugins/extent-plugin_v0.3.zip
- Support of the ExtentX 0.2 report server (obsoleted)
For details on the version differences see the Change Log. Should you need to upgrade the Extent libraries replace all JAR files except for the extent-plugin.jar one in the plugin folder and the lib/ subfolder with the new ones. Names of the JAR files don't matter because the plugin loads all .jar files located in these two folders.
OPTION 1:
IMPORTANT: As Java 9 broke support of dynamic JAR loading you must use this option if you are running Java 9 or higher.
- Unzip the file to a location on your hard drive.
- Add all the JAR files in the folder and the
lib/subfolder to the class path of the Robot start command. For details see the Robot release notes. - Start or restart Robot. The test scripts will be exposed to Robot. When you create a Run command in your TPR script the property window will list the plugin scripts.
OPTION 2 (JAVA 8 AND LOWER):
- Unzip the file to the
plugins/directory under the Robot installation directory. This will make Robot load the classes on the start up. Make sure to remove any older versions of the plugin. - Start or restart Robot. The test scripts will be exposed to Robot. When you create a Run command in your TPR script the property window will list the plugin scripts.
OPTION 2 (JAVA 8 AND LOWER):
- Unzip the file to a location on your hard drive.
- If you plan on using the plugin in the TPR scripts put the following command to the beginning of each test script:
Include "<location>/extent-plugin.jar" - If you plan on using the plugin in Java test scripts put all the JAR files in the plugin archive onto the Java class path.
- To create a portable Robot project extract the archive to the project folder and reference it from scripts using the _PROJECT_DIR variable:
Include "{_PROJECT_DIR}/extent-plugin.jar"
Alternatively use a relative path to the calling script:
Include "../extent-plugin.jar"
To uninstall the plugin simply delete the files and remove the Include references.
3. Usage
The plugin contains three Java test scripts:
| Script Name | Description |
|---|---|
com.tplan.extent.Report | Start the Extent report generator. |
com.tplan.extent.Set | Set the report attributes. |
com.tplan.extent.Flush | Flush (save to file) the Extent report. |
The plugin scripts are to be called from TPR test scripts using the Run command. The commands may be easily created using the Command Wizard tool. To edit an existing Run command right click it and select Properties in the context menu.
The following picture shows how the parameters and artefacts created by a Robot test script get propagated into the Extent report:
Example TPR script:
// Load the plugin saved to the project dir Include "../extent-plugin.jar" // Start the Extent report Run "com.tplan.extent.Report" desc="Extent reports demo" file="extentreport.html" name="Demo Test" // Set the author, category, target system and Robot version Run "com.tplan.extent.Set" author="John Doe" category="Regression" param="System" value="Windows 7 64-bit" Run "com.tplan.extent.Set" param="Robot" value="{_PRODUCT_VERSION_LONG}" // Start also the Robot report to show how it gets linked Report "results.xml" // Produce some reportable objects // Screenshot Screenshot "myscreen.png" desc="Test screenshot" // Record one PASS and one FAIL test step Step "Successful test step" pass Step "Unsuccessful test step" fail // Exit with the code of 0 which means the overall PASS result Exit 0
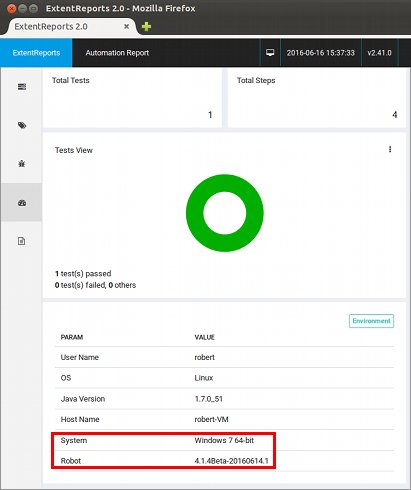
Resulting Extent report:

The system info parameters are located in the test details:
3.1 Report Script
DESCRIPTION
The Report script provides functionality similar to the Robot's Report command. Key features:
- To get the accurate data the report must be started at the beginning of your test script. If you start it later or even at the end of your script it will contain all the artefacts but the duration and result time stamps will be incorrect. This is a limitation of the Extent API.
- Unless an absolute file path is specified the report gets saved to the script's report directory, i.e. to the path specified by the _REPORT_DIR variable. See the docs on the report paths for details. You may create the Robot report simultaneously in the same folder through another Report command call.
- The plugin is not ready for parallel testing, i.e. when two scripts running in parallel write to the same report. The plugin can be eventually updated to support parallel reports following this example.
- The report will be written to the target file on the script termination. To save it at any time during the script execution call Flush.
The report will record the following Robot artefacts:
- Screenshots created by the Screenshot command,
- Test steps created by Step,
- Warnings created by Warning,
- Logs written to the Robot's execution log by the T-Plan framework and calls of the Log command (optional, off by default).
Extent by default makes a test fail if there's at least one failed step. This plugin however follows the Robot model and derives the PASS/FAIL result from the test script exit code.
SYNOPSIS (TPR SCRIPTS)
Run com.tplan.extent.Report [file=<HTML_file_path>] [name=<name>] [desc=<description>] [logs=<true|false>] [project=<project_name>] [extentx=<address[:port]>] [kolv=<address[:port]>]
SYNOPSIS (JAVA SCRIPTS)
run ("com.tplan.extent.Report", "file", "<HTML_file_path>", [, "name", "<name>"] [, "desc", "<description>"] [, "logs", "true|false"] [, "project", "<project_name>"] [, "extentx", "<address[:port]>"] [, "klov", "<address[:port]>"] );
* Red color indicates obligatory parameters
OPTIONS
file=<HTML_file_path>
- Path to the HTML file to save the Extent report to. If the file is relative or just a file name it will be resolved against the current report directory of the calling Robot script.
name=<name>
- The test script name.
desc=<description>
- The test script description.
logs=<true|false>
- The value of true will record also logs written to the Robot's execution log. These are created by Robot and by calls of the Log command. The default value is false (do not record logs).
extentx=<address[:port]>
- Optional address (known network host name or IP address) of the machine hosting the Mongo database which serves as a back up of the ExtentX or Klov report server, for example "192.168.100.3" or "mymachine.mynetwork.com". The port doesn't have to be specified as long as the Mongo DB runs on the default port of 27017. When a valid address is provided the script will creates a local HTML report and uploads a copy to the DB to make it visible in the ExtentX or Klov report server. The latter one requires the klov parameter to be populated as well. For details read the Klov Integration or ExtentX Integration chapter. Supported since v0.3.
klov=<address[:port]>
- Optional address (known network host name or IP address) of the machine hosting the Klov report server, for example "192.168.100.3" or "mymachine.mynetwork.com". The port doesn't have to be specified as long as Klov runs on the default HTTP port of 80. The extentx parameter must be populated with the MongoDB address as well. For details read the Klov Integration chapter. Supported since v0.4.
project=<project_name>
- Optional project name. It is not displayed by the report but allows for categorization in the ExtentX dashboard. For details read the Klov or ExtentX Integration chapter. Supported since v0.3.
RETURNS
The command always returns 0 (zero).
EXAMPLES
- Start an Extent report in the script's report folder:
Run "com.tplan.extent.Report" file="extent.html" name="MyApplication test" desc="This test opens MyApplication and tests its functionality."
- Start an Extent report and upload it to the Klov report server. We presume that both Klov and MongoDB are installed at default ports of the local machine:
Run "com.tplan.extent.Report" file="extent.html" name="MyApplication test" project="MyApplication" extentx="localhost" klov="localhost"
- Start an Extent report and upload it to the ExtentX dashboard whose Mongo DB back end runs on machine mymongo.mynetwork.com :
Run "com.tplan.extent.Report" file="extent.html" name="MyApplication test" project="MyApplication" extentx="mymongo.mynetwork.com"
- Create both the Extent and Robot XML reports in the script's report folder:
Run "com.tplan.extent.Report" file="extent.html" name="MyApplication test" desc="This test opens MyApplication and tests its functionality."Report "results.xml" desc="This test opens MyApplication and tests its functionality."
3.2 Set Script
DESCRIPTION
The Set script sets attributes of the previously started Extent report such as:
- The test autor name, such as "John Doe".
- The test category, such as "Regression", "Black box" etc.
- The system info in form of a param-value pair, such as "System", "Windows 7 x64" etc.
- The report configuration file (XML) which allows you to customize the report appearance. See the example.
To populate multiple values (multiple authors, system info entries or categories) call the script repeatedly. If no parameters are specified or the script is called while there are no running Extent reports it will do nothing.
SYNOPSIS (TPR SCRIPTS)
Run com.tplan.extent.Set [author=<author_name>] [category=<category>] [param=<sysinfo_param>] [value=<sysinfo_value>]
SYNOPSIS (JAVA SCRIPTS)
run ("com.tplan.extent.Set" [, "author", "<author_name>"] [, "category", "<category>"] [, "param", "<sysinfo_param>"] [, "value", "<sysinfo_value>"] );
* Red color indicates obligatory parameters
OPTIONS
author=<author_name>
- The test author name, for example "John Doe".
category=<category>
- The category name, for example "Regression" or "Black box".
param=<sysinfo_param>
- System info parameter name, for example "System".
value=<sysinfo_value>
- System info parameter value, for example "Windows 7 x64".
config=<configuration_file>
- Extent configuration file (.xml). This is obsoleted and it is supported only by the old Extent 2.41.0.
RETURNS
The command always returns 0 (zero).
EXAMPLES
- Start an Extent report in the script's report folder and set its author, category and system type:
Run "com.tplan.extent.Report" file="extent.html" Run "com.tplan.extent.Set" author="John Doe" category="Regression" param="System" value="Windows 7 x64"
- Set multiple authors:
Run "com.tplan.extent.Set" author="John Doe"Run "com.tplan.extent.Set" author="Jane Doe"
3.3 Flush Script
DESCRIPTION
OPTIONS
The Extent reports started through Report are for performance reasons flushed (saved to file) after the test script finishes. To flush the running report(s) at any time during the script execution use Flush.
If the script is called while there are no running Extent reports it will do nothing.
SYNOPSIS (TPR SCRIPTS)
Run com.tplan.extent.Flush
SYNOPSIS (JAVA SCRIPTS)
run("com.tplan.extent.Flush");
* Red color indicates obligatory parameters
No options.
RETURNS
The command always returns 0 (zero).
EXAMPLES
- Start an Extent report and flush it immediately to make the report file available:
Run "com.tplan.extent.Report" file="extent.html" name="MyApplication test" desc="This test opens MyApplication and tests its functionality."Run "com.tplan.extent.Flush"
4. Klov Integration
Klov is a report server delivering a test dashboard on top of a set of Extent reports. It features basic test report statistics and analysis. For a demo see the Klov site.
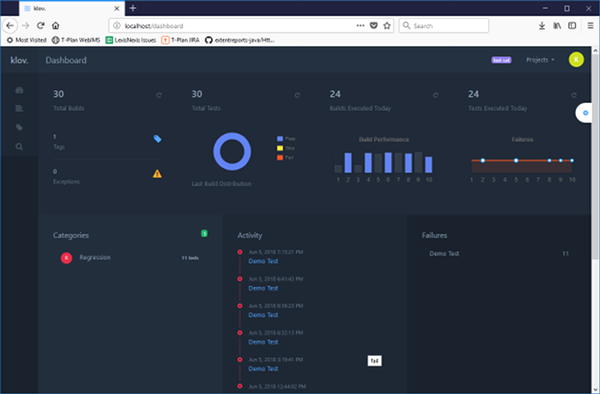
- Follow the instructions at the Klov site to install and start the server.
- Once up and running call the Report script with the properly specified extentx (the Mongo DB host and port) and klov (Klov server host and port) parameters. The Extent report will be both saved to a local HTML file and uploaded to the Klov server.
NOTE: The Klov report server fails to upload and display report screen shots. See bug #45: Problems attaching screenshots to the log. This issue does not affect Extent reports saved to local HTML files.
5. ExtentX Integration
IMPORTANT: ExtentX has been obsoleted by Klov. We provide the information below only for a backward reference.
ExtentX is an older product which has been obsoleted by Klov.
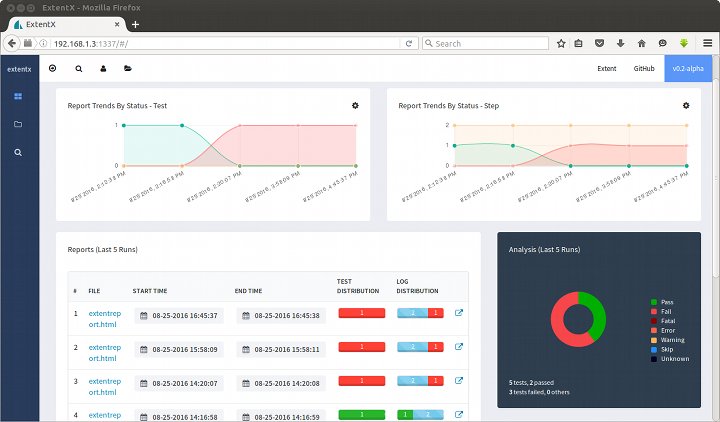
The plugin v0.3 and newer integrates with ExtentX v0.2 featuring:
- ExtentX v0.2 is supported. Version 0.2.1 is NOT supported because it requires Extent v3.0.0 which was unstable at the time of writing of this document (August 2016). Should you be interested in ExtentX 0.2.1+ integration please contact the T-Plan support for information on the latest staus.
- The plugin integrates with ExtentX through the "extentx" and "project" parameters of the Report script:
- The extentx parameter specifies the address (host name or IP) and optional port of the machine hosting the Mongo DB.
- The project specifies the project name. The dashboard supports filtering by the project through the Select Project button in the top left menu:

- When the Mongo DB address is specified the plugin creates both the local report and a copy in the ExtentX dashboard.
- Due to a limitation of ExtentX 0.2 no external resources are uploaded to the server. This includes screen shots, logs and any external files linked to the Extent HTML report. This is allegedly being addressed in ExtentX v0.2.1 which as of Aug 2016 has not been officially released yet.
5.1 ExtentX Setup
This document contains steps to install the ExtentX server (dashboard) on Windows 10 Home 64-bit. For an installation on 32-bit Windows please download the 32-bit installers. The steps basically follows instructions for the MongoDB & NodeJS on same host scenario published at the ExtentX site but it is more detailed and deals with a few issues experienced during the installation process. For other systems or the scenario with MongoDB and ExtentX running on separate machines see the official installation instructions.
1. Install NodeJS using the 64-bit MSI installer.
2. Install MongoDB using the Windows Server 2008 R2 64-bit or later with SSL support installer.
3. Create the default DB data folder and start MongoDB from a command prompt (instructions taken from the MongoDB docs)
md \data\db"C:\Program Files\MongoDB\Server\3.2\bin\mongod.exe"
Leave the command prompt open. The output must say something like:
2016-08-26T10:36:37.496+0200 I NETWORK [initandlisten] waiting for connections on port 27017
TIP: For info on how to set up MongoDB as a system service see the product documentation.
4. Download ExtentX 0.2-alpha. Do NOT download 0.3 pre-Alpha because it requires Extent 0.3 while our Extent Reports plugin v0.3 for Robot is based on Extent 0.2.41.
5. Unzip the file, open a command prompt and change to the "extentx" folder (the one that contains the package.json file):
npm installnode_modules\.bin\sails lift
Leave the command prompt open. The output must say something like:
info: To see your app, visit http://localhost:1337info: To shut down Sails, press <CTRL> + C at any time.
6. Open http://localhost:1337/ in the web browser. You should see the empty ExtentX dashboard. To view the dashboard from another machine replace "localhost" with the host name or IP address of the machine hosting the ExtentX installation.
7. To kill the dashboard press Ctrl+C in the Extent app command prompt and eventually kill the database the same way too. To start both components again switch to the ExtentX home folder and execute:
Command prompt #1: "C:\Program Files\MongoDB\Server\3.2\bin\mongod.exe"
Command prompt #2: node_modules\.bin\sails lift
5.2 ExtentX Customization
This chapter provides steps on how to modify the ExtentX source code to display your company links and/or graphics. As the product is licensed under the BSD license there are little legal considerations.
The instructions are based on a review of the ExtentX 0.2-alpha source code. The files are a mixture of JavaScript code and HTML elements and are easy to modify in any plain text editor (Notepad, JEdit,..). To apply your changes simply restart the ExtentX application ("sails lift").

| Item | File and location in the ExtentX distro | Instructions |
1. Page icon | assets/favicon.ico | Replace the icon with your own one of the same name & format (32x32.ico) |
| 2. Page title | views/layout.ejsline 4 | To change the page title replace the red text in:<title>ExtentX</title> |
| 3. Top left link | views/partials/sidenav.ejsline 4 | To change the top left link label and target replace the redt text in:<li class='no padding'> <a class='logo' title='ExtentX' href='http://extentreports.relevantcodes.com'>extentx</a> </li> |
| 4. Top right links | views/partials/header.ejslines 52-53 | To change the top right links replace the red text in:<div class='float-right menu'> <a class='item' href='http://extentreports.relevantcodes.com'>Extent</a> <a class='item' href='http://github.com/anshooarora/extentx'>GitHub</a> <a class='item' href='#!'>v0.2-alpha</a></div> |
| 5. CSS styles | assets/styles/extentx.css | Edit the styles to give the dashboard custom colors, fonts, insets etc. |
5. Change Log
Version 0.4 released on 5 June 2018
- Support of Extent 3.1.5
- Integration with the Klov 0.1.1 report server through the "extentx", "klov" and "project" parameters of the Report script.
Version 0.3 released on 26 August 2016
- Integration with the ExtentX dashboard through the "extentx" and "project" parameters of the Report script.
- ExtentX description, setup and customization instructions introduced to this document.
Version 0.2 released on 1 August 2016
- Image (screenshot) links changed from absolute to relative ones to make the images display correctly under a web root (Jenkins).
- When running in the CLI mode (with the -n/--nodisplay option) the plugin prints out a console log with the report file location (same as the default XML/HTML report generator).
Version 0.1 released on 16 June 2016
- Initial version.