Plugin Framework
1. Introduction
Up to release 7 the concept of Robot plugins was fairly simple. A plugin was a piece of compiled Java code, typically in form of a single JAR file. It contained at least one Java class that extended a Robot plugin interface to deliver a new feature or a script extension. From now on let's call them feature plugins. There's a document on how to create them here.
Feature plugins had to be installed manually. The user was instructed to download and drop the JAR to the plugins/ folder of the Robot installation. The folder was then scanned on the startup and all plugins discovered there were enabled. The plugins can be viewed in the Plugins window.
This approach is quite fair but suffers from a few limitations. There is no installer or uninstaller. Nobody checks for dependencies, platform requirements or minimum Robot version. There is no plugin version management. Users have to keep track of their plugins and watch out for updates. Last but not least this mechanism is designed for compiled Java code while most plugins also need other files or do not even contain Java code at all.
Introduction of Chromium and JDK plugins in Robot release 7 levelled plugins with Robot releases. You may download, install and uninstall plugins through the Update & Upgrade window. There is a version, dependency and platform requirements control in place and the plugin can contain anything, including a feature plugin. To avoid confusion let's call the new format installable plugins.
Just like the feature plugins the installable plugin framework is generic and public. In the next chapters we will explain how you can take advantage of it to create Robot extensions and distribute them transparently within your organizations or even to 3rd party customers.
2. Plugin Example
To demonstrate principles of the plugin framework we will build a simple plugin. Let's use the two feature plugin examples documented in appendix of the Feature Plugin Framework document and the example Java test script described in chapter 6 of the Java Scripts document. There will be three classes:
- The
com.tplan.robot.scripting.commands.impl.ConsoleMessageCommandclass delivers a new TPR scripting language command called "Msg" - The
pluginexamples.GuiPluginExampleclass installs a new menu item and a tool bar button called "Hello" to the Robot's Tools menu and tool bar. - The
scripts.Verifyclass is a Java test script allowing to verify existence of a file from a test script.
We have pre-compiled the code and made the three classes available as a JAR file. You may download it here.
To verify the functionality, extract the JAR file from the downloaded archive to the plugins/ directory of your Robot installation. Then start or restart Robot and make sure that:
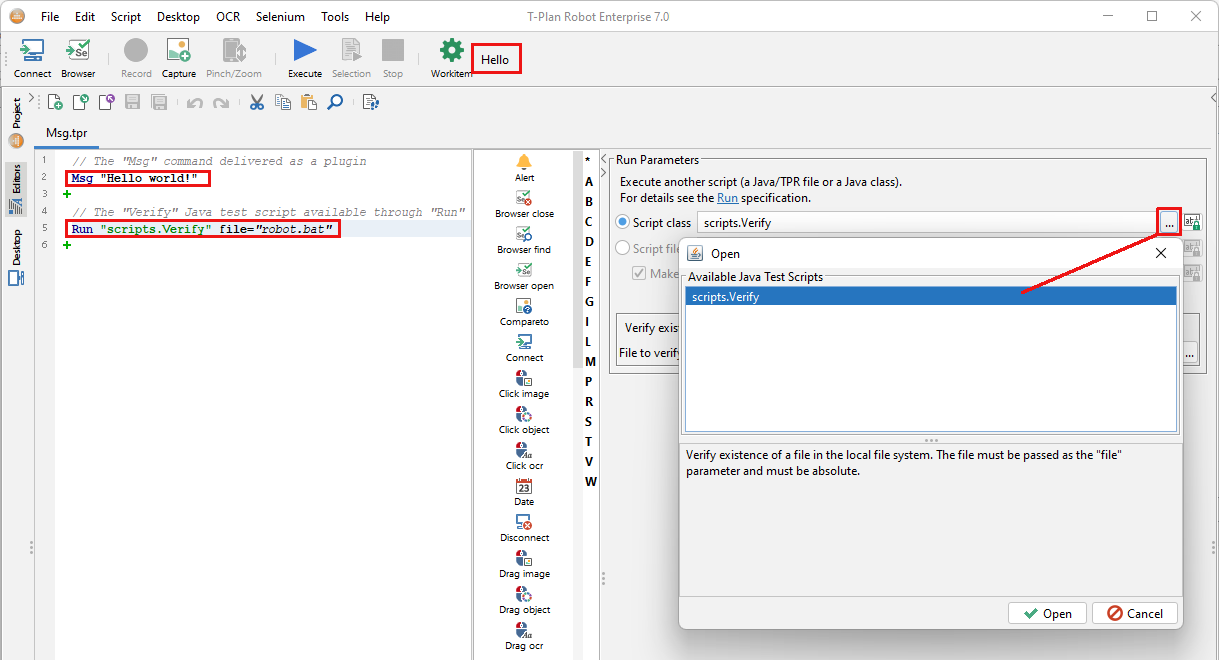
- There's a "Hello" button at the toolbar. There's also a corresponding menu item in the "Tools" menu. When selected it opens a simple message window.
- You may use the "Msg" command in a TPR test script to print out a message to the console. To see the message use the Help→Log Viewer window after you execute the command.
- The scripts.Verify script can be selected in the Run script class selector (the "..." button to the right).
By building a JAR file we effectively created a feature plugin with 3 features. Now we will create an installable plugin with the same functionality.
3. Plugin Structure
An installable plugin archive is a simple ZIP to be extracted to the Robot installation directory. Plugins on Linux/Unix and Mac OS X may need to preserve the file permissions - the ZIP in such a case contains a single TAR file with all the necessary files.
The archive contains the actual plugin files including any directory structure and the plugin descriptor. It is a mandatory JSON file which describes the plugin. It must be placed in the plugins/ directory and it must be called <pluginId>.json where <pluginId> is a unique Id (name) that identifies the plugin.
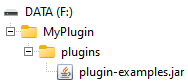
Let's start with the plugin files. Create a new empty directory and switch to it. Then create a subdirectory called plugins/ and copy the JAR file in there:
Now it's the time to create the plugin descriptor.
3.1 Plugin Descriptor
Before you create the descriptor you have to choose a unique identifier (Id) for your plugin. It may contain any characters that are accepted for file names. It is recommended to use a string which is unique, for example with a prefix of your name or company. For our example we will use the Id of:
tplan-plugin-examples
The Id plays an important role. The descriptor file must be named by it. If Robot needs to verify if our plugin is installed it looks for the plugins/tplan-plugin-examples.json descriptor file. The Id is also used when Robot checks whether a newer version of your plugin is available.
Use different Ids when you produce multiple OS versions of a single plugin. If our plugin would require separate versions for MS Windows and Mac OS we would choose tplan-plugin-examples-win and tplan-plugin-examples-mac.
Robot 7+ contains command line support to generate a plugin descriptor. Use the folder with the plugin files as the first argument and the target JSON file as the second one. Switch to the Robot installation folder and execute:
C:\Program Files (x86)\T-Plan\Robot> java -cp .\* com.tplan.robot.update.UpdateManager F:\MyPlugin F:\MyPlugin\plugins\tplan-plugin-examples.json |
|---|
The JSON file will look like this:
{ "uniqueId": "tplan-plugin-examples", "version": "<Version>", "names": { "en": "<English Name>" }, "descriptions": { "en": "<English Description>" }, "messagesBeforeInstall": { "en": "<Optional English Message To Display Before Install>" }, "messagesAfterInstall": { "en": "<Optional English Message To Display After Install>" }, "messagesBeforeUpdate": { "en": "<Optional English Message To Display Before Update>" }, "messagesBeforeDelete": { "en": "<Optional English Message To Display Before Delete>" }, "vendorName": "T-Plan Ltd", "vendorHomePage": "http://www.t-plan.com", "minimumRobotVersion": "7.0", "supportContact": "http://www.t-plan.com/support.html", "date": "2022-10-04", "mainPath": "", "startupRunnable": "", "restartRequired": false, "windows": true, "mac": true, "linux": true, "architectures": [ "amd64" ], "keywords": "", "group": "<GroupCode>", "canUpdate": true, "canDelete": true, "testClasses": "", "helpLink": "", "files": { "plugins/plugin-examples.jar": "2f3793f1", "plugins/plugin-examples.json": "f2958fd" }} |
|---|
You will have to update some of the attribute values to match your plugin features. Make sure to use a text editor supporting UTF-8.
| Attribute | Acceptable Value | Description |
|---|---|---|
uniqueId | String. Accepted characters are the same as those of a file name | The ID must be unique and equal to the JSON file name without the .json extension. It identifies the plugin. |
version | String consisting of digits and periods, for example 1.0 or 5.3.2 | The plugin version. |
names | Map of strings with mandatory English ("en") and other optional languages identified by the 2-character ISO-639-1 language code | The default English plugin name (plain text) and its variants for other languages. |
descriptions | Map of strings with mandatory English ("en") and other optional languages identified by the 2-character ISO-639-1 language code | The default English plugin description and its variants for other languages. It may be a plain text or HTML starting with the "<html><body>" prefix. |
messagesBeforeInstall | Map of strings where each key is a 2-character ISO-639-1 language code | A message to be displayed in a pop-up window before the plugin installation. It may be a plain text or HTML starting with the "<html><body>" prefix. |
messagesAfterInstall | Map of strings where each key is a 2-character ISO-639-1 language code | A message to be displayed in a pop-up window after the plugin installation. It may be a plain text or HTML. |
messagesBeforeUpdate | Map of strings where each key is a 2-character ISO-639-1 language code | A message to be displayed in a pop-up window before updating the plugin. It is typically used to explain why the plugin cannot be updated when canUpdate is set to false. It may be a plain text or HTMLstarting with the "<html><body>" prefix. |
messagesBeforeDelete | Map of strings where each key is a 2-character ISO-639-1 language code | A message to be displayed in a pop-up window before deleting the plugin. It is typically used to explain |
vendorName | String | The vendor/plugin producer name. |
vendorHomePage | String (HTTP link) | The vendor/plugin producer home page. |
minimumRobotVersion | String consisting of digits and periods, for example 7.0 or 8.1 | The minimum Robot version required to install the plugin. It must be set to 7.0 or higher. |
supportContact | String (HTTP link) | The vendor/plugin producer support contact page. |
date | Date in the yyyy-MM-dd format | The plugin release date. |
mainPath | File path | Internal use - leave empty. |
startupRunnable | String (Java class name) | The installation hook. Plugins that need to initialize on the Robot startup may populate it with a fully qualified name of a Java class that implements the java.lang.Runnable interface. Robot will then execute its run() method on the startup. This presumes that the plugin has installed a JAR file with the class into a location that is on the Robot class path, for example into the Robot home directory or to one of the plugins/ or libs/ subfolders. |
restartRequired | Boolean (true or false) | Indicates whether Robot has to be restarted after the plugin installation. |
windows | Boolean (true or false) | Specify whether the plugin supports MS Windows, Mac OS X and/or Linux/Unix. |
architectures | Array of Strings. Supported values: Microsoft Windows: x86 or amd64 (32- or 64-bit OS)Mac OS X: x86_64 (Intel/AMD), aarch64 (M1)Linux/Unix: x86 or amd64 (32- or 64-bit OS) | Supported architectures (optional). If specified, they will be used together with the supported OS |
keywords | String | An optional keyword or a comma separated list of keywords that characterize the plugin. The value may be used for plugin search purposes. |
group | String | Plugin group name (optional). It serves as a name of the folder (branch) displayed in the Update & Upgrade window. The field may be populated with the actual name or with a reserved keyword which identifies a known group, one of: "selenium" (Selenium Components)"java" (Java Development Kit)"script" (Scripting Language Enhancements)"features" (Tools & Features)"wda" (WebDriverAgent for "iOS Over Xcode" Connection)"iosplugin" (iOS Plugin for "iOS Mirror" Connection)"other" (Other) |
canUpdatecanDelete | Boolean (true or false) | Indicates whether the plugin may be updated and deleted. Some plugins such as, for example, Java may not be updated or deleted from Robot because they are in use while Robot is executing. |
testClassses | String | Internal use - leave empty. |
helpLink | String (HTTP link) | Link to the online plugin help page/documentation (optional). Robot will add a new Help menu item pointing to the site if specified. |
files | Map of Strings | Robot generated map of plugin files and their check sums. Do not modify. |
It is important to realize that the plugin descriptor contains a list of files with their check sums. If you modify any file in the plugin except for the descriptor itself, you will have to re-create the descriptor or update the files attribute with an updated list.
The minimum changes for our example plugin are:
"version": "1.0"- the plugin version must meet the specification."restartRequired": true- our plugin requires Java to load theplugin-examples.jarfile and it requires a Robot restart."architectures": []- delete the current architecture to indicate that the plugin will work on all of them.
We will also update some of the optional fields to improve the plugin appearance such as the name, description, group and message to be displayed before the installation. You may view them in the example archive later.
3.2 Plugin Archive
To create the plugin archive simply compress the plugin directory to a single ZIP file. If you need to preserve file permissions on Linux/Unix or Mac OS then create a single TAR file of any name and then compress it to a ZIP. Our example plugin will look like this:
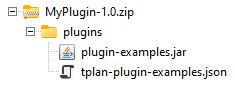
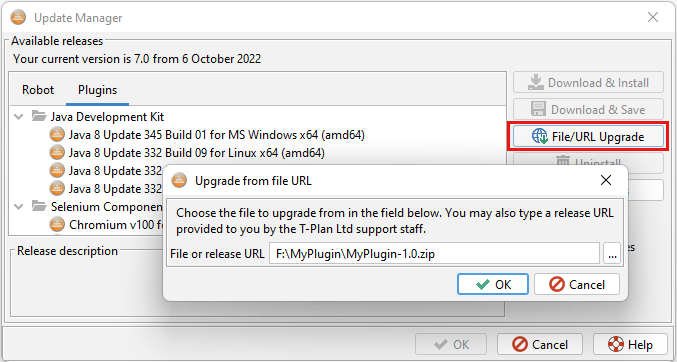
You may download the file here. To verify the functionality, you may install it from file:
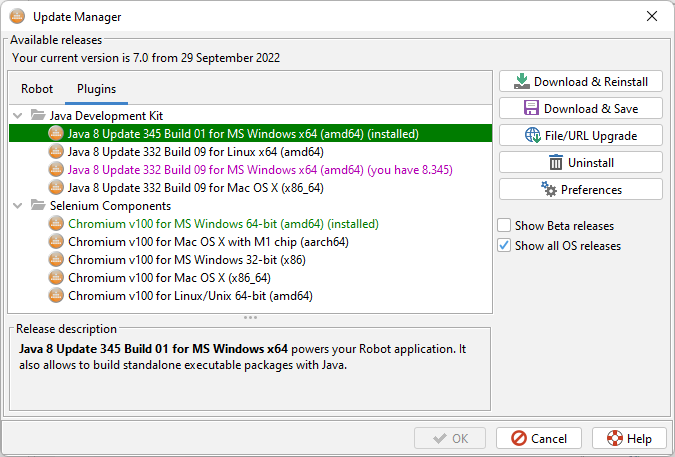
- Open the Tools→Update & Upgrade window
- Select the File/URL Update button
- Enter the file path to the field and select OK.
Once you finish the installation and restart Robot you may check that you see the three features delivered in the plugin.
4. Release Descriptor
As you have seen already plugin archives and Robot releases are being distributed via the Update & Upgrade window. The data it displays is loaded from the 'release descriptor'. It is an XML file which is placed on a HTTP server at a known address. For example, the default T-Plan descriptor is located at:
https://downloads.t-plan.com/releases/robot/descriptor.xml
The file may not be viewable because it may be optionally encrypted.
Release descriptors are typically created with tools such as the Release Descriptor Editor. We will write about it later. However, a manual edit is more efficient in some cases such as a simple label or description update. That's why it is good to be familiar with the basic descriptor format.
An empty release descriptor is very simple:
<?xml version="1.0" encoding="UTF-8" standalone="no"?><releases></releases> |
|---|
The releases node may contain two children node types:
release -specifies a release.descriptor -loads content of another descriptor. For example, a child node like<descriptor>https://downloads.t-plan.com/releases/robot/descriptor.xml</descriptor>will add all T-Plan releases to your descriptor.
To create a release descriptor for our example plugin first paste the empty descriptor XML to a UTF-8 compliant editor. To create the release node, call the very same Robot command line interface we used to create the plugin descriptor, but this time provide the plugin file path as the only argument:
|
|---|
Now simply copy the release node to the inside of the releases. Your first descriptor will then look like:
<?xml version="1.0" encoding="UTF-8" standalone="no"?><releases> <release product="plugin" type="patch" id="tplan-plugin-example" group="other" platform="all" arch="all" label="T-Plan Installable Plugin Example" build="1.0" url="MyPlugin-1.0.zip" cksum="2913311261" size="5215" producer="T-Plan Ltd"> <desc><![CDATA[ This plugin contains three simple features. ]]></desc> </release></releases> |
|---|
As the descriptor may contain any number of release nodes you may repeat these steps for another plugin or even for the same plugin of a different version. The only limitation here is that two nodes within a single descriptor may not have the same label attribute. This is because the Update & Upgrade window displays the labels in the product tree and having multiple entries of the same name would be ambiguous. For this reason, we recommend adding a version to your plugin name, for example "T-Plan Installable Plugin Example v1.0".
To test out your descriptor use the File/URL Upgrade feature of the Update & Upgrade window, only now you enter the descriptor XML file path into the field. Once loaded the window should look like follows:
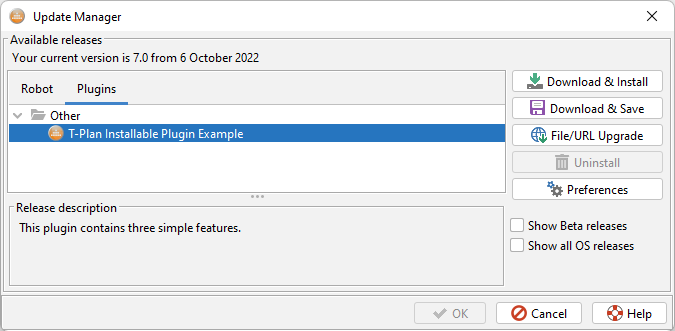
It is recommended to verify:
- Make sure that the buttons are enabled as expected. For example, the Download & Install button
- Select Download & Install to install the plugin. This verifies that the file size, check sum and path (URL) attributes are correct.
Here is a complete specification of the release node attributes and how they affect the Update & Upgrade window behaviour:
| Attribute | Acceptable Value | Description |
|---|---|---|
product | "plugin" or "robot" | The value of "robot" stands for a T-Plan Robot package while "plugin" is everything else. In contextof the Update & Upgrade it defines whether the product will be displayed in the Robot or the Plugins tab. |
type | "patch" or "os-specific" | A "patch" indicates a ZIP package that can be installed by extracting the content into the Robot install folder.An "os-specific" product is anything outside that, for example a package with an executable installer that has to be ran to install the product. The Download & Install button is always disabled for this product type. |
id | String | The plugin unique identifier. Not present for the "robot" product type. It is used to identify whether the plugin is alreadyinstalled and/or may be updated. |
group | String | The plugin group identifier, either a name or a code of a well known group. It defines where to display the package in the Update & Upgrade tree. See the Plugin Descriptor chapter for more details. This attribute may be omitted. It is ignored for the "robot" product type. |
platform | "" "all" one or more comma separated values of "win", "linux" and/or "mac" | The OS support. Remove the attribute or use an empty string "" or "all" to indicate that the package supports all supported operating systems. Otherwise specify one or more operating systems separated by comma, for example "win" or "win,mac". The Update & Upgrade window will enable the package installation only if the local OS matches this value. |
arch |
x86 or amd64 (32- or 64-bit OS)Mac OS X: x86_64 (Intel/AMD), aarch64 (M1)Linux/Unix: x86 or amd64 (32- or 64-bit OS) | The OS support. Remove the attribute or use an empty string "" or "all" to indicate that the package supports all architectures. Otherwise specify one or more comma separated architectures. For example, to restrict the package to the M1 chip on Mac OS X use the value of "aarch64". The Update & Upgrade window will enable the package installation only if the current architecture matches this value. TIP: To find out your current architecture open the Help→About window, select the System Information tab and look at the value of the os.arch property. |
label | String | The default English displayable package name. To specify other language variants use the label-[lang] child node described in the table below. This text is used as the package name in the Update & Upgrade product tree. |
build | String consisting of digits and periods, for example 1.0 or 5.3.2 | The package version. |
url | String (HTTP link or relative file path) | Plugin file download link. It may be either an HTTP link such as http://my.server.com/downloads/MyPlugin-1.0.zip or a file path relative to the descriptor. |
sizecksum | String | Plugin file size and check sum (a hash). They are is used to verify that the downloaded file is not corrupted or tampered with. The values are computed by the CLI - do not modify them manually. |
producer | String | The produce/vendor name. |
The release node supports these child nodes:
| Child Node Name | Description |
|---|---|
desc | The default English plugin description. The text must be placed as the node text content. Examples: <desc>This is my plugin.</desc> <desc><![CDATA[ <html><body>This is <b>my plugin with HTML description.</b></body></html> ]]></desc> |
desc-[lang] | Plugin description for a language specified by the 2-character ISO-639-1 language code. For example, a Spanish description would be specified within the <desc-es></desc-es> child node. The format is the same as desc above. |
label-[lang] | Plugin display name (label) for a language specified by the 2-character ISO-639-1 language code. The same rules as above are applied save that HTML is not allowed here. |
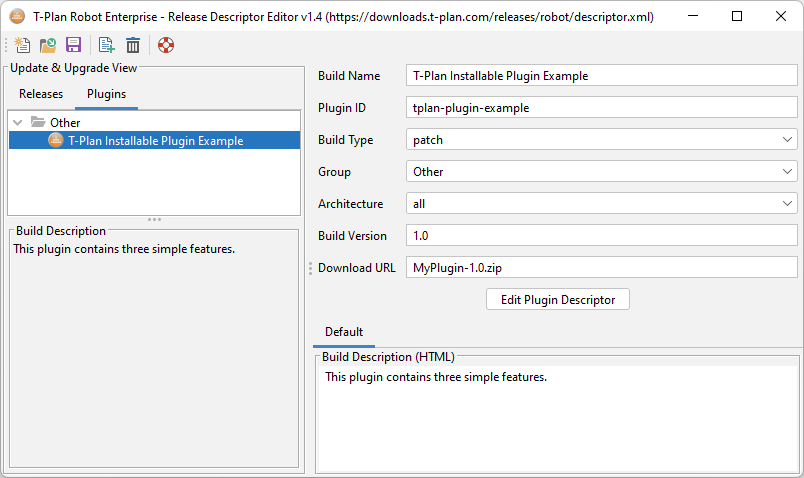
5. Release Descriptor Editor
The Release Descriptor Editor (RDE) is a GUI tool produced by T-Plan. It allows to create and edit release descriptors and plugin archives.
RDE is implemented in Java and distributed as a Robot plugin. It works on top of the Robot plugin framework. A great advantage is that it displays the product tree the same way as the Update & Upgrade window because it uses the same API.
To get RDE look for its plugin in Update & Upgrade. In case you don't see it contact the T-Plan support for the download link and install it through the URL/File Upgrade button.
Once installed start the RDE as follows:
- Switch to the Robot home folder
- Execute
release.bat(MS Windows) orrelease.sh(Mac OS, Linux/Unix). In case ofrelease.shyou may have to give it executable file permissions first (chmod a+x release.sh).
IMPORTANT: RDE always downloads the current T-Plan release descriptor on startup. This is to ensure that it works with the most up to date XML structure. If you have no internet access it will fail to start.
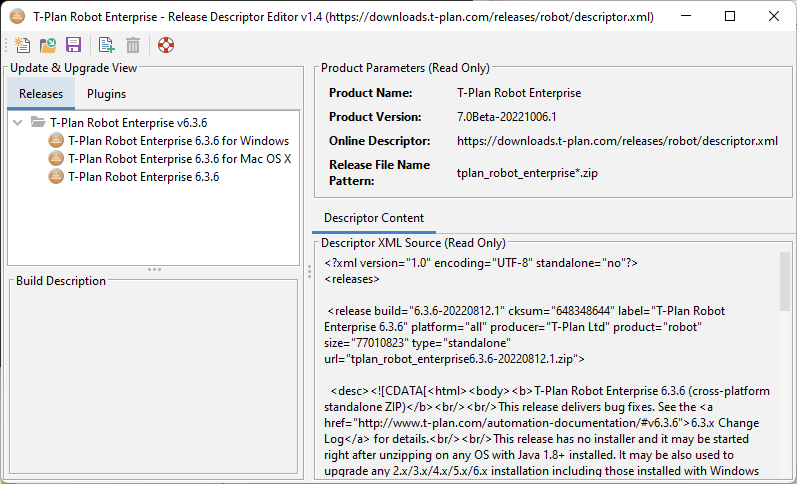
The left side of the window displays the current descriptor content. The right side is for editing and code view.
To create a new descriptor click the New button at the tool bar. RDE in fact just removes all packages from the current document and leaves the recent XML structure in place.
To load an existing descriptor file select Open.
Unlike the Robot plugin CLI the RDE works with already zipped plugin archives (or optional tar/zip on Linux/Unix). The archive does not have to contain the plugin descriptor and the plugins/ folder - the RDE will create it for you. This allows you to skip the manual creation of the plugin JSON descriptor described earlier. All you have to do is to zip the files you want to place in the Robot install folder.
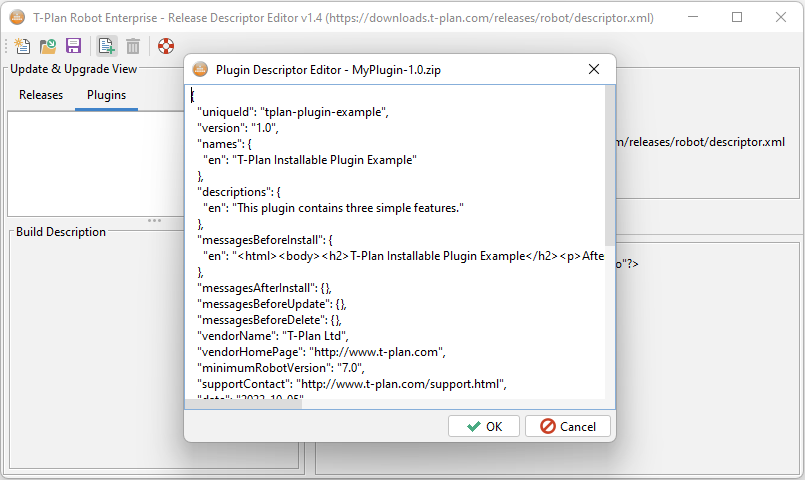
To add the ZIP as a new plugin click Add at the tool bar and select the ZIP file. RDE will display the JSON editor with the plugin descriptor where you may modify the plugin attributes. You will be able to edit them at any time later.
Once the plugin is added you may edit its release node attributes in the right side of the window.
A few tips:
- Be careful when editing the properties because the changes are applied immediately. There's no "Cancel my changes" option later - you may only discard the whole descriptor or re-add the plugin to reset the values!
- The release descriptor duplicates some of the properties present in the JSON descriptor inside the plugin ZIP. These are mainly Plugin Id, Build Type, Build Version and Architecture. Though editing of these values is enabled please avoid changing them to stay in sync with the plugin itself. Use the editor only for changes of appearance in Update & Upgrade, i.e. update only the label (Build Name), group, the descriptions and the download URL.
- You may enter raw HTML into the description editor. For example, paste "
<html><body><h1>Hello!</h1></body></html>" into it and watch the effect in the left view. - To add a non-English description right click the Default tab above the description editor and choose the Add a localized description context menu item.
- To edit the JSON plugin descriptor, use the Edit Plugin Descriptor button. If the RDE asks you to select the plugin file again make sure to provide the right file.
- RDE v1.4 does not support links to other descriptors (the
descriptorXML nodes). You must add them manually in a text editor. RDE will not touch them.
Once you are satisfied with the descriptor content select Save on the tool bar to save it to a file. You may optionally load it using File/URL Upgrade in the Update & Upgrade window and make sure it works as expected.
6. Plugin Distribution
To distribute your plugin or plugins:
- Put the packages (plugin ZIP archives) and the XML release descriptor to a document root of a public web server.
- Figure out the descriptor URL, for example
https://myserver.mydomain/downloads/descriptor.xml - Provide this URL to your users and ask them to load it using the File/URL Upgrade feature of the Update & Upgrade window.
As of Robot 7.0 it is not possible to add your descriptor to the product tree permanently. Users always have to load it manually through File/URL Upgrade. The window will however remember the last value. There is also no auto-updater or a pop up notifying the user of a new plugin version. Future Robot releases are planned to provide a such features.