android
Automating Android Over The ADB
Contents:
1. Introduction
2. Setting Up
2.1 PC Set Up
2.2 Android Device Set Up
2.3 Connecting To Robot
2.4 Screen Stream Mirror
2.5 Performance Considerations
3. Troubleshooting
4. Automation
4.1 Connecting to the Device
4.2 Dealing With Screen Rotation
4.3 Touch Screen Automation
4.4 Keyboard Automation
1. Introduction
T-Plan Robot Enterprise version 3.1 and higher supports automation of Android devices over the ADB (Android Debug Bridge). ADB is a tool delivered as part of the Android SDK which provides connectivity to Android devices attached to the USB.
Version 4.2 delivers support of Screen Stream Mirroring (SSM) application driven screen transfer which provides a better option for automation of applications requiring fast screen response such as games etc.
Version 5.0.6 introduced a new screen transfer method called Android Mirror. It is intended to replace the SSM one. It is easy to set up, fast to start and operate and it requires no SW installation on the device.
Compared to automation over VNC (namely VMLite VNC and DroidVNC):
| Factor | Automation over ADB w/ Screen Mirror | Automation over ADB only | Automation over VNC |
|---|---|---|---|
| Rooting | + Not required | - DroidVNC: The device must be rooted + VMLite VNC: The device doesn't have to be rooted | |
| Network | + Not required (network is optional) | + No network required (only USB) | - DroidVNC: Network connection required (Wi-Fi) + VMLite VNC: Network or USB connection required |
| SW Requirements | + No SW installation on the device required (Android Mirror) - Application required on the device (Screen Stream Mirroring) | + No SW installation on the device required | - VNC server required on the device |
| Parallel Connections | - Not supported (one automated device at a time) | + Supported | + Supported |
| Keyboard Support | + Good support of the Android native keys | - Support of the Android native keys is subject to the server vendor | |
| Screen Performance | + Good screen refresh rate (see performance) | - Slower screen refresh rate for large screen devices due to lack of image compression in the Android SDK | + Fair screen refresh rate for large screen devices (depends on the preferred image encoding) |
| Gaming Support | + Supported | - Limited support (no OpenGL content) | |
| Screen Rotation | + Both automatic and manual screen rotation supported | - Manual screen rotation only supported | |
| Pinch & Zoom | + Supported (Robot 3.5+/Android 4.3+) | - Not supported | |
The nature of the ADB connection makes this approach suitable for non-intrusive automated testing of Android applications across multiple device types.
2. Setting Up
Though the Android SDK is supported on Windows, Linux and Mac OS X, it is recommended to use a MS Windows host for the automation. Automation on Linux (namely Ubuntu Linux which we use for testing) requires to run Robot from the root account and connection to the device is unstable, especially under a high load during test script execution. Though Robot can in most cases repair the connection automatically it leads to delays and lower reliability.
2.1 PC Set Up
Robot 8
If you installed Robot for Windows/Mac/Linux then you are all set. Proceed to the device setup chapter right away.
Robot 5.0.3 - 7.x
Robot 5.0.3 bundles all necessary JAR libraries from Android SDK. It is no longer necessary to download the whole Android Studio package and put the JAR files onto the class path. Download the Android SDK Platform Tools package instead. The steps:
- Download Android SDK Platform Tools for your platform and unzip it on the local hard drive.
- Start Robot and give its path to the Android Over ADB connection.
Robot 5.0.2 and older
It is recommended to upgrade to Robot 5.0.3+ to avoid the manual steps below.
Download and install the Android SDK revision 18 or higher on your computer:
- If you have and older version of the SDK upgrade it to the latest one using the SDK Manager tool located in the SDK home folder.
IMPORTANT: To enable automation of Android 9 devices you have to download the ddmlib library version 26 and either save it to the Robot directory (Robot 4.4.7) or put it onto the class path manually (instructions below). The latest SDK version as of May 2019 contains ddmlib v25 which is not compatible with Android 9.
MS Windows only: If you installed the full Android Studio add the folder containing adb.exe to the user or system path:
- Open Windows Explorer (Windows+E)
- Right click Computer and select Properties
- Select "Advanced System Settings" and click the "Environment Variables" button
- Select the PATH user variable, click Edit and insert the path to the folder containing adb.exe to the beginning of the list. To separate the path from the original value use semicolon, ';'. The new value should look like: <SDK_path>\platform-tools;<originalPaths>
- Save with OK.
IMPORTANT: As Java 9 introduced new security restrictions and disabled loading of Java libraries (JARs) on the fly it is necessary to update the class path:
- Find out your Java version through one of the following options. Be aware that versions 6, 7 and 8 identify themselves as 1.6, 1.7 and 1.8.
- Open a command prompt (terminal) and execute: java -version
- Start Robot and select Help->About
- If your Java is version 9 or higher edit the Robot starting command and add full paths of the following libraries to the -classpath list:
MS Windows: <SDK_path>\tools\lib\sdklib.jar;<SDK_path>\tools\lib\guavalib.jar;<SDK_path>\tools\lib\ddmlib.jar;<SDK_path>\tools\lib\chimpchat.jar
Unix/Linux: <SDK_path>\tools\lib\sdklib.jar:<SDK_path>\tools\lib\guavalib.jar:<SDK_path>\tools\lib\ddmlib.jar:<SDK_path>\tools\lib\chimpchat.jar
For example if your SDK is installed to C:\Android Studio\SDK the complete Robot start command must look like:
java -Xmx512m -classpath robot.jar;jh.jar;activation.jar;mail.jar;poi-3.6-20091214.jar;cron4j-2.2.5.jar;gson-2.5.jar;jna-3.5.1.jar;platform-3.5.1.jar;JNativeHook.jar;"C:\Android Studio\SDK\tools\lib\sdklib.jar";"C:\AndroidStudio\SDK\tools\lib\guavalib.jar";"C:\Android Studio\SDK\tools\lib\ddmlib.jar";"C:\Android Studio\SDK\tools\lib\chimpchat.jar" com.tplan.robot.ApplicationSupport <CLI parameters>
If you are using Robot packaged as an Mac OS X application and start it from the Mac menu the best option is to create symbolic links to the above libraries. Start a terminal and execute the following commands (substitute <SDK_path> for the real path):
cd /Applications/TPlanRobot.app/Contents/Java
ln <SDK_path>/tools/lib/sdklib.jar sdklib.jar
ln <SDK_path>/tools/lib/guavalib.jar guavalib.jar
ln <SDK_path>/tools/lib/ddmlib.jar ddmlib.jar
ln <SDK_path>/tools/lib/chimpchat.jar chimpchat.jar
2.2 Android Device Set Up
- Enable the "USB Debugging" option on your Android device:
- Android 4.1 and lower:
- Go to Menu->Settings->Applications->Development and set on the "USB Debugging" option.
- Android 4.2 and higher:
- Go to Menu→Settings
- Select the About menu in the More or General group. On some devices it is located under Settings->About->Software->Information->More.
- Scroll to Build Number and tap it 7 times until you see a message saying "You are now a developer" or "Developer mode has been enabled".
- Android 4.1 and lower:
- Go back to the Settings menu, select the Developer Options and turn on the slider at the top to enable the options:
- Set on USB Debugging.
- Set on OEM Unlocking if it's present.
- Set the USB Configuration option to PTP (Picture Transfer Protocol). The device is unlikely to connect if this option is set to MTP (Media Transfer Protocol).
- It is recommended to set on the Stay Awake option to prevent screen locking while the device is connected to the PC.
2.3 Connecting To Robot
- Connect the Android device through the USB cable to the computer. It is not recommended to connect the device after the connection is initiated from Robot because it leads to intermittent connection crashes.
- Start T-Plan Robot Enterprise. If your system is a Linux/Unix one you will have to start it from the root account (sudo may not be sufficient).
- In the Login Window set the "Connection Type" to "Android over ADB" and provide the path to the Android Platform Tools or SDK. This path will be saved to the user preferences and it will get populated automatically onwards.
- If you have two or more Android devices connected to the computer set the "Device Serial No." field to the serial number of your device. You may find it out through clicking of the "..." button or by executing "adb devices" from the platform-tools/ folder of your Android SDK. Alternatively leave the field on "default" to connect to the first detected device.
- T-Plan Robot Enterprise version 4.2 or higher: Select the "Screen transfer method":
- The "ADB (default)" option is the slowest one but requires no additional application on the device. As the screen data is transferred over the USB cable the device doesn't have to be connected to the network.
- The "Android Mirror" option is supported since 5.0.6. It provides JPEG encoded streaming of the device screen through the USB cable. It is simple, fast and easy to use.
- The"Screen Stream Mirroring" option will mirror the screen using the H.264 video stream using a streaming application. See the next paragraph for installation and configuration instructions. It is recommended to use the "Android Mirror" option instead unless there's a reason to use SSM.
- Hit Connect to connect to the device. If the connection fails refer to the Troubleshooting chapter.
2.4 Screen Stream Mirror
Mirroring is an optional screen transfer method supported for Robot v4.2 or higher running on MS Windows Vista or newer. It requires to install the Screen Stream Mirroring (SSM) application by Mobzapp on the Android device. The screen data may be transferred over the network or the USB cable alone.
IMPORTANT: It is recommended to use the "Android Mirror" option instead. Unlike SSM it requires no configuration or SW changes on the device.
Steps to enable screen mirroring:
- Install the Screen Stream Mirroring application on the Android device. The trial version is OK for evaluation purposes (it displays ads and shuts down after a few minutes).
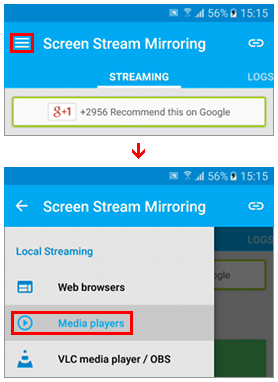
- Start the app to verify it works. If you are connected to a network it must display an address like "rtsp://<IP_address>:5000/screen". If the displayed URL is like "http://localhost:5000/screen" or other than RTSP perform the following steps:
- Tap the top left button
- Select Media Players
- Switch back and make sure the URL has changed appropriately
- No other steps are required if your device is connected to a network visible to Robot and you prefer the screen data transfer over TCP/IP. There's no need to start the app manually prior to connecting.
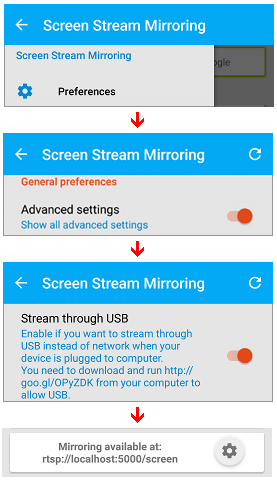
- Should you want to avoid the network and set up the USB screen data transfer:
- Start the app and tap the top left button to open the app menu. Choose Preferences.
- Scroll down to the bottom and set on "Advanced settings".
- Set on the "Stream through USB" option and tap the top left button to save the changes. The main screen must display the address of "rtsp://localhost:5000/screen".
2.5 Performance Considerations
Performance of the mirror stream is subject to the following factors:
- Some machines are equipped with both the USB 2.0 and 3.0 ports. Make sure that the device is plugged to a 3.0 one.
- When the screen mirror is used for video transfer the data travels over the local network. The network speed affects the performance.
- Decoding of the mirror stream relies on the CPU. The graphic card (GPU) plays a very minor role. Upgrade the CPU to boost the performance.
- The RAM is not a factor as long as there is enough of it. According to our performance stats Robot mirroring a full-HD Android device needs only 50-60 MB of RAM in the idle state. The memory may double or triple in peaks while executing a test script with image comparison where copies of the screen image are being processed. Unless the machine is overloaded or there is little free RAM it should not be a problem. To verify it please observe:
- Check the memory usage indicator at the right bottom corner of the Robot GUI. If it's in green and occasionally in yellow the program has enough RAM. If the usage is high please raise the limit as is described here.
- Start the Windows' Task Manager and check the CPU and RAM usage. If it's too high reduce the number of other programs and/or services running on the machine.
If the video is slow or lags behind considerably:
- Stop Stream Screen Mirroring as well as any unnecessary applications running on the device and reconnect.
- Go to Edit->Preferences in the Robot menu. Select the Android Over ADB screen and raise the parameter called "Process only every <N> video frame" option. This will decrease the load and RAM required on the Robot machine. Animations and fast motion scenes will be blurred but still screens will retain the original image quality. Image comparison searching the screen for stable displayed components will not be affected.
- As the very last resort modify the video quality parameters in the Screen Mirroring Application. Be aware that a major decrease of the video quality is likely to break image comparison. Tap the gear wheel to the right from the "Mirroring available at:" label (see the above image) and choose "Video Preferences":
- The Resolution is set to 640p. Any resolution update will lead to the screen size change which will invalidate all component images created so far. Avoid changing of this parameter when you already have some automation in place.
- The Encoding bitrate is typically 2048 kb/s. You may decrease it to save resources but don't set less than 1024 kb/s.
- The Max framerate is typically set to 30 fps. This limit is rarely achieved in real environments. You may not see any effect unless you reduce it to 2-5 fps. It is recommended to leave the default value.
- To apply the preferences leave the screen using the top left "back" arrows. If mirroring is on it will restart to apply the changes. You will have to reconnect then.
3. Troubleshooting
To resolve issues with the Android connection take advantage of settings available under the "Android over ADB" panel of the Edit->Preferences window:
- Should you experience any issues please set on the Debug mode to produce logs. These can be viewed in the console (command prompt) or the log file through the Help->Log Viewer window.
- When the device screen image is distorted or displays in wrong colors change the decoding method:
- The default "Android SDK" decoder relies on the Android functionality to decode the image data into the Java format. This approach is known to fail for some devices, for example Samsung Galaxy GT-I5500 which displays with a greenish screen.
- The "Robot" one decodes the data on its own. This method is slightly slower but seems to work for most failing devices.
- On unresolvable screen issues set on the "Create the screen image dump" option, make an attempt to connect to create the dump and then send the log file through the Help->Log Viewer window to T-Plan support. Then set off the option. The dump will allow us to reconstruct the image from the raw pixel data and inspect why the decoder fails.
If Robot fails to connect to the target device for no obvious reason and the log or the Login Window provides no reasonable explanation:
- Disconnect the device from the USB cable and connect it again.
- Restart the ADB server manually:
- Open a console/command prompt and switch to the platform-tools folder under the Android SDK installation path.
- Execute:
adb kill-server
adb devices - Make sure the device is listed in the output. If it is not there your environment is not configured properly:
- Make sure the USB Debugging and other options are enabled as is described in the Setting Up chapter
- Some devices may require specific USB drivers to enable communication with the Android Studio, for example Samsung Galaxy drivers. Search documentation provided by your device vendor for details. Restart your PC after driver installation and reconnect your device even if it is not required.
- Should everything fail retry with another USB cable.
Limitations of the keyboard and touch screen support are listed in the Automation chapter. Should you experience any outstanding issues please contact the T-Plan support and attach the log file.
4. Automation
4.1 Connecting to the Device
To connect to an Android device from a test script use the Connect command (TPR scripts) or the connect() method (Java test scripts). The argument URL must be in form of either "adb://default" or "adb://<device_serial_No>". The Android SDK path must be configured prior to running the script either by providing the path in the Login Window and connecting to the device once or by setting it in the "Android over ADB" panel of the Preferences window.
For example, the following command/method call will connect you to the first detected device using the ADB screen transfer:
TPR test scripts: Connect adb://default
Java test scripts: connect("adb://default");
To connect to a device with the serial number of MB104PY10519:
TPR test scripts: Connect adb://MB104PY10519
Java test scripts: connect("adb://MB104PY10519");
To set on the Screen Stream Mirroring screen transfer use:
TPR test scripts: Connect adb://MB104PY10519 screen=mirror
Java test scripts: connect("adb://MB104PY10519", "screen", "mirror");
To set on the Android Mirror screen transfer use:
TPR test scripts: Connect adb://MB104PY10519 screen=minicap
Java test scripts: connect("adb://MB104PY10519", "screen", "minicap");
Another alternative is to encode the parameters to the connect URL query. This form is also suitable for the -c/-connect CLI connection. You may copy the URL of any of your recent connections from the Tools->CLI Wizard window. Another alternative is to give your connection a name in the Desktop->Connection Manager window and then use it instead of the URL.
TPR test scripts: Connect adb://MB104PY10519?screen=mirror
Connect adb://MB104PY10519?screen=minicap
Java test scripts: connect("adb://MB104PY10519?screen=mirror");
connect("adb://MB104PY10519?screen=minicap");
4.2 Dealing With Screen Rotation
The ADB connection supports two screen rotation modes. To change the mode go to the "Android over ADB" panel of the Preferences window.
1. Auto screen rotation (default)
The auto mode will read the screen orientation from the device on every screen refresh and rotate it accordingly. As this has a significant impact on the screen performance it is recommended to switch to the manual mode or to design the test suite against a constant screen orientation where high performance is required.
2. Manual screen rotation
In this mode the screen must be rotated in the Robot view manually (or from the script) through pressing of the F4 key. This behavior is compatible with the Droid VNC server.
To ensure that the touch screen events are properly placed and the image comparison works as expected always keep the view in Robot consistent with the real device state:
|
|
|
Correct view | Incorrect view |
4.3 Touch Screen Automation
The touch screen actions are mapped as follows: The touch screen actions are mapped as follows:
Device Action | Computer Action | Test Script Action |
|---|---|---|
Tap (touch) | Left mouse click | Call the Mouse click command (TPR scripts) or one of the mouseClick() methods (Java scripts). |
Long tap (touch) | Long left mouse click | Call a sequence of Mouse press, Wait and Mouse release commands or the corresponding Java methods. |
Swipe (drag) | Mouse drag (left button down) | Call the Mouse drag command (TPR scripts) or one of the mouseDrag() methods (Java scripts). |
Pinch (zooming with 2 fingers) | Call the Mouse pinch/zoom command (TPR scripts) or one of the mousePinch() or mouseZoom() methods (Java scripts). Supported since Robot 3.5. Requires device running Android OS 4.3 or higher. | |
Back | Right mouse click | Call the Mouse click btn=right command (TPR scripts) or one of the mouseRightClick() methods (Java scripts).Alternatively use "Press Back" or press("Back"). |
Robot v3.5.2 and newer supports an option to perform mouse clicks over the UIAutomator interface. This usually resolves occasional touch screen failures for certain app controls. It requires Android 4.1.2 or newer.
- To set on the UIAutomator driven mouse clicks globally select the "Enable click/tap over the UIAutomator API" user preference in the Edit->Preferences->Android Over ADB screen. As this gets saved to the user preferences file it will affect all Robot instances running on the local PC. The option may be tweaked for a single Robot instance through the -o/-option CLI option.
- To control the UIAutomator clicks temporarily from the script using Robot 4.0.1 or higher set the _UIACLICK variable to true ("enable") or false ("disable"). This mechanism overrides the above user preference. It has no impacts on other test scripts executing concurrently within the same Java process. For example, to enable it just for one particular click use:
Var _UIACLICK=true
Mouse "click"
Var _UIACLICK=false
4.4 Keyboard Automation
To make the script type a text call the Type or Typeline commands or the type()/typeLine() Java methods. To press a keyboard key call the Press command or the press() method. The keyboard events are supported as follows:
- Robot version 6.3 and older can type only printable ASCII 7-bit characters (codes 32-127) and part of the keys from the 0-31 range (Enter, Backspace, ...) except for greater than (>), less than (<), double quote (") and circumflex (^) which don't have their counterparts in the Android SDK API.
- Robot version 6.3.1 and higher uses clipboard transfer for outstanding characters and it can type virtually any text.
- The only supported modifier keys are Shift and Alt. The Ctrl modifier is not supported because it doesn't have its counterpart in the Android SDK API.
- Some characters out of the ASCII 7-bit set can be generated through combinations of Alt+<character>. For example "Press Alt+Z" generates the Euro character on some devices. These composed keys are subject to the device, its language and keyboard settings and they must be explored per device.
- The PC keyboard action keys are mapped onto the native Android keys as follows. Support of these keys is subject to the particular Android device and some keys may not have any effect:
Android Device Key | Computer/Script Key (Action) | Description |
|---|---|---|
BACK | Escape, Right mouse click | Back key. |
CALL | PageDown | Call key. |
CAMERA | F6 | Camera key. Used to launch a camera application or take pictures. |
CLEAR | F7 | Clear key. |
DEL | Backspace | Backspace key. Deletes characters before the insertion point. |
DPAD_DOWN | Down (Arrow Down), Mouse wheel down | Directional Pad Down key. May also be synthesized from trackball motions. |
DPAD_LEFT | Left (Arrow Left) | Directional Pad Left key. May also be synthesized from trackball motions. |
DPAD_RIGHT | Right (Arrow Right) | Directional Pad Right key. May also be synthesized from trackball motions. |
DPAD_UP | Up (Arrow Up), Mouse wheel up | Directional Pad Up key. May also be synthesized from trackball motions. |
ENDCALL | End | End Call key. |
FOCUS | F5 | Camera Focus key. Used to focus the camera. |
HOME | Home | Home key. This key is handled by the framework and is never delivered to applications. |
MENU | PageUp | Menu key. |
NOTIFICATION | F9 | Notification key. Used to display the list of notifications. |
POWER | F10 | Power key. |
| RECENTS | Insert, Middle Mouse button | Access the device recent applications/tasks list. |
SEARCH | F3 | Search key. |
SOFT_LEFT | F1 | Soft Left key. Usually situated below the display on phones and used as a multi-function feature key for selecting a software defined function shown on the bottom left of the display. |
SOFT_RIGHT | F2 | Soft Right key. Usually situated below the display on phones and used as a multi-function feature key for selecting a software defined function shown on the bottom right of the display. |
SYM | F8 | Symbol modifier key. Used to enter alternate symbols.On most devices it pops up the "Select input method" window. |
VOLUME_DOWN | F11 | Volume Down key. Adjusts the speaker volume down. |
VOLUME_UP | F12 | Volume Up key. Adjusts the speaker volume up. |