schedule
Workitems
Contents:
1. Overview
3.1 Manual Execution
3.2 CLI Execution
1. Overview
Scheduling is a new feature delivered in v4.0. It allows to create workitems (formerly called "schedules") which define sequences of one or more test scripts to be executed within a single Robot process. Highlights:
- Sequential and parallel script execution. Sequentially executed scripts may be constrained to the result of the previous ones, for example "execute script B only after script A finishes with the PASS result".
- Execution scheduling. Workitems may apply start time constraints specifying whether to start immediately, with a delay, at the specified date or execute repeatedly/regularly (cron scheduling).
- High level reporting. The workitem produces a graphical report viewable in most web browsers.
- Easy script-like management. Workitems can be started and managed the same way as individual test scripts, either from the Robot's GUI or through the -r CLI option or from the Java API.
2. Create Workitem
Workitems are physically stored as XML files in the schedules/ folder of your project. As test scripts are referenced through relative file paths they will remain functional when the whole project is moved or renamed.
2.1 Create Empty Workitem
Test suites may be easily created and maintained through the Workitem Editor tool. To create a workitem do one of the following:
- Right click the Workitems node in the Project View and select "Create workitem..." in the context menu.
- Click the Workitem tool bar button.
- Select Script->Workitem in the main menu.
The blue rectangle subtitled "Start settings" represents the top level workitem object. The tabbed pane at the bottom provides access to the workitem attributes:
The Properties tab contains the "Report Details" section which configures how the workitem report is created:
- The "Save report to" drop down is by default set to store the report to a unique folder under the project report location. This is a recommended setting because it displays the reports under the Results node of the Project View. The other drop down option allows to customize the target report file.
- The "Use custom XSL" field allows linking the report with an external XSL file. The report itself is an XML file which links to an Extensible Stylesheet Language (XSL) file to enable viewing in any XSLT compliant web browser. You may customize the XSL file to modify the report appearance and link it through this option.
The Scheduling tab allows to set the "Start Type" property. It defines how the workitem should be started (see Execute Workitem for start up options):
- Immediately after start up - Start immediately without any delays.
- After the specified delay - Start after the specified timeout.
- Regular schedule (cron) - Executing repeatedly at scheduled intervals. It can be used for scheduling such as for example "execute the scripts every Monday at 10pm". In this mode the workitem will not stop after the tasks are executed but it will keep running until it gets stopped or the Robot process gets terminated.
- At the specified date - Start at the specified date and time.
The Report Details section allows to configure how the workitem report is created:
- The "Create summary report" field sets the report on or off. The report is an XML file displayable in any XSLT compliant web browser thanks to a linked XSL. An online workitem report example is here.
- The "Save report to" drop down is by default set to store the report to a unique folder under the project report location. This is a recommended setting because it displays the reports under the Test Results node of the Project View. The other drop down option allows to customise the target report file.
The field supports multiple reports since version 4.1.4. When the option is set to "Custom file" a new field accepting semicolon (;) separated folder(s) or XML file(s) appears. When a folder is specified the workitem will save the report to <folder>/summary.xml. - The "Use custom XSL" field allows to link the report with an external XSL file. The report itself is an XML file which links to an Extensible Stylesheet Language (XSL) file to enable viewing in any XSLT compliant web browser. You may customize the XSL file to modify the report appearance and link it through this option.
- The "Execute Workitem" option specifies how many times to execute the workitem. The default value is 1 (execute once).
The Input Params tab defines optional parameters required to execute the workitem. These are exposed to workitem scripts in form of variables (see Variables document for the basics and the Var and Varg commands).
- When the workitem is started manually from the GUI a pop up window requesting the parameters will be displayed.
- For unattended automation (such as through the -r/--run CLI option) the parameters may be injected using the -v/--variable and --variable-session options.
The Output Params tab defines optional output parameters, i.e. variables created by the workitem scripts which are to be exposed to external processes such as the T-Plan RAP.
2.2 Add Scripts to Workitem
To add the first script to the workitem select (click) the "Start settings" top level object (rectangle) and do one of the following:
- Right click the object and choose the "Add script" menu item
- Click the
 icon on the workitem editor tool bar
 - Drag a script from the Scripts branch of the Project View and drop it onto the object or anywhere in the Workitem view.
- Drag tab of an opened script editor.
The script will appear in the view as a new box titled with the script file name. You may give it an optional display name. To add more scripts:
- Use the steps above to add other script calls to the top level object. Such scripts will be started in parallel.
- To add a script which depends on (follows, waits for completion of) the script click the script box and use one of the three actions described above on it.
For example, consider automation of a mobile phone application. There are two scripts to automate it on iOS (iOS.tpr) and Android (Android.tpr). The plan is to execute it first on an iOS 6 device and when it passes re-run it also on iOS 7. Automating on Android will be started in parallel. It will be first performed on a Samsung S2 device and if it succeeds will be re-run on a Samsung S3. The workitem will look as follows:
To add the first script (called "task") to the workitem select (click) the "Start settings" top level object (rectangle) and do one of the following:
- Right click the object and choose the "Add script" menu item
- Click the icon on the workitem editor tool bar
- Drag a test script from the Test Scripts branch of the Project View and drop it onto the workitem object or anywhere in the Workitem view.
The task will appear in the view as a new box titled with the script file name. You may give it an optional display name. To add more scripts:
- Use the steps above to add other tasks to the top level object. Such tasks will be started in parallel. Parallel execution is subject tor restrictions discussed in the Execute Workitem chapter.
- To add a new task which depends on the task (follows, waits for completion of) click the task box and use the tool bar buttons or the right click pop up menu.
The task properties can be edited in the bottom editor:
- The task Name assigns the task a display name. When no name is provided it defaults to the script file name.
- The CLI options allow to modify the task environment:
- c/--connect with the optional p/--password one allow to specify the test environment (server or device) to execute the script on. For example, the below screen shot instructs Robot to start the script on the Android device of serial number A123456 connected over the Android Over ADB connection.
- v/--variable set the specified script variable to a fixed value. It allows to pass execution specific values to the script. The option may be specified multiple times to set multiple variables.
- Other applicable CLI options such as n/--nodisplay or o/--option are accepted only at the level of the Robot start command. They are then applied to all scripts in the workitem. See the Execute Workitem chapter for details on workitem execution.
- The "Start dependency type" radio buttons control when the task gets started. There are 4 options:
- The "Start Immediately" option will start the task right after the workitem gets started. If there are two or more tasks with this dependency type the workitem will execute them as follows:
- If the Robot process runs in the CLI mode with the n/-nodisplay option AND the user license allows for multiple processes the tasks will be started in parallel. Watch out for connection conflicts, i.e. ensure that two tasks don't connect to the same SUT.
- If the Robot process runs in the GUI mode OR there are license limitations the tasks will be executed sequentially in the natural order (from the top to the bottom).
- The "Start after the ... script finishes" will start the task after the selected task finishes regardless of its result (pass or fail).
- The "Start after the ... script passes" will start the task only after the selected task finishes with the pass result (it returns the exit code of 0). For more info on exit codes see the Exit command.
- The "Start after the ... script fails" will start the task only after the selected task finishes with the fail result (it returns the exit code other than 0).
- The "Start Immediately" option will start the task right after the workitem gets started. If there are two or more tasks with this dependency type the workitem will execute them as follows:
For example, consider testing of a mobile phone application. There are two test scripts to test it on iOS (iOS.tpr) and Android (Android.tpr). The plan is to execute it first on an iOS 13 device and when it passes retest it also on iOS 14. Testing on Android will be started in parallel. It will be first performed on an Android 10 device and if it passes it will be retested on an Android 11. The workitem will look as follows:
3. Execute Workitem
Workitems are in general treated the same way as individual test scripts. They can be started in three ways:
3.1 Manual Execution
To start the workitem in the GUI mode simply select the ![]() Execute button on the tool bar or the corresponding Script->Execute menu item while the workitem is opened in the Workitem Editor tool. Once it is executing you may stop/pause it using the
Execute button on the tool bar or the corresponding Script->Execute menu item while the workitem is opened in the Workitem Editor tool. Once it is executing you may stop/pause it using the ![]() Stop and
Stop and ![]() Pause buttons. For details on the GUI execution see the Script Editor topic.
Pause buttons. For details on the GUI execution see the Script Editor topic.
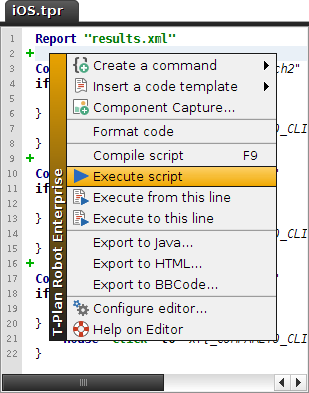
When there are both a workitem and a test script opened in the GUI the Execute button always prefers the workitem. To execute the test script alone right click the script editor and select Execute script from the context menu.
As the GUI is not capable of executing test scripts in parallel it will always execute them sequentially (one at a time). For parallel executions use the CLI or Java API execution mode together with the n/--nodisplay option.
3.2 CLI Execution
Just like test scripts the test suite XML files may be also passed to Robot through the r/--run CLI option. This will start Robot, execute the workitem and exit. There are two modes:
- The GUI mode (default) opens the Robot's GUI, loads the workitem, executes it and exits. Parallel scripts will be executed sequentially. The start command:
<Robot_start_command> -r <workitem_XML_file_path>
- The CLI mode is triggered by the n/--nodisplay option. It is recommended for production deployments. As it will not open the GUI it has much lower memory requirements and it is faster. It is also suitable for executions started remotely over telnet or ssh. If the workitem contains parallel scripts they will be started in parallel. The command:
<Robot_start_command> -n -r <workitem_XML_file_path>
Process Exit Code
- Up to version 4.4.2 the workitem returns the exit code of 0 (PASS) to the underlying OS on successful completion regardless of whether any tasks failed. Non-zero exit codes are reserved for unexpected errors and crashes.
- Starting with version 4.4.3 the workitem returns 0 if all tasks pass or the exit code of the first failed task. This allows to detect the result from external frameworks such as Continuous Integration.
3.3 Java API Execution
The Java API allows to execute workitems from 3rd party Java applications. This way is suitable for integration of Robot driven automation with custom frameworks. Workitems are treated in the same way as Java test scripts executed from their main() method. The automation runnable may be created through the createAutomatedRunnable(String, String[], PrintStream, boolean) method where the workitem file path gets passed through the -r/--run option inside the arguments:
public static void main(String args[]) { ApplicationSupport robot = new ApplicationSupport(); AutomatedRunnable t = robot.createAutomatedRunnable("Example" , new String[] {"-r", "<path_to_workitem_XML>"}, System.out, true); new Thread(t).start(); }
Alternatively there's the createAutomatedRunnable(Schedule, String, String[], PrintStream, boolean) method to create a runnable for an existing workitem instance. Note that the com.tplan.robot.scheduler.Schedule class represents the workitem.
public static void main(String args[]) throws ParserConfigurationException, SAXException, IOException { ApplicationSupport robot = new ApplicationSupport(); com.tplan.robot.scheduler.Schedule schedule = new com.tplan.robot.scheduler.Schedule(); schedule.read(new java.io.File("<path_to_workitem_XML>")); AutomatedRunnable t = robot.createAutomatedRunnable(schedule, "Example" , new String[] {}, System.out, true); new Thread(t).start(); }
Both approaches allow to force the CLI execution mode through putting -n or --nodisplay to the list of input arguments:
AutomatedRunnable t = robot.createAutomatedRunnable("Example" , new String[] {"-n", "-r", "<path_to_workitem_XML>"}, System.out, true);