selenium
Selenium WebDriver Automation With T-Plan
Contents:
1. Introduction
2. Set Up Instructions
3. Selenium Configuration
4. Automation
4.1 Automation Example
4.2 Selenium API Access
4.3 Integration Of Existing Selenium Scripts
4.4 Parallel Browser Automation (Load Testing)
1. Introduction
Version 5.0 delivers integration with Selenium WebDriver to enable combined image based and web browser automation from a single script. Features:
- Robot 8 uses Selenium 4.25 while Robot 7.x integrates with the Selenium Java Client 3.141.59. You may see the version you have in the Browser command preferences (see below). The files are installed to the
selenium/folder and may be eventually replaced manually with a new version. - Supported browsers:
- Microsoft Edge
- Microsoft Internet Explorer
- Firefox
- Chrome
- Safari (Mac OS)
- Chromium embedded browser delivered as a plugin (since 7.0) or as part of OS specific releases (since 8.0).
- Only one local browser can be automated at a time in the GUI mode. Multiple parallel browsers can be started in the CLI mode since v7.2.6.
- Starting with release 8 you may automate multiple tabs and/or windows of the same browser instance. This is not parallel testing because only one tab or window can be automated at a time. See the Browser command for details.
- Automation of remote browsers (Selenium Grid) is supported since v6.3.
2. Set Up Instructions
To open a local browser:
- Open the Selenium Downloads page and scroll down to the "Third Party Drivers, Bindings, and Plugins" section. Download the target browser driver(s) and extract it to your hard drive.
- Select Selenium → Configure Selenium in the Robot menu and set the path(s) to the driver executables.
IMPORTANT: The driver executable version must match the browser one or the connection may fail. For example, to automate Chrome version 101 you needchromedriver.exeversion 101. To ensure that the automation is stable disable browser auto update and/or update the driver after every browser update.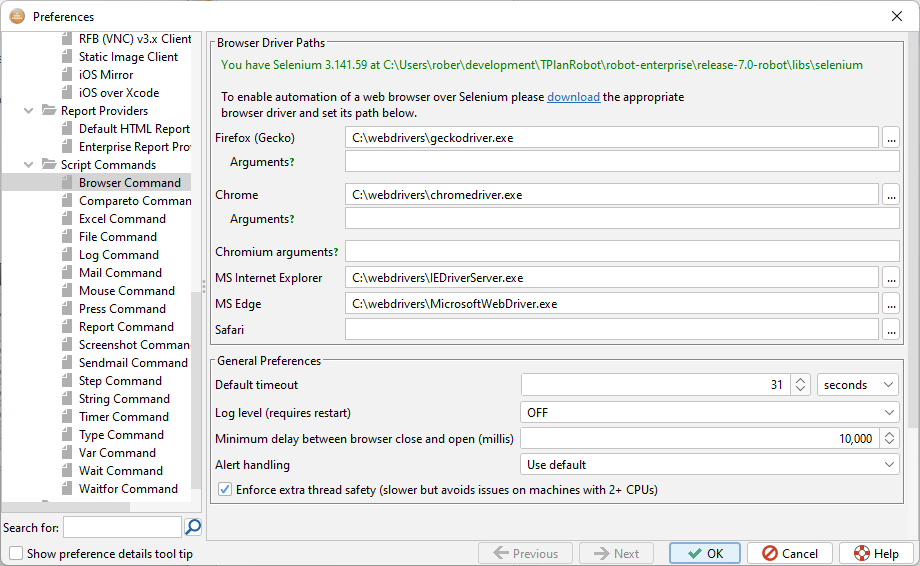
- Select Selenium → Open Browser... or click the Browser tool bar button. Select the target browser in the drop down and optionally populate the target URL. Click Open to start.
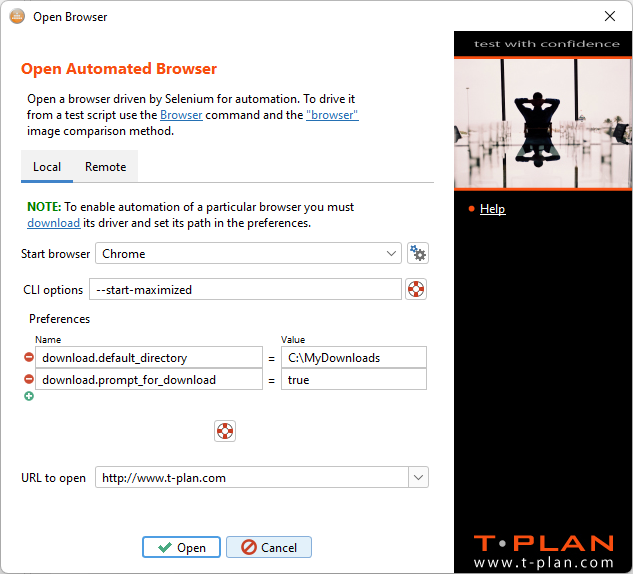
NOTE: Robot v7 introduced the ability to set browser preferences. It is available only for those browser that support this feature through Selenium, namely Firefox and Chrome.
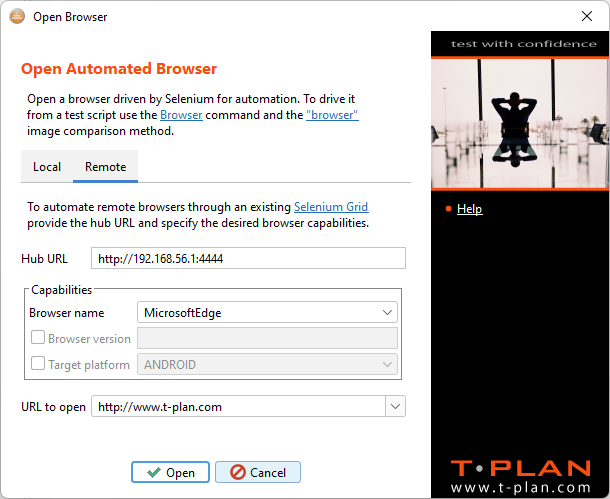
To connect to a remote browser:
- Set up the Selenium Grid first.
- Select Selenium → Open Browser... or click the Browser tool bar button.
- Select the Remote tab in the window, enter the hub URL and select the target browser type. Click Open to start.
Once the browser is up and running you may start to create the script code to drive it. To view elements in the current page open the Selenium → View Elements menu item.
3. Selenium Configuration
The Browser Command preference screen supports several Selenium configuration options:
- You may specify command line (CLI) arguments to be passed to certain drivers. In the case of Chrome it is a way to overcome a number of issues experienced by the community. The arguments may be also passed from the script using the "args" parameter of the Browser open command. The current status:
- Firefox options are documented here.
- Chrome options are not officially documented but they can be retrieved from the Chromium engine source code
- Chromium options are basically the same as Chrome but they are restricted to the ones implemented by the engine alone.
- MS Internet Explorer options are not supported.
- MS Edge options will be fully supported in release 8. Since v7.2.6 you may use the only option of
--start-maximizedto maximize the browser window. - Safari options are not fully supported. Since v7.2.6 you may use the only option of
--start-maximizedto maximize the browser window.
- There's an option to specify how to handle the system pop ups (alerts).
- The default behavior is DISMISS which makes the driver choose the first option (button) and dismiss the window immediately.
- To make the alerts stay on the screen set the value to IGNORE.
4. Automation
There are two new elements in the Robot scripting language:
- The "browser" comparison method allows to search for elements in the web page using the standard CompareTo and Waitfor commands.
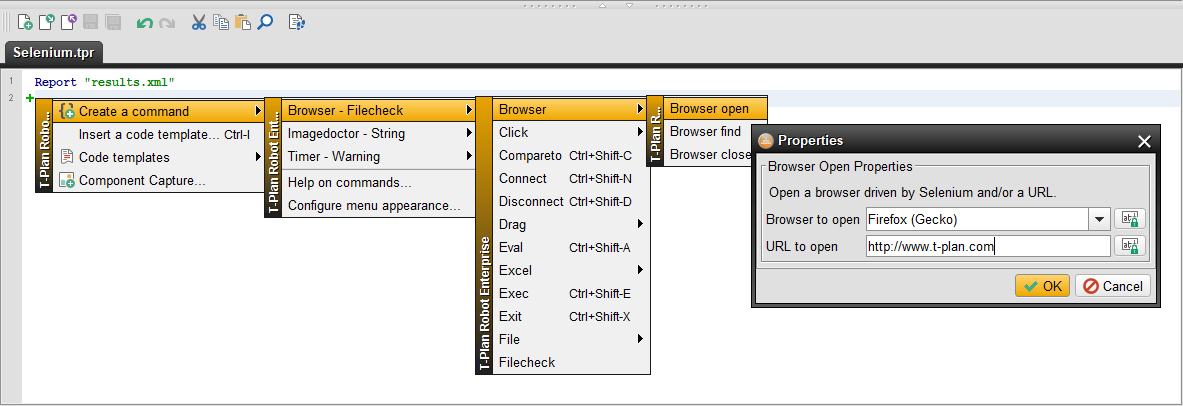
- The "Browser" command allows to manage and drive the Selenium driven browser. For a formal specification of the command see the Language Reference.
- Use "Browser open" to open the target browser and web site. Call "Browser close" to close it.
- Use "Browser find" to locate an element (an HTML tag) in the page and apply an optional action to it (click, type, submit, clear, select). The target element may be identified as follows:
- FAST: Enter an Xpath, CSS or one or more element attributes and click Verify. If there are multiple elements matching the criteria select the "Choose in viewer" button in the pop up window. Select the target element in the viewer and tick the criteria to identify it.
- SLOW: Select "Choose in viewer" in the command property window to open the element viewer. As this involves loading of all elements in the current web page it is likely to be slow. Select the target element in the viewer and tick the criteria to identify it.
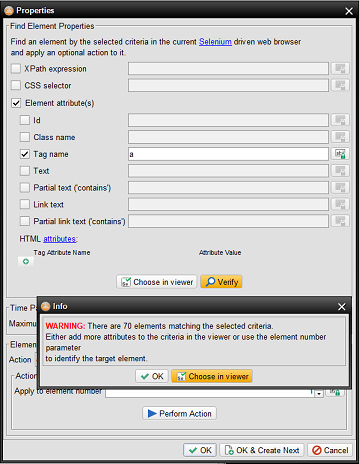
NOTE: The "Text" and "Partial text" criteria alone is usually not sufficient because Selenium returns the element containing it as well as all its parent elements (div, form, ...). This can be used to retrieve the text of top elements or the whole page. For example, to get all text in the page set the "Tag Name" to "body". The calling script may then retrieve the text from the _WEB_TEXT variable.
- Once you design the criteria you may select the Perform Action button to apply the selected action to the target element. This allows you to avoid direct interaction with the browser and to verify that it works as expected.
- Select OK to save the command to the active script editor. If you wish to design another "Browser find" command on the next line click "OK & Create New" button instead.
- Use "Browser open" to open the target browser and web site. Call "Browser close" to close it.
The "Browser find" command exposes the number of elements found and some of their attributes through a set of variables:
| Variable Name | Description |
|---|---|
| _WEB_COUNT=<number> | The number of elements retrieved by "Browser find" |
| _WEB_X_<n>=<x-coordinate> _WEB_Y_<n>=<x-coordinate> _WEB_W_<n>=<x-coordinate> _WEB_H_<n>=<x-coordinate> | The X and Y coordinates, width and height of the n-th element. |
| _WEB_TEXT=<text> | Text of the n-th element (cumulative/including texts of all child elements). |
The command in addition stores HTML attributes of the first up to 30 elements to the _WEB_ prefixed variables. For example, when looking for a link (the "a" tag) the "href" attribute of the second element will be available as the _WEB_HREF_2 variable. The limit of 30 elements is applied for performance reasons and can not be changed.
4.1 Automation Example
Let's demonstrate Robot capabilities on a simple example:
- Open the Wikipedia home page in Firefox
- Type 'automation' into the search field and submit it to open the Automation topic.
A pure Selenium solution in Java would look like:
import org.openqa.selenium.WebDriver;import org.openqa.selenium.firefox.FirefoxDriver;import org.openqa.selenium.By;public class WikipediaAutomation { public static void main(String args[]) { // Set path to the Firefox/Gecko driver System.setProperty("webdriver.gecko.driver", "C:\\Selenium\\geckodriver.exe"); // Create the driver and execute the script WebDriver driver = new FirefoxDriver(); // Open the Wikipedia home page driver.get("https://www.wikipedia.org"); WikipediaAutomation script = new WikipediaAutomation(); script.automate(driver); } public void automate(WebDriver driver) { // Enter 'automation' into the search field driver.findElement(By.id("searchInput")).sendKeys("automation"); // Submit the form using the button next to the field driver.findElement(By.xpath("//button")).submit(); }}
To design the same script in Robot use the Browser open and Browser find property windows described in the previous chapter.
- If your script is a TPR one the corresponding code will look like:
Browser "open" browser="firefox" url="https://www.wikipedia.org"Browser "find" id="searchInput" elaction="type" eltext="automation"Browser "find" tagname="button" elaction="submit"
- If your script is a Java one the property windows will generate an automation code similar to the one below. The rest of the Java script class is omitted for brevity.
browserOpen("firefox", "https://www.wikipedia.org");browserFindAndType("automation", "id", "searchInput");browserFindAndSubmit("tagname", "button");
4.2 Selenium API Access
Robot does not support all the Selenium functionality yet. You may reach an unsupported Selenium feature at the level of the Java code from a Robot Java test script as follows:
WebDriverAdapter adapter = WebDriverAdapterFactory.getInstance().getAdapter(getContext(), WebDriverAdapter.ADAPTER_NAME_SELENIUM);
org.openqa.selenium.WebDriver driver = (org.openqa.selenium.WebDriver) adapter.getDriver();
For example, to accept and dispose a JavaScript pop up from a TPR test script use the following Java code block:
java { import com.tplan.robot.remoteclient.webdriver.WebDriverAdapter; import com.tplan.robot.remoteclient.webdriver.WebDriverAdapterFactory; WebDriverAdapter adapter = WebDriverAdapterFactory.getInstance().getAdapter(getContext(), WebDriverAdapter.ADAPTER_NAME_SELENIUM); org.openqa.selenium.WebDriver driver = (org.openqa.selenium.WebDriver) adapter.getDriver(); driver.switchTo().alert().accept();} endjava
4.3 Integration of Existing Selenium Scripts
Existing Selenium Java code may be freely combined with Robot scripts. The only thing the two entities must share is the Selenium web driver object (the org.openqa.selenium.WebDriver instance). The key class in the Robot framework is com.tplan.robot.remoteclient.webdriver.WebDriverAdapterFactory which allows to access the driver wrapper class (WebDriverAdapter) assigned to the executing scripts.
For example, to let Robot open the Wikipedia home page in Firefox and then perform the automation using our pure Selenium example above create a Robot Java script as follows:
package test;

import com.tplan.robot.scripting.*;
import com.tplan.robot.*;import com.tplan.robot.remoteclient.webdriver.*;import java.io.*;public class RobotWikipediaScript extends DefaultJavaTestScript { public void test() { try { // Call "Browser open" to create the driver browserOpen("firefox", "https://www.wikipedia.org"); // Obtain a reference to the Selenium driver from the Robot framework WebDriverAdapter adapter = WebDriverAdapterFactory.getInstance().getAdapter(getContext(), WebDriverAdapter.ADAPTER_NAME_SELENIUM); org.openqa.selenium.WebDriver driver = (org.openqa.selenium.WebDriver) adapter.getDriver(); // Call the existing example Selenium script WikipediaAutomation seleniumScript = new WikipediaAutomation(); seleniumScript.automate(driver); } catch (StopRequestException ex) { throw ex; } catch (IOException ex) { ex.printStackTrace(); throw new IllegalStateException(ex); } } public static void main(String args[]) { RobotWikipediaScript script = new RobotWikipediaScript(); ApplicationSupport robot = new ApplicationSupport(); AutomatedRunnable runnable = robot.createAutomatedRunnable(script, "RobotWikipediaScript@" + Integer.toHexString(script.hashCode()), args, System.out, false); new Thread(runnable).start(); }}
It is not possible to call existing Selenium scripts from TPR ones directly. You must wrap the Selenium execution into a Robot Java script and then call it using the Run command.
For example, to drive our automation from a TPR script remove the "browserOpen("firefox", "https://www.wikipedia.org")" method call from the RobotWikipediaScript example above and call it from TPR as:
Browser "open" browser="firefox" url="https://www.wikipedia.org"Run "test.RobotWikipediaScript"
To make the above example work please put the compiled Selenium code (a JAR or a class path with the compiled WikipediaAutomation class) onto the Robot class path.
4.4 Parallel Browser Automation (Load Testing)
Support of parallel browser automation was introduced in release 7.2.6. The goal is to enable driving of multiple browsers in parallel from one Robot session for stress or load testing purposes. The key features:
- Browsers can be driven through both object oriented and image based methods relying purely on the Selenium API. You can drive a browser with the Selenium based Browser command as well as the classic desktop commands such as Mouse, CompareTo, Waitfor match, Click, MoveTo, Press and Type/Typeline without having to be connected to the Local Desktop connection.
- The Local Desktop connection is still needed to enable script recording. The resulting script should then run fine without the connection provided that the script automates elements in the browser content only.
- Image based testing is applied only to the visible browser content. Consider maximizing the browser window through the
--start-maximizedCLI option to achieve consistent results. - Browsers are always started sequentially (one at a time) to avoid resource conflicts. Once they are up and running the automation may run in parallel.
- One test script (.tpr or .java) can drive just one browser at a time. As the Robot GUI can execute just one script at a time it can also start one browser only. To achieve parallel testing create a workitem with parallel tasks and run it in the CLI mode, i.e. with the -n/--nodisplay option. See the example below.
- Parallel testing is not supported by Safari. There's a limitation applied by Apple that only one instance of the Safari driver can run at a time.
- Browser connections are subject to our license terms, i.e. they consume license seats.
Example:
Let's automate a dummy registration with our demo web application called T-Plaza. The target system is the MS Edge browser on MS Windows. We will open up the registration form, fill in personal data and submit it. The data will be loaded from a single row of a shared Excel sheet:

The row number will be specified in the script through a variable called ROW. This design makes it possible to set the row (aka the person) from outside using the -v/--variable CLI switch. It is also easy to scale up. To register another person you just add a new row with the personal data into the sheet and create another task (script run) working with the new row.
Before we proceed to the script make sure that:
- You have Robot 7.2.6 or higher with at least 3 license seats. If you are not sure check what the Tools→License Key Manager window displays.
- You have downloaded the Edge web driver of the version corresponding to your Edge browser and put its path to the Selenium configuration.
Once you are ready download our example project. Extract the archive and open it in Robot using the File→Open project menu item. The project contains three major files:
- The
tpr\data.xlsMS Excel file contains the personal data. - The
tpr\TPlaza.tprscript drives the browser to perform a single registration. You may execute it right away to verify that it works well on your environment. - The
schedules\TPlaza.xmlworkitem starts 3 instances (tasks) of theTPlaza.tprscript in parallel. As you may see on the screenshot below each task processes a unique Excel row number injected through the script CLI options:
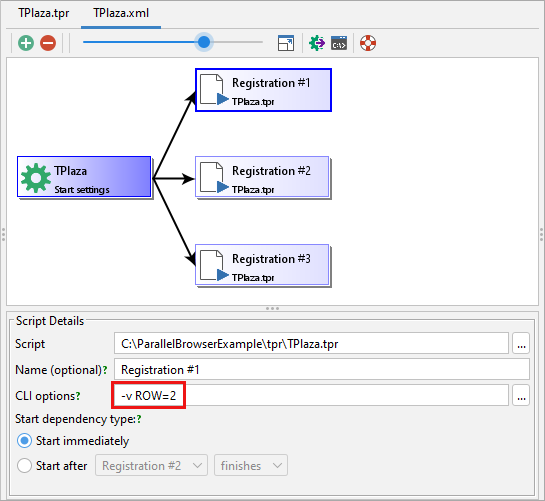
As we have already discussed the Robot GUI can drive just one script and one browser at a time. If you start the workitem in there you will see the tasks to execute as a sequence instead of in parallel. To achieve a real parallel execution you must switch to the CLI mode using the -n option. Open a command prompt, change to the Robot installation folder and execute:
C:\Program Files (x86)\T-Plan\Robot> robot.bat -r C:\ParallelBrowserExample\schedules\TPlaza.xml -n
Robot will execute without the GUI, start the three browsers and perform the automation in parallel. You may then start the GUI and look at the reports in the project tree.
TIP: Click the ![]() icon in the workitem editor to design various forms of the CLI start command.
icon in the workitem editor to design various forms of the CLI start command.